The granny square is a popular crochet motif and with its timeless appeal, it’s the perfect foundation for a range of projects. I’m showcasing a variety of my own granny square patterns and projects today.

Some projects use a blend of basic crochet stitches and granny squares while others use them as building blocks for the whole project. I’m also linking to free pattern collections where you’ll find other projects that use granny squares.
- Why Granny Squares Are So Popular
- Granny Square Construction
- Granny Square Variations
- Joining Techniques
- Granny Square Projects and Patterns
- Project Notes
- Abbreviations and Stitches
- Free Granny Square Patterns
- Basic Granny Square Pattern
- Half Granny Square Pattern
- Half Solid Granny Square Pattern
- Solid Granny Square Pattern
- Ammonite Granny Square Pattern
- Crochet Flower Granny Square Pattern
- Canterbury Granny Square Pattern
- Flower Granny Square Pattern
- Flower Granny Square Variation
- Victoria Granny Square Pattern
- Daisy in a Granny Square Pattern
- Related Crochet Patterns
- Granny Square FAQ: Your Guide to All Things Granny Squares
- What is the best yarn for making granny squares?
- How do I increase or decrease the size of a granny square?
- How do I change colours in a granny square?
- How can I choose colour combinations that work well together?
- How do I block or finish my granny square projects?
- Why doesn’t my granny square stay flat? Why is it ruffling?
- How do I stop my granny square from twisting?
- Should you flip granny squares?
- Can I modify or design my own granny square patterns?
- Are there any free resources to explore granny square patterns?
Why Granny Squares Are So Popular
This is my list of why I think they’re popular. Are there any you would add?
- Simplicity: The granny square is relatively easy to learn and crochet, making it accessible to beginners. The basic construction involves repetitive stitches and simple increases, making it a great starting point for those new to crocheting.
- Versatility: Granny squares can be used to create a wide range of projects. From blankets and afghans to scarves, bags, and clothing, the granny square’s versatility allows us to explore our creativity and make a variety of items.
- Portable: Granny squares are typically small and portable, which makes them a convenient project to take on the go! Additionally, we can work on individual squares and later join them together to create larger pieces.
- Endless Design Possibilities: With countless colour combinations, stitch variations, and pattern adaptations, the granny square offers endless design possibilities. We can experiment with different yarns, textures, and patterns to create unique and personalized projects. We can be as creative as we want to be with our granny square projects!
- Nostalgia and Tradition: The granny square evokes a sense of nostalgia and connects people to their heritage. Many people have fond memories of seeing their grandmothers or older relatives creating granny squares, which adds sentimental value to this crochet motif.
- Timelessness: Despite its long history, the granny square remains a timeless design. Its classic and traditional appeal goes beyond trends. I think generations to come will still be crocheting granny squares!
Granny Square Construction
Granny squares typically consist of multiple rounds of crochet stitches worked from the center outwards. Traditionally, it is made up of clusters of double crochet or treble crochet stitches (US terminology) separated by chain spaces.
Granny Square Variations
There are numerous variations of the granny square. Some common variations include solid granny squares, flower granny squares, textured granny squares, and multicoloured granny squares. These variations allow for endless creativity and customization.
Within this collection, you will find granny square projects that use:
- Solid granny square pattern
- Half solid granny square pattern
- Flower granny squares
- Bobble stitch to create texture/3D
- Colour changes to add interest
Joining Techniques
Joining granny squares is an important part of creating larger projects. There are various joining techniques which can be used to connect the squares together, the most common being:
- Whip Stitch
- Slip Stitch
- Single Crochet
- Invisible Stitch
- Join As You Go
- Reverse Mattress Stitch
Recommended watch: In this video tutorial, you will be shown 7 different techniques for how to crochet granny squares together. Each join is demonstrated slowly and extensively, with detailed explanations to ensure better comprehension. The video showcases both the front and back of the work, giving you a clear preview of the join’s appearance and enabling you to decide how best to utilize each specific method. After presenting all 7 demonstrations, the video also demonstrates how to attach additional granny squares to your project as it expands, followed by a guide on joining granny squares in the opposite direction.
Granny Square Projects and Patterns
Each of my granny square project begins with a photo of the granny square and clear, detailed instructions for the free granny square crochet pattern that is used in that project.
Following the granny square pattern, you’ll find information about the specific crochet project it is used in.
Clicking on the numbered pattern name will take you directly to the project.
If you click on the numbered link to a roundup, you’ll be taken to the free crochet patterns in that collection that include granny squares.
Project Notes
- Typically, granny squares share a common starting point. To begin my patterns, you’ll make a chain of four stitches and then slip stitch into the first chain, forming a ring. This minimizes the risk of unraveling. Alternatively, if you prefer to use the magic circle technique, that works just as well.
- The half granny square and half solid square are worked in rows.
- The Victoria granny square is turned for one round to create the bobble stitches.
- All other granny squares are worked in rounds on the right side.
Abbreviations and Stitches
US Terminology
Basic stitches:
- Single crochet (sc)
- Single crochet 2 together (sc2tog)
- Double crochet (dc)
- Double Treble Crochet (dtc)
- Double 2 Together (dc2tog)
How to work the stitches above can be found in part one of my stitch library.
Special Stitches:
- Bobble Stitch (bob)
- 3-Treble Bobble Stitch (3tr-bob)
- 3-Bobble Stitch (3-bob)
- 4-Bobble Stitch (4-bob)
- 5-Bobble Stitch (5-bob)
- Beginning Cluster (beg CL)
- Cluster (CL)
- V-Stitch (V-st)
How to work the special stitches can be found in part 2 of my stitch library.
Abbreviations:
- Ch = chain
- Sl st = slip stitch
- Rep = repeat
- Corner sp = corner space
- Sp = space
- Prev = previous
- St = stitch
- Rs = right side
- Ea = each
- Sk = skip
Let’s get started with the projects!
Free Granny Square Patterns
1. Blossom Cottage Blanket
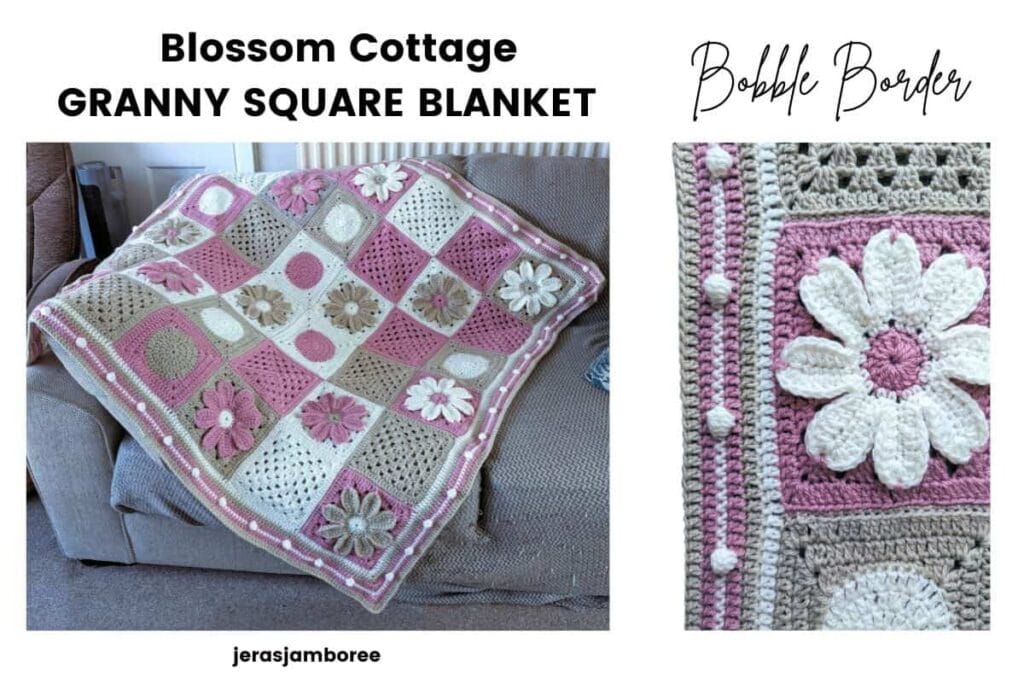
My Blossom Cottage Blanket combines classic granny squares, circle motifs, and textured flower squares to create a cosy lap blanket with a soft cottage garden feel.
Designed using three complementary colours and finished with a bobble stitch border, this pattern is perfect for crocheters who enjoy relaxing, motif-based projects with a modern vintage style.
The free pattern includes written instructions for the flower square, circle in a square and classic granny square. The ad-free PDF includes a photo tutorial for the granny square.
2. Granny Square Poncho with Sleeves

It was great fun designing this poncho! A classic granny square is transformed into a diamond and with the addition of sleeves, makes this poncho unique.
Instructions are written in both UK and US crochet terms for sizes S to 5X.
Continuing to sew the side seams after the sleeves will change this project into a sweater. Easy!
This pattern is available to buy as a PDF.
3. Granny Square Cardigan
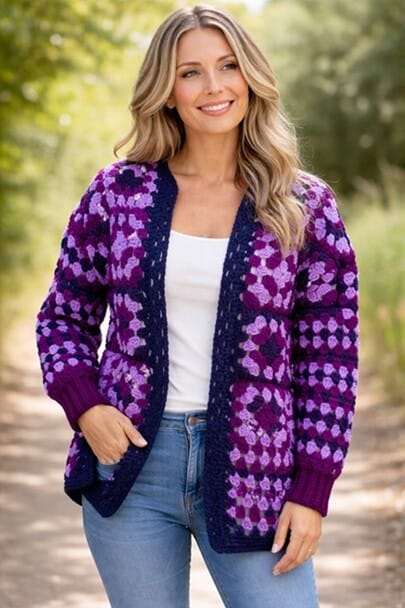
Made up of clusters of double crochet stitches separated by chain spaces, this pattern is perfect to crochet a granny square for beginners.
Basic Granny Square Pattern
Instructions
Round 1: ch 4, 2 dc into 1st ch, *ch2, 3dc into same ch, *rep 2 more times, ch2, sl st to top of 1st dc to join.
Fasten off.
Round 2: join new colour into any corner sp with a standing stitch, [ch2, 2dc, ch2, 3dc], *ch 1, [3dc, ch2, 3dc], * rep 2 more times, ch1, join with a sl st to top of dc.
Fasten off.
Round 3: join new colour in any corner sp with a standing stitch, [ch2, 2dc, ch3, 3dc], *ch1, 3dc in ch1-sp, [3dc, ch2, 3dc] into corner sp, *rep round, ch 1, join with a sl st to top of dc.
Repeat round 3 fastening off each colour and rejoining until you reach your desired size.
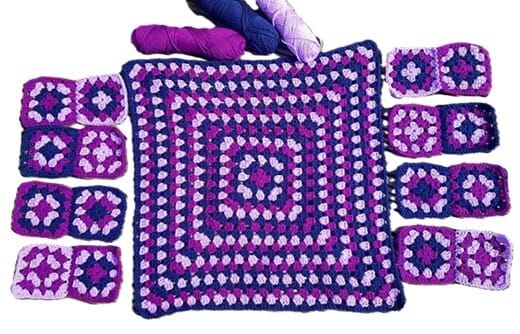
This granny square project for a cardigan uses 16 basic granny squares of 4 rounds for the front, and one large granny square for the back.
For the front, the granny squares are joined in strips of 2 across and with a length of 4.
The sleeves are worked in rounds of granny stitch.
Made-to-measure, your bust size will determine the size of the squares.
You can use any combination of colours or granny square designs, making this cardigan unique to you!
4. Granny Square Shrug

My cocoon shrug uses the classic granny square with extensions crocheted in rows for the side. This transforms the fabric into a rectangle.
Once the shrug is folded, the extension rows become the front and the granny square is in the middle on the back. Doesn’t it look effective!
An easy project, use scrap yarn from your stash to make this cardigan uniquely yours.
5. Lap Blanket

This lap blanket was inspired by the granny square in my Queen of Diamonds poncho.
Construction is almost the same but with the addition of 2 rows of double crochet before the blanket continues working in the round.
The shell border gives a lovely finishing touch.
6. Granny Square Christmas Tree (Wall Hanging)

This project uses the same classic granny square as the pattern in the project above.
6 simple granny squares in different sizes are crocheted to make this gorgeous wall hanging Christmas tree.
Crochet in any colour to suit your décor and make it your own by choosing different embellishments to suit your style.
This is a beginner-friendly granny square project.
7. Granny Square Crochet Scarf

This free granny square project uses variations half granny square, half solid square and solid granny squares.
You’ll need 4 colours to make this project.
Half Granny Square Pattern
Instructions
Ch 4 sl st to first ch to form ring and work into the ring as follows:
Row 1: ch4 (counts as a dc and ch-1 sp), 3dc, ch2, 3dc, ch1, dc, turn
Row 2: ch4, working into the first ch1-sp, [dc3], ch1, in the next ch2-sp [dc3, ch2, dc3], ch1, [dc3] in the last ch1-sp, ch1 and dc in the last ch1-sp (from ch4 of prev row), turn
Row 3: ch4, [dc3, ch1] in ea ch1-sp on the first side, [dc3, ch2, dc3] in the ch2-sp at the tip of the triangle, [ch1, dc3] in ea ch1-sp on the second side, ch1, 1dc in last ch1-sp (from ch4 of prev row).
Row 4 and 5: rep round 3
Fasten off and weave in ends.
Half Solid Granny Square Pattern
Instructions
Ch4 sl st to first chain to form ring and work into the ring as follows:
Row 1: ch3, 6dc into ring, turn
Row 2: ch3, 2dc into same st as ch3, 5dc into next st (creates corner of triangle), 1 dc in ea of next 2 sts, 3dc into last st, turn
Row 3: ch3, 2dc into same st as ch3, 1dc into next 6 sts, 5dc into next st (corner of triangle), 1dc into ea of the next 6 sts, 3dc into last st, turn
Row 4 and 5: rep round 3
Fasten off and weave in ends.

Solid Granny Square Pattern
Instructions
Ch4, sl st to first ch to form a ring and work into the ring as follows:
Round 1: ch3, 2dc, [ch2, 3dc] 3 times, ch2, join with a slip stitch in top of ch3 (12 sts and 4 ch-sps)
Round 2: ch3, 1 dc in ea of next 2 sts, [2dc, ch2, 2dc] in next ch-sp, *1dc in ea of next 3 sts, [2dc, ch2, 2dc] in next ch-sp, rep from * twice more, join with a sl st to top of ch3 (28 sts and 4 ch-sps)
Round 3 – 7: rep round 2 working dc into sts before ch-sp, [2dc, ch2, 2tc] into each ch-sp
Fasten off and weave in ends.

This granny square project for a scarf is worked in 6 solid granny squares, 4 half solid granny squares and 4 half granny squares.
Two different colours of the half granny are joined together to make a square. Two further rounds of white are crocheted.
Once all the squares are joined together, I have added a simple border of 2 rows of double crochet in white to give a professional finish.
This is a fabulous stash busting project!
Looking for a quick last minute crochet gift? The granny square scarf is perfect for gifting.
- Measurements: 23cm/9” (W) X 104cm/41” (L)
8. Small Granny Square Bag

This granny square purse uses solid stitches for the center and continues with rounds of granny stitch.
Ammonite Granny Square Pattern
Instructions
4ch and join with sl st to make a ring.
Round 1: 3ch (counts as dc here and throughout), 11dc in ring. Join with sl st to 3rd ch. (12 sts)
Round 2: 3ch, 1dc in same st as 3ch, 2dc in each st around. Join with sl st to 3rd ch. (24 sts)
Round 3: 1ch, 2sc in next st, [1sc, 2sc in next st] rep around. Join with sl st to ch1.
Round 4: 3ch, 2 dc in same st as 3 ch, ch1, sk2, [3dc, ch2, 3dc in next st], *ch1 sk2, 3dc in next st, ch1 sk2, 3dc in next st, [3dc, ch2, 3dc in next st] *rep three times, ch1, sk2, 3dc in next st, ch1, join with sl st to 3rd ch.
Rep round 4 to desired size
Fasten off and weave in ends.

You’ll crochet 2 granny squares of 10 rounds each in variegated yarn to make this super easy granny square bag.
The free pattern includes a lining crocheted in half herringbone stitch. Photos guide you through attaching the lining.
The handles are non-stretchy and with two options of how to attach them to the bag, you can change the length of the handles to make them smaller or keep them longer for a cross body bag.
You have the option to download the pattern for free if you subscribe for crochet news and offers.
- Measurements: 24cm/9.5inches square
9. Granny Square Tote Bag Pattern
The granny square used in this project has a raised flower in the middle giving it a lovely 3D effect!
You’ll need 3 colours for this square.
Crochet Flower Granny Square Pattern
Instructions (see special stitches for 3tr-bob)
Ch4, join with sl st to form a ring
Round 1: (RS) ch1, 8sc into ring, join with a sl st to first sc
Round 2: ch4, 3tr-bob in same sc, ch4, sl st same st, *(sl st, ch4, 3tr-bob, ch4, sl st) in next sc * rep around (8 petals). Fasten off and weave in ends
Round 3: Join new colour with sl st to any sl st between petals, ch3, dc in same st, ch3, *2 dc in next sl st between petals, ch3, *rep around, join with sl st to top of ch 3 (16dc, 8 ch3-sps). Fasten off. Weave in ends
Round 4: Join new colour with sl st to any ch3-sp, ch3, (2dc, ch1, 3dc) in same sp, ch2, 2sc in next ch3-sp, ch2, *(3dc, ch1, 3dc) in next ch3-sp, ch2, 2sc in next ch3-sp *rep around, join with sl st to first top of ch3 (24 dc, 4 ch1-sps, 8sc and 8 ch2-sps). Do not fasten off.
Round 5: ch3, dc in next 2 sts, *[1dc, ch2, 1dc] in ch1-sp, dc in next 3 sts, 2dc in ch2-sp, dc in next 2 dc, 2dc in ch2-sp, dc in next 3 sts * rep around (56 dc, 4 ch1-sp)
Round 6: rep round 5. (64 dc, 4 ch1-sp)
Fasten off. Weave in ends.

I’ve used a blend of 10 flower granny squares and 3 solid granny squares as building blocks for this crochet granny square bag.
This granny square project also includes a diagram for the colour sequence and written instructions for joining the squares, working the border and handles.
- Measurements: 1 granny square = 12cm/4.5” ; Body of Bag = 34cm/13.5” ; Handles = 30cm/12”
10. Cosmos Hot Water Bottle Cover
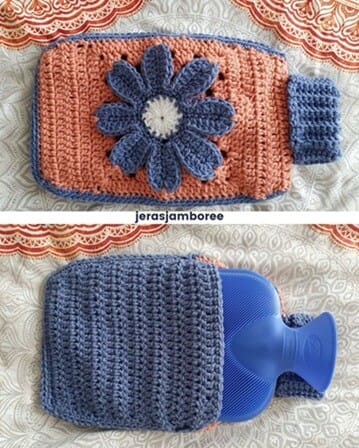
Stay cozy with my hot water bottle cover – a retro-meets-modern design featuring an 8-petal flower granny square and easy envelope construction.
The free pattern includes a photo tutorial for the flower square.
This stash-busting project is perfect for using up yarn scraps and experimenting with colour combinations.
11. Crochet Tote Bag

This granny square represents a Celtic Cross. I designed it to be used in a tote bag blending basic crochet stitches and this granny square pattern.
You’ll need three different colours to make this pattern.
Canterbury Granny Square Pattern
Instructions
With Yarn A and a 5mm hook
Ch 6, sl st into first ch to form a ring
Round 1: ch1, 12 sc into the ring, sl st to ch1
Round 2: ch3, work 4dc into same st, ch3, (first corner made), sk 2 sts, *work 5 dc into next st, ch3 (next corner made), sk 2 sts, rep from * 2 more times, sl st into top of ch3
Fasten off and weave in ends.
Join Yarn B into the first tr of any 5 dc group
Round 3: ch3, 1 dc into next st, 5dc into next st (this is the center st of the 5 dc group), 1dc into next 2 sts, ch3, *1 dc into next st, 5dc into next st, 1 dc into next 2 sts, ch3, rep from * rep 2 more times, sl st into top of ch3
Fasten off and weave in ends.
Join Yarn C into the first tr of any 9tr group
Round 4: ch3, 1dc into next 3 sts, 5dc in next st (this is the centre st of the 9 dc group), 1dc into next 4 sts, ch3, *1 dc into next 4 sts, 5dc into next st, 1 dc into next 4 sts, ch3 * rep 2 more times, sl st into top of ch3
Fasten off and weave in ends.

This tote bag pattern is worked in rounds.
6 granny squares in four rounds are crocheted first and then joined together in two strips.
The base of the bag is crocheted in single crochet, followed by rounds of half double crochet. The strips of granny squares are joined to the bag before continuing in single crochet to form the top and handles of the bag.
- Measurements: 36 cm / 14.25 inches (W) X 26 cm / 10.25 inches (L)
I really enjoyed designing and working on this granny square project!
12. Granny Square Bucket Hat

I used this flower granny square as a building block for this cotton bucket hat.
You’ll need 3 different colours for this granny square pattern.
Flower Granny Square Pattern
Instructions
Using colour A, B or C, ch4, join with sl st to first ch to form a ring
Round 1: (RS) ch1, 8sc into ring, join with sl st to first sc (8sc)
Round 2: ch3, [yo, insert hook into same st as ch3, pull up a lp, yo, draw through 2 lps on hook] 3 times (4 lps on hook), yo, draw through all 4 lps, ch2: [4-bob in next sc, ch2] around, join with a sl st to 3rd ch of beg ch3. Fasten off and weave in ends (8 x 4-bob, 8 x ch2-sp)
Round 3: Join Yarn A, B or C with a sl st to any first ch2-sp, ch3, 2dc in same sp, ch1, (3-bob, ch3, 3-bob) in next ch2-sp, ch1, *3dc in next ch2-sp, ch1, (3-bob, ch3, 3-bob) in next ch2-sp, ch1 *rep around, join with sl st to first dc. Fasten off and weave in ends (12 dc, 8 x 3-bob, 8 x ch1-sp, 4 x ch3-sp)
Round 4: Join Yarn A, B or C with a sl st to any corner sp, ch3, dc, ch1, 2dc in corner sp, *dc to next corner sp, 2dc, ch1, 2dc in corner sp * rep around, join with a sl st to first dc (46dc, 4 x ch1-sp)
Round 5: rep round 4
Fasten off and sew in ends

The bucket hat pattern blends 4 flower granny squares with simple crochet stitches.
The granny squares are crocheted first and joined to each other to form a strip.
This strip forms the foundation of the size of your bucket hat.
Next, the crown is crocheted using single crochet in rounds.
The crown is joined to the granny squares using single crochet.
Finally, the brim is crocheted in single crochet.
The yarn is re-joined to the bottom edge of the strips and stitches picked up evenly.
4 rows of increases are worked in amongst single crochet rounds to obtain the flop/wave of the brim.
Increases for the brim are made by crocheting 2 stitches in the same space.
I’ve crocheted my brim in stripes using the three colours of my flower granny squares but you could also crochet in one colour.
This project is incredibly fast. Fab for last minute gifts!
- Size: to fit head circumference 21” / 53.5cm
This pattern is available as a PDF.
13. Fruitdrop Crochet Sweater

This crochet sweater uses a flower granny square variation for the sleeves and is worked in self-striping yarn.
Flower Granny Square Variation
Instructions
Round 1: Ch4, sl st to first ch to form loop, beg CL, ch4, [CL, ch2] 7 times, join with sl st to top of beg CL (8 Clusters with ch2 between each one)
Round 2: Sl st into next ch2 sp, [beg CL, ch4, CL] in same ch2 sp, [ch1, 2dc, ch1] in next ch2 space, *[CL, ch4, CLst] in next ch2 sp, [ch1, 2dc, ch1] in next ch2 sp*, rep between * 2 more times, join to beg CL. (4 dc on each side + 4 corners)
Round 3: Sl st into next corner sp, [beg CL, ch4, CL] in same corner sp, ch1, 2dc in next ch1 sp, dc in each dc, 2 dc in next ch1 sp, ch1, *[CL, ch4, CL] in next corner sp, ch1, 2dc in next ch1 sp, dc in each tr, 2 dc in next ch1 sp, ch1* rep between * 2 more times, join to beg CL (8 dc on each side + 4 corners)
Round 4: rep Round 3
Fasten off

This crochet sweater is an easy project. It’s easy to crochet and easy to assemble.
The blended chevron with the granny square sleeves gives a boho vibe!
Three lengths are available: crop, standard and tunic
- Sizes: Available in sizes XS to 5X
This pattern is available to purchase.
14. Granny Square Poncho

The granny square variation in this project uses bobble stitch and crossed double stitches to create texture.
It is a larger granny square however, if you want a smaller square to work in your project, you could stop at round 6.
Victoria Granny Square Pattern
Instructions
Round 1: Ch4, sl st to first ch to form loop, beg CL, ch4, [CL, chain 2] 7 times, join with sl st to top of beg CL (8 Clusters with chain 2 between each one)
Round 2: Sl st into next ch2 sp, [beg CL, chain 4, CL] in same chain 2 sp, [ch1, 2dc, ch1] in next ch 2 sp, *[CL, ch 4, CLst] in next chain 2 sp, [ch1, 2dc, ch1] in next ch 2 sp*, rep between * 2 more times, join to beg CL. (4 dc on each side + 4 corners)
Round 3: Sl st into next corner sp, [beg CL, ch 4, CL] in same corner sp, ch1, 2dc in next ch1 sp, dc in each dc, 2 dc in next ch1 space, ch1, *[CL, ch 4, CL] in next corner sp, ch1, 2dc in next ch1 sp, dc in each dc, 2 dc in next ch1 sp, ch1* repeat between * 2 more times, join to beg CL (8 dc on each side + 4 corners)
Round 4: rep Round 3, turn
Round 5: ch3, dc in ch sp, bob in next st, 1sc in next st, 1dc in next st to ch1 sp, 2dc in ch 1 sp, ch1, [CL, ch 4, CL] in ch2 sp, ch1, *2dc in ch1 sp, [bob in next st, 1sc in next st, 1 dc in next st] to ch1 sp, 2dc in ch1 sp, ch1 [CL, ch 4, CL] in ch2 sp, ch1, * rep 2 more times, join to top of ch3, turn
Round 6: rep round 3 (dc in top of 5bob, dc in dc, dc in tr from prev round)
Round 7 and 8: rep Round 3
Round 9: sl st into next corner sp, [beg CL, ch 4, CL] in same corner sp, *ch1, 2dc in ch1 sp, ch1, sk next st, dc in next st, 2dc in ch1 sp, [CL, ch 4, CL] in corner sp, * rep 3 more times, join to beg CL
Round 10, 11 and 12: rep Round 3
Rounds 5 to 12 complete sequence
Continue working rounds to desired size

The process of creating my poncho involves crocheting four large granny squares. It’s how the granny squares are joined together where the magic happens 🙂
To adjust the neckline to fit, a crochet cord is utilized by threading it through the stitches around the neck and tying the ends together.
To enhance the design, I’ve incorporated simple crochet flowers at both ends of the cord.
You could use yarn from your stash and create a colourful, personalized poncho. Sizes: small to 5X
15. Easy Crochet Boho Shawl

This crochet granny square with flower center is worked in 6 rounds. The shawl continues with repetitions to match the size of the mesh side panels.
Daisy in a Granny Square Pattern
Instructions
Ch5, sl st in first ch made
Round 1: 12 sc into ring, 1 sl st in first sc of round
Round 2: [ch11, 1 sl st in next sc] 12 times (makes the open petals)
Round 3: 1 sl st in each of first 6 ch of first ch loop, ch4, 1 sc in 6th ch of next loop, ch4 [3 dc tog, ch4, 3 dc tog] in next loop *ch4 [1 sc in 6th ch of next loop, ch4] twice, [3 dc tog, ch4, 3 dc tog] in next loop, repeat from * twice more, ch4, 1sc in same place as 6th sl st at beginning of round
Round 4: 1 sl st in each of next 2 ch, ch3, 2 dc tog in same 4 ch sp, ch4, 1 sc in next 4 ch sp, 4ch [3 dc tog, ch4, 3 dc tog] in 4 ch sp at corner *ch4, 1 sc in next 4 ch sp, ch4, 3 dc tog in next 4 ch sp, ch4, 1 sc in next 4 ch sp, ch4 [3 dc tog, ch4, 3 dc tog] in next 4 ch sp at corner, rep from * twice more, ch4, 1sc in next 4 ch sp, ch4, 1 sl st in 3rd of 3 ch at beginning of round
Round 5: sl st in next stitch, ch3, 2 dc in next ch sp, ch1, 3dc in next ch sp, ch1 to corner sp, 3dc in next ch sp, ch1 3 dc tog, ch3, 3 dc tog to beginning of round
Round 6: Ch3, dc to corner sp, [3dc, ch3 3dc in corner sp] to beginning of round
Fasten off and weave in ends.

This crochet shawl uses self-striping yarn – no fastening off after each round (less ends to sew in!)
For guidance, I’ve included photos for each round in the flower granny square.
The crochet pattern starts with crocheting the daisy granny square and then re-joining the yarn to a corner to continue working the mesh stitch. Easy!
- Measurements: Daisy Granny Square 17” / Open crochet mesh stitch, each panel 17” W x 29” L
Related Crochet Patterns
The collections below have at least one project that uses granny squares. I’ve included them here for inspiration.
- Easy granny square bag patterns (all bags in this collection use granny squares as building blocks and include: Tote bags, Shopper bag, Cross body bag, Sock/PE bag, Fat bottom bag, Market bag, Purse). Granny square patterns include: Classic granny square, crochet sunflower granny square, daisy granny square.
- Infinity Scarf Patterns – the scarf in this collection uses 7 granny squares.
- Bucket Hat Patterns – as well as my design, there are three bucket hats that use granny squares in this collection and use: flower granny square, Daisy granny square.
- Heart Patterns – in this collection you’ll find a crochet heart granny square.
- Dog Sweater Patterns – there is one dog sweater constructed with 16 granny squares in this collection.
- Hot Water Bottle Covers – there are four hot water bottle patterns that use granny squares in this collection; 12 sunburst granny squares, 12 traditional granny squares, 12 basic granny squares, using the join-as-you-go for both front and back panel, 12 motifs join together to make the front of this cozy with 6 more and stripes of colour for the back
- Summer Tops – two free patterns that use granny squares are included in this roundup of summer crochet tops; Boho Tank Top – 7 granny squares, Granny Square Top – 2 large granny squares
- Sweater Patterns – there are two free sweater patterns that use granny squares: 4 granny squares (front, back and two sleeves) which are seamed together to create this stunning crochet box sweater the Starburst granny square joining together with the ‘join as you go’ method for the front and back
- Poncho Patterns – you’ll find a granny square poncho pattern made from six granny squares that is crocheted in chunky yarn.
- Boho Patterns – Granny squares have been used in these projects: tops, sweater, cardigans, jacket, mini dress, skirt, headband, bucket hat
- Pillow/Cushion Patterns – Patterns include: pillows using 1, 2, 9, 16, 18 and 50 granny squares, granny stitch worked in the round to create a circle then squared off, round granny pillow, flower center granny square, clover leaf granny square, sunburst granny square
- Wall Hanging Patterns – the patterns in this collection include: simply granny square wall hanging, modified granny square
- Baby Blanket Kits – this collection has: giant crochet granny square blanket, large sunburst granny square blanket
- Baby Blanket Patterns – this collection includes two projects for a crochet granny square blanket pattern: using 49 granny squares using 36 granny squares
- Christmas Decoration Patterns – in this collection you’ll find the following granny square projects: Christmas stocking, Christmas wreath
In this article I’ve explored different granny square patterns and projects (including classic ones that have stood the test of time) and some fun variations.
Each project and granny square gives you a chance to express your own style and show off your individuality. I hope you’ve found inspiration in the projects I’ve shared. Happy crocheting!
Granny Square FAQ: Your Guide to All Things Granny Squares
With so many variations, techniques, and design options available, it’s natural to have questions.
In this FAQ section, I have gathered together the most frequently asked questions about granny squares, sourced from crafters like ourselves. I’ve gathered expert advice, tips, and tricks to help navigate the intricacies of granny square projects with confidence.
I hope you find this helpful.
What is the best yarn for making granny squares?
The best type of yarn depends on your personal preferences and the intended use of your project. Here are some popular yarn options that work well for granny squares:
- Worsted Weight Yarn: Worsted weight yarn is a versatile choice for granny squares. It’s a medium-weight yarn that provides good stitch definition and durability. Acrylic or acrylic-blend yarns are often favored for their affordability, wide colour range, and easy care.
- Cotton Yarn: Cotton yarn is a great option for granny squares, especially if you’re making projects like dishcloths, coasters, or lightweight garments. It has a smooth texture, breathability, and excellent stitch definition. Cotton yarn is also available in various weights, from fine to bulky.
- Bamboo Yarn: Bamboo yarn is another popular choice for granny squares, especially if you prefer eco-friendly and sustainable fibers. It has a soft and silky feel, drapes nicely, and is often blended with other fibers like cotton or silk.
- Merino Wool: If you’re looking for warmth and softness, merino wool is a luxurious option. It’s lightweight and provides excellent stitch definition. However, keep in mind that it may require special care, such as handwashing or delicate machine cycles.
- Variegated Yarn: Variegated yarn with multiple colours can add a vibrant and eye-catching element to your granny squares. It creates beautiful colour combinations without the need for frequent colour changes.
Ultimately, the choice of yarn depends on your project’s desired characteristics, such as texture, drape, and durability, as well as your personal preferences for fiber content and care requirements. Consider the specific qualities you’re looking for in your granny square project and experiment with different yarns to find the perfect match.
How do I increase or decrease the size of a granny square?
There are a few ways to increase or decrease the size of a granny square.
- Change the hook size. Using a larger hook will make your granny squares larger, while using a smaller hook will make them smaller. The size of your granny squares will also depend on the weight of your yarn. For example, a worsted weight yarn will make larger granny squares than a sport weight yarn.
- Add or remove stitches. You can also increase or decrease the size of your granny squares by adding or removing stitches. To add a stitch, simply work a single crochet into the same stitch twice. To remove a stitch, simply work a single crochet into the next stitch and then skip the stitch you just worked into.
- Change the number of rounds. The number of rounds you work will also affect the size of your granny square. For example, a granny square with 5 rounds will be smaller than a granny square with 8 rounds.
Here are some examples of how to change the size of a granny square:
- To make a larger granny square, use a larger hook and/or add stitches. For example, if you are using a worsted weight yarn and a G (4.00 mm) hook, you could use a H (5.00 mm) hook and/or add 2 stitches to each round.
- To make a smaller granny square, use a smaller hook and/or remove stitches. For example, if you are using a worsted weight yarn and a G (4.00 mm) hook, you could use a F (3.75 mm) hook and/or remove 2 stitches from each round.
- To make a granny square with a different number of rounds, simply work the pattern for the desired number of rounds. For example, if you want to make a granny square with 7 rounds, you would work the pattern for 7 rounds instead of the usual 6 rounds.
Experiment with different hook sizes, stitch counts, and round counts to find the size and shape of granny square that you like best.
How do I change colours in a granny square?
There are a few ways to change colours in a granny square.
- Carry the old colour up the side of the work. This is the easiest way to change colours, but it can be difficult to keep the yarn from showing on the front of your work. To do this, simply work the last stitch of the old colour, yarn over with the new colour, and then pull up a loop on the hook. Continue working with the new colour, carrying the old colour up the side of the work.
- Cut the old colour and weave in the ends. This is a more secure way to change colours, but it can be more time-consuming. To do this, work the last stitch of the old colour, yarn over with the new colour, and then pull up a loop on the hook. Cut the old colour, leaving a long tail. Thread the tail on a tapestry needle and weave it in and out of the stitches on the back of your work.
- Use a slip stitch to join the new colour. This is a more advanced technique, but it can give you a cleaner finish. To do this, work the last stitch of the old colour, yarn over with the new colour, and then slip stitch into the first stitch of the new colour. Continue working with the new colour.
Here are some tips for changing colours in a granny square:
- When carrying the old colour up the side of the work, try to keep the yarn as close to the stitches as possible. This will help to prevent it from showing on the front of your work. Check the tension of the floating yarn to make sure it is not too tight and ruffling your work.
- When cutting the old colour, leave a long tail. This will make it easier to weave in the ends.
- When using a slip stitch to join the new colour, make sure that the new colour is pulled up tightly. This will help to prevent the stitches from becoming too loose.
Experiment with different methods of changing colours to find the one that works best for you.
How can I choose colour combinations that work well together?
There are a few things to keep in mind when choosing colour combinations for granny squares:
- Contrast. When choosing colours, it is important to consider the amount of contrast between them. Contrasting colours will make your granny squares stand out, while similar colours will create a more subtle look.
- Tone. You can also use tone to create different effects in your granny squares. For example, you can use light and dark shades of the same colour to create a more modern look, or you can use different tones of the same colour to create a more traditional look.
- Pattern. The pattern of your granny squares can also affect the way the colours look. For example, a solid granny square will show off the colours more than a granny square with a lot of stitches.
Here are some examples of colour combinations that work well together in granny squares:
- Monochromatic. A monochromatic colour scheme uses shades of the same colour. This can be a great way to create a sophisticated look.
- Analogous. An analogous colour scheme uses colouurs that are next to each other on the colour wheel. This can be a great way to create a harmonious look.
- Complementary. A complementary colour scheme uses colours that are opposite each other on the colour wheel. This can be a great way to create a striking look.
- Triadic. A triadic colour scheme uses three colours that are evenly spaced on the colour wheel. This can be a great way to create a balanced look.
Experiment with different colour combinations to find the ones that you like best.
Here are some additional tips for choosing colour combinations for granny squares:
- Consider the mood you want to create. Do you want your granny squares to be cheerful, calming, or sophisticated? The colours you choose can help to create the desired mood.
- Think about the pattern you will be using. Some patterns will work better with certain colour combinations than others. Consider the overall look of the pattern when choosing colours.
- Don’t be afraid to experiment. The best way to find out what colour combinations you like is to experiment. Try different combinations until you find ones that you love.
How do I block or finish my granny square projects?
Here are some ways to block or finish your granny square projects:
Wet blocking: This is the most common way to block granny squares. To wet block, soak your squares in warm water for a few minutes. Gently squeeze out the excess water and lay them out on a blocking mat or towel. Use pins to shape the squares to the desired size and shape. Leave the squares to dry completely.
Steam blocking: This is a quicker way to block granny squares. To steam block, place your squares on a blocking mat or towel. Use a steam iron or steamer to gently apply steam to the squares. The steam will help to set the stitches and shape the squares. Leave the squares to cool completely.
No-blocking: Some people prefer not to block their granny squares. This is a perfectly acceptable option, but your squares may not be as uniform in size and shape.
Here are some tips for blocking or finishing your granny square projects:
- Use the correct blocking method for your yarn. Some yarns, such as acrylic, do not block well.
- Use the correct blocking board or mat. Blocking boards and mats are designed to help your squares dry evenly. They also help to prevent the squares from slipping around while they are drying.
- Use the correct amount of pins. Too many pins can distort the shape of your squares. Too few pins can cause the squares to lose their shape.
- Be patient. Blocking can take some time. Be patient and let your squares dry completely before moving on to the next step.
Why doesn’t my granny square stay flat? Why is it ruffling?
There are a few reasons why your granny square might not be staying flat. Here are a few things to check:
- Your tension might be too tight. If your stitches are too tight, the square won’t have any give. Try loosening up your tension a bit and see if that helps.
- You might be working too many stitches in each round. If you’re working more stitches than the pattern calls for, the square will be too big and won’t lay flat. Check the pattern to make sure you’re working the correct number of stitches.
- You might not be turning your work at the end of each round. If you don’t turn your work, the stitches will be worked in the same direction on each round, which can cause the square to curl. Make sure you turn your work at the end of each round and work the stitches in the opposite direction.
If you’ve checked all of these things and your square is still not staying flat, practice your tension. Tension is one of the most important things to learn when you’re crocheting, and it can take some time to get it just right. The more you practice, the better your tension will become.
Here are a few tips for practicing your tension:
- Start with a simple granny square pattern. A simple pattern will help you to focus on your tension without getting overwhelmed by the pattern.
- Use a light-weight yarn. Light-weight yarn is easier to work with and will help you to see your stitches more clearly.
- Count your stitches. Counting your stitches regularly will help you to make sure that you’re working the correct number of stitches in each round.
- Be patient. It takes time and practice to develop good tension. Be patient with yourself and don’t get discouraged if you don’t get it right away.
With a little practice, you’ll be able to crochet granny squares that stay flat in no time!
How do I stop my granny square from twisting?
There are a few things you can do to stop your granny square from twisting:
- Turn your work after each round. This will help to keep the stitches from becoming too tight.
- Work the first stitch of each round into the back loop only. This will help to create a more even tension and prevent the square from curling.
- Use a stitch marker to mark the first stitch of each round. This will help you to keep track of where you are and prevent you from accidentally skipping stitches.
- Block your squares after you have finished crocheting them. This will help to set the stitches and prevent the squares from curling.
Here are some additional tips for preventing your granny squares from twisting:
- Use the correct size hook. If you are using a hook that is too small, your stitches will be too tight and the square will curl. If you are using a hook that is too large, your stitches will be too loose and the square will not be flat.
- Use the correct weight yarn. If you are using a yarn that is too heavy, your stitches will be too tight and the square will curl. If you are using a yarn that is too light, your stitches will be too loose and the square will not be flat.
- Be consistent with your tension. If your tension is too tight, the square will be small and won’t have any give. If your tension is too loose, the square will be large and won’t lay flat.
Should you flip granny squares?
Flipping granny squares after each round helps to prevent the squares from twisting and will also help to create a more even tension. When you flip your squares, you are working the stitches in the opposite direction, which helps to distribute the tension evenly.
Here are some reasons why you might want to flip your granny squares:
- To prevent twisting. When you work granny squares in the same direction without flipping, they can start to twist. Flipping helps to distribute the tension evenly and prevent this from happening.
- To create a more even tension. When you work granny squares in the same direction without flipping, the tension can become uneven. Flipping helps to distribute the tension evenly and create a more uniform look.
- To create a reversible granny square. If you flip your granny squares after each round, they will be reversible. This means that they will look the same on both sides.
Whether or not you flip your granny squares is ultimately up to you. However, flipping can help to create flat, even, and reversible granny squares.
Can I modify or design my own granny square patterns?
Yes, you can modify or design your own granny square patterns. There are many ways to do this, and the best way for you will depend on your own skills and preferences.
Here are a few ideas for how to modify or design your own granny square patterns:
- Change the stitch pattern. The most basic granny square pattern uses single crochets and double crochets. However, you can use any stitch pattern you like to create your own unique granny squares.
- Change the colours. You can use any colour combination you like to create your own unique granny squares. You can also use different yarn weights or textures to create different looks.
- Change the size. You can make your granny squares any size you like by changing the number of stitches you work in each round.
- Add embellishments. You can add embellishments to your granny squares, such as beads, buttons, or flowers, to create a more unique look.
Once you have a basic understanding of how to crochet granny squares, you can start to experiment with different modifications and designs. There are endless possibilities, so have fun and be creative!
Are there any free resources to explore granny square patterns?
Some time ago now, Nadia Fuad released a free granny square pattern a day so if you’re looking for inspiration, 365 days of granny squares is a fantastic free resource.
Every year, on 15th August, makers and crafters unite worldwide on Granny Square Day by sharing their squares. This celebration was started in 2014 by Susan Regalia and goes from strength to strength. Find out more (updates each year) Granny Square Day
Blogs, social media and YouTube are also fab places to find free patterns for granny squares. A quick search online will turn up plenty of results.
Don’t forget to let me know if you have a question that you can’t find here.