I’ve been looking for inspiration for projects that will use up my yarn stash and I had a lightbulb moment for an idea for creating a crochet Christmas tree using classic granny squares.
Jera’s Jamboree receives payments for affiliate advertising. This is at no extra cost to you. As an Amazon Associate I earn from qualifying purchases. Please see my disclosure policy for more information.
Today I’m sharing step-by-step instructions for creating a crochet granny square Christmas tree.
This is a quick and easy crochet project that will spice up your holiday decorating and create a talking point with your guests.

Design Inspiration
What I love about this crochet project is the almost endless possibilities of design.
I chose traditional Christmas colours for my crochet tree but you could choose any colour to fit your Christmas décor.
Best gifts for crocheters? Get inspired with my gift guide
Using different yarn (both fibre and colour), different embellishments and different sizes of granny squares will give a unique Christmas tree every time!
With so much choice though it is easy to get bogged down so if you’re going to give it a go yourself, have a plan at the beginning (even if it is only rough!).
I knew what I wanted from the beginning and the embellishments were easy to source.
How the pattern is worked
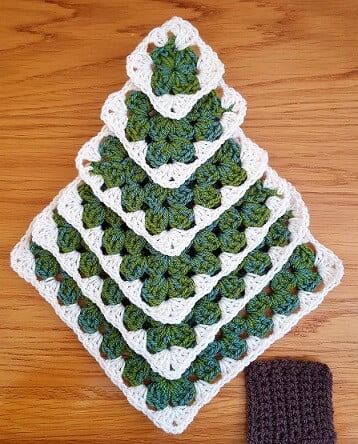
With two strands of DK held together, 6 granny squares in different sizes are crocheted.
I worked 7 rounds for the largest square and decreased one round for each subsequent square.
Granny squares needed:
- 1 = 7 rounds
- 1 = 6 rounds
- 1 = 5 rounds
- 1 = 4 rounds
- 1 = 3 rounds
- 1 = 2 rounds
I started with the largest granny square. You could also start with your smallest and work up to your largest.
If your granny squares are curling or ruffling, browsing through my crochet tips should help.
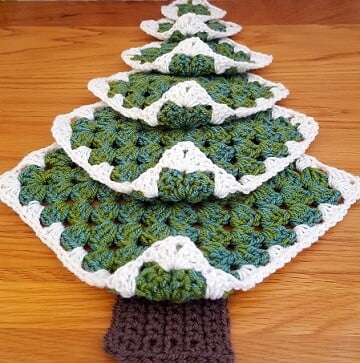
The trunk of the tree is then crocheted.
Finally, the embellishments are added.
Join the Facebook Community
Join us to share your projects, discover new patterns, swap tips and tricks, and connect with a warm, welcoming community that loves all things crochet!
What You’ll Find:
- Inspiring patterns and tutorials
- Themed posts
- A supportive space to ask questions and share your progress
- Friendly chats with fellow yarn lovers
Join Our Crochet Facebook Group Now!
Don’t forget to answer the questions and accept the group rules.
Related Holiday Crochet Patterns
- Heart Tote Bag
- Easy Heart Shaped Cushion
- 11+ Easy Heart Patterns
- 30+ Free Easter Crochet Patterns
- Snowman Gift Bag
- 35 Free Christmas Crochet Patterns
Yarn
I used yarn from my stash, two strands of Womens Insitute DK and one strand of white for my final row (to represent snow).
You can substitute any DK yarn for this project.
You can use Aran/Worsted yarn instead of DK.
Use what you have in your stash!
Pattern Notes
- Pattern is written in UK and US Crochet Terms
- Chain 3 counts as a stitch
- Chain 1 does not count as a stitch
- Round 1 stitches are all worked into the same stitch
- The smallest granny square is 2 rounds
- The largest granny square is 7 rounds
- Granny squares are worked in double strand DK
- The last round of the granny square is worked in single strand DK
- The trunk is worked in single strand DK
- If you are making a larger tree you will need to increase the trunk size and may need to stiffen the squares
- As you secure the bead you will also be securing the next square up so make sure you have the correct angle as you don’t want your tree to lean to one side
- The string of beads is sewn onto both sides of each granny square and the middle to secure
Level
Easy – beginner
Materials
Browse the supplies list in my Amazon store.
- Yarn from your stash – 2 strands of DK for the granny squares in green; 1 strand for final round in white; DK for the trunk in brown
- Crochet Hook 4mm
- Beads
- Bows
- Star
- Thread for sewing
- Haberdashery needle
- Scissors
Stitches and Abbreviations
Double crochet (dc) / US Single Crochet (sc)
Treble Crochet (tr) / US Double Crochet (dc)
- ch = chain
- sl st = slip stitch
- rep = repeat

Related Granny Square Patterns
- Free Modern Granny Square Cardigan Patterns
- Granny Square Projects and Patterns
- Granny Square Poncho Victoria
- Granny Square Scarf
- Granny Square Cardigan Stella
- Granny Square Bucket Hat
- Granny Square Lap Blanket
- Queen of Diamonds Poncho
Crochet Christmas Tree Wall Hanging Instructions
Granny square (make 6)
Classic Granny Square Pattern
Round 1: Ch4, 2 tr in 4th ch from hook *ch2, 3 tr in same stitch; rep from * 3 times, ch2 join with a sl st
Round 2: sl st to next ch2 sp, ch3 (2 tr, ch2, 3 tr) in same ch2 sp *ch1, (3 tr, ch2, 3 tr) in next ch 2 sp; rep from * 3 times, ch1, join with a sl st to top of starting ch3
Round 3: sl st to next ch2 sp, ch3 (2 tr, ch2, 3 tr) in same ch2 sp, *ch1, 3 tr in next ch1 sp, ch1 (3 tr, ch2, 3 tr) in next ch2 sp, rep from * 3 times
In each corner sp you are working 3 tr, ch2, 3 tr and in each ch1 space you are working 3 tr
Continue with Round 3 until desired size.
Christmas Tree Trunk
Ch 12 in brown,
Row 1: ch1, dc in 2nd ch from hook, dc across, turn
Row 2: ch1, dc in base of st, dc across, turn
Row 3 – 9: rep row 2
US Crochet Terms
Granny square (make 6)
Classic Granny Square Pattern
Round 1: Ch4, 2 dc in 4th ch from hook *ch2, 3 dc in same stitch; rep from * 3 times, ch2 join with a sl st
Round 2: sl st to next ch2 sp, ch3 (2 dc, ch2, 3 dc) in same ch2 sp *ch1, (3 dc, ch2, 3 dc) in next ch 2 sp; rep from * 3 times, ch1, join with a sl st to top of starting ch3
Round 3: sl st to next ch2 sp, ch3 (2 dc, ch2, 3 dc) in same ch2 sp, *ch1, 3 dc in next ch1 sp, ch1 (3 dc, ch2, 3 dc) in next ch2 sp, rep from * 3 times
In each corner sp you are working 3 dc, ch2, 3 dc and in each ch1 space you are working 3 dc
Continue with Round 3 until desired size.
Fasten off
Weave in ends
Christmas Tree Trunk
Ch 12 in brown,
Row 1: ch1, sc in 2nd ch from hook, sc across, turn
Row 2: ch1, sc in base of st, sc across, turn
Row 3 – 9: rep row 2
Fasten off
Weave in ends
Assembly Instructions (UK and US)
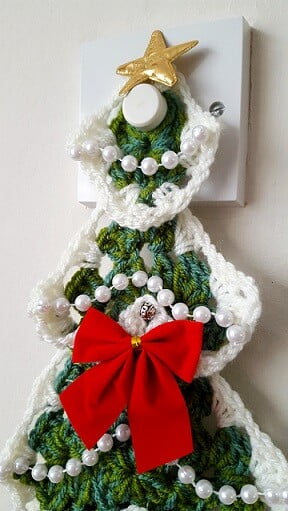
- Sew the trunk onto the bottom ‘corner’ of the largest square.
- Fold the bottom corner of the largest square over to the front of your tree and secure with a button or bead.
Continue this step moving up each granny square of the tree.
As you secure the bead you will also be securing the next square up so make sure you have the correct angle as you don’t want your tree to lean to one side.
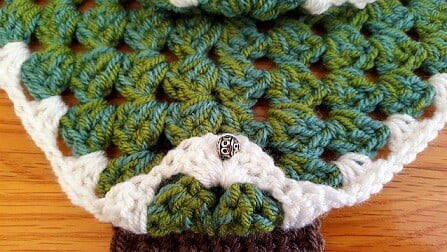
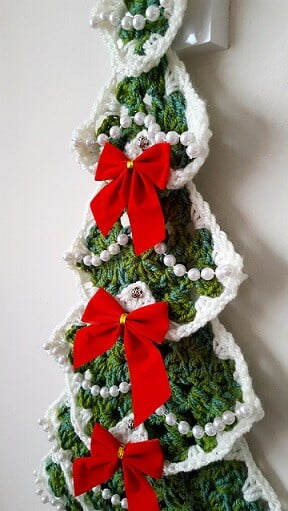
- Next, add the string of beads (or pom-poms if that’s what you’re using).
Sew the string of beads onto each side of the square and the middle. This helps the granny square maintain its shape.
I did debate about using my glue gun for securing the string of beads but decided to sew it on.
Not only is it more secure but the finished crochet Christmas tree hangs much better too.

- The next step is to add the bows.
I added mine just below where I turned the bottom of the square up.
I chose mini bows for the velvety texture and a big plus for me, no more sewing!
The bows only need securing using the gold band that wraps round the middle. I threaded this through the crocheted fabric.

- Finally, add the star (or symbol of your choice) to the top square of your smallest square.
I chose gold puffy stars as I wanted a little more texture and reflection at the top of my tree. I used cotton thread to sew it on.

Granny Square Christmas tree wall hanging complete!
I finished my Christmas tree wall hanging in four hours.
As always for me, the crocheting was the easy part with finishing off the most frustrating (I’m such a perfectionist it has to be as exact as it can be).
Sewing isn’t something I enjoy but I felt so inspired that kept me going 🙂
What do you think? Are you going to give it a go? Let me know how you get on. I would love to see your designs.
Happy crocheting!
Copyright Notice
The pattern and photographs of this design are the property of Sharon Goodwin at Jera’s Jamboree. This pattern and design are subject to copyright and are for personal, non-commercial use only. You may not share, resell, alter or redistribute this pattern in part or in whole. You may, however, sell any finished items you make. If you would like to include this pattern in a roundup, you may take one photo and link back to this pattern.

Thank you for this pattern.
You’re very welcome Sandra
how do I get the PDF for this tree
Hi Diana, if you click on Print Friendly (after Copyright) you can save as a PDF to your device.
Could you tell us how many rounds each square has?
Hi Marsha,
The largest granny square is 7 rounds and each square decreases each round. You will need 6 granny squares.
1 = 7 rounds
2 = 6 rounds
3 = 5 rounds
4 = 4 rounds
5 = 3 rounds
6 = 2 rounds
Thank you for reaching out.
Shaz
Thank you i am doing it in green and white as i have already got those colours
It was the same for me – perfect colours for a Christmas tree 🙂
Hi am am making your christmas tree granny squares the large one has 7 rows is that including the white round xxx
Hi Carol, yes, that does include the white round. I’d love to know your colours and what you’ve chosen to decorate your tree with 🙂 Shaz