My free granny square tote bag pattern is an easy project and suitable for confident beginners as well as seasoned crocheters.
If you’re looking to cut back on your crocheting costs, this project doesn’t use much yarn and you’ve probably got something suitable in your stash.

The beauty of the granny square is, of course, it’s versatility.
There are so many different designs to choose, from the classic to the more intricate … making the granny square suitable for almost any crochet project!
- I’ve used granny squares in this bucket hat design
- Using colour and triangles with squares makes interesting geometric shapes as in this scarf design
- With only one granny square and a lining, this bag is easy but stylish
- A blend of granny squares and basic stitches can make a project eye-catching and stylish as in this crochet tote bag
- Granny squares work really well in boho crochet pattern designs
And thanks to fashion designers, celebrities and TV programmes, the granny square has gained popularity!

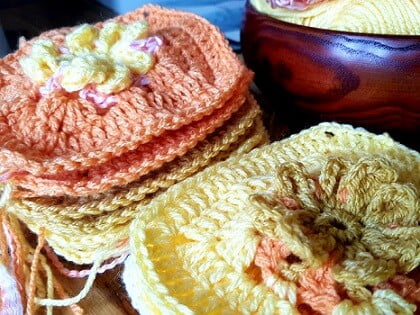
Worked in 13 granny squares (10 flower squares and 3 solid squares), my crochet tote bag works up quickly and is an easy project.
The flower granny square uses basic crochet stitches as well as a special stitch (3-Double Treble Bobble Stitch (3dtr-bob) / US 3-Treble Bobble Stitch
(3tr-bob).
Jera’s Jamboree receives payments for affiliate advertising. This is at no extra cost to you. As an Amazon Associate I earn from qualifying purchases. Please see my disclosure policy for more information.
I’ve written the pattern in UK and US Crochet Terms.
The free pattern below includes instructions for the flower and solid granny squares, a diagram for the color sequence and written instructions for joining the squares, working the border and handles.
Once you’ve crocheted a bag for yourself, you might want to crochet more to gift to family and friends.
Eco conscious? Take your crochet bag shopping and you’ll be reducing your plastic use.

Design Inspiration
This time of year, flora and fauna grow from those small shoots and buds into lush blooms and blossoms. Suddenly there are flowers everywhere.
I wanted to honour the season and worked on creating an 8-petal flower granny square. Once it was crocheted, I was reminded of Clematis. And then a friend shared a photo on social media of her Josephine Clematis and I knew this was it. It felt right!

How the pattern is worked
13 granny squares are crocheted and then joined together using double/single crochet.
3 of the squares are solid treble/double granny squares, 10 are flower squares.
Flower granny squares:
- the first two rounds of each granny square are worked in the same color
- there is a color change for round three and round four
- Round 5 and 6 are worked in treble crochet (US double crochet) in the same color as round four
A photo helps you on where to place the granny squares and crochet them together to form the body of the tote bag.
The border and handles are then crocheted.
Yarn
The Josephine tote bag uses DK acrylic yarn but you could use any fibre or weight.
Just remember that if you use a heavier yarn weight and larger hook your bag will be larger and of course, a lighter weight yarn and smaller hook will make your bag smaller.
I’ve used a mixture of DK brands from my stash.
Pattern Notes
- This pattern uses chain 4 with a slip stitch to the first chain to form a circle (instead of a magic circle)
- Chain 1 does not count as a stitch throughout
- Chain 3 counts as a stitch throughout
- The different colors are written in the pattern as Yarn A, Yarn B, Yarn C, Yarn D and Yarn E
- The granny squares are numbered to make it easier to follow the color sequence and the placement
- I have joined the granny squares using double crochet (US single crochet)
- Make sure your squares are right side facing inwards and you crochet through both loops
- If you prefer you can sew your squares together
- Join the squares together in strips – this is much easier
- The border and handles are worked together (not as two separate pieces)
- When working the border and handles, the ‘valley’ is the dip and the ‘peak’ is the highest point
- If you’re having problems with your granny squares rippling or twisting, I have some crochet tips that will help

Level
Confident beginner
Materials
If you want to use my color scheme, these are the brands I used:
- Emu Classic DK
- Deramores Studio DK
- King Cole Caribbean Calypso DK
50 g x 5 coordinating colors:
- Yarn A – Emu Classic DK – Pumpkin
- Yarn B – Deramores Studio DK – Yellow
- Yarn C – King Cole Caribbean Calypso DK – St Lucia
- Yarn D – Deramores Studio DK – Butterscotch
- Yarn E – Deramores Studio DK – Cream
- 4mm crochet hook
- Scissors
- Tapestry Needle
Stitches and Abbreviations
Double Crochet (dc) / US Single Crochet (sc)
Treble Crochet (tr) / US Double Crochet (dc)
Special Stitches:
3-Double Treble Bobble Stitch (3dtr-bob) / US 3-Treble Bobble Stitch (3tr-bob)
Double Crochet 2 Together (dc2tog) / US single crochet 2 together (sc2tog)
If you need help working these stitches, visit the stitch library for instructions.
- Ch/s = chain/s
- Sl st = slip stitch
- Sl knot = slip knot
- Rep = repeat
- Sp/s = space/es
- St/s = stitch/es
- Rs = right side
Measurements
1 granny square = 12cm/4.5”
Body of Bag = 34cm/13.5”
Handles = 30cm/12”
Granny Square Tote Bag Instructions
Colour sequences:
Granny Square Number 1
Make 2
Round 1 and 2 in Yarn C
Round 3 in Yarn A
Round 4, 5 and 6 in Yarn B
Granny Square Number 2
Make 2
Round 1 and 2 in Yarn B
Round 3 in Yarn C
Round 4, 5 and 6 in Yarn A
Granny Square Number 3
Make 4
Round 1 and 2 in Yarn A
Round 3 in Yarn B
Round 4, 5 and 6 in Yarn D
Granny Square Number 4
Make 2
Round 1 and 2 in Yarn D
Round 3 in Yarn A
Round 4, 5 and 6 in Yarn B
Granny Square Number 5
Make 3
Solid granny square in Yarn E
Instructions UK Crochet Terms
Flower Granny Square
(make 10 flower granny squares following the color sequences)
Ch4, join with sl st to form a ring
Round 1: (RS) ch1, 8dc into ring, join with a sl st to first dc
Round 2: ch4, 3dtr-bob in same dc, ch4, sl st same st, *(sl st, ch4, 3dtr-bob, ch4, sl st) in next dc * rep around (8 petals). Fasten off and weave in ends
Round 3: Join new color with sl st to any sl st between petals, ch3, tr in same st, ch3, *2 tr in next sl st between petals, ch3, *rep around, join with sl st to top of ch 3 (16tr, 8 ch3-sps). Fasten off. Weave in ends
Round 4: Join new color with sl st to any ch3-sp, ch3, (2tr, ch1, 3tr) in same sp, ch2, 2dc in next ch3-sp, ch2, *(3tr, ch1, 3tr) in next ch3-sp, ch2, 2dc in next ch3-sp *rep around, join with sl st to first top of ch3 (24 tr, 4 ch1-sps, 8dc and 8 ch2-sps). Do not fasten off.
Round 5: ch3, tr in next 2 sts, *[1tr, ch2, 1tr] in ch1-sp, tr in next 3 sts, 2tr in ch2-sp, tr in next 2 dc, 2tr in ch2-sp, tr in next 3 sts * rep around (56 tr, 4 ch1-sp)
Round 6: rep round 5. (64 tr, 4 ch1-sp) Fasten off. Weave in ends.
Solid Treble Granny Squares
Make 3 in Yarn E
Ch4, join with a sl st to form a ring
Round 1: ch4, 3tr into ring, ch2 (corner sp), 3tr, ch2, 3tr, ch2, 2tr, sl st to 3rd chain of ch4
Round 2: sl st into corner sp, ch4, 2tr in same corner sp, *1tr into each st to corner sp, [2tr, ch2, 2tr] into corner sp, * rep to last corner sp, tr into corner sp, sl st to 3rd ch of ch4
Round 3 – 5: rep round 2.
Fasten off and weave in ends.
Joining the granny squares
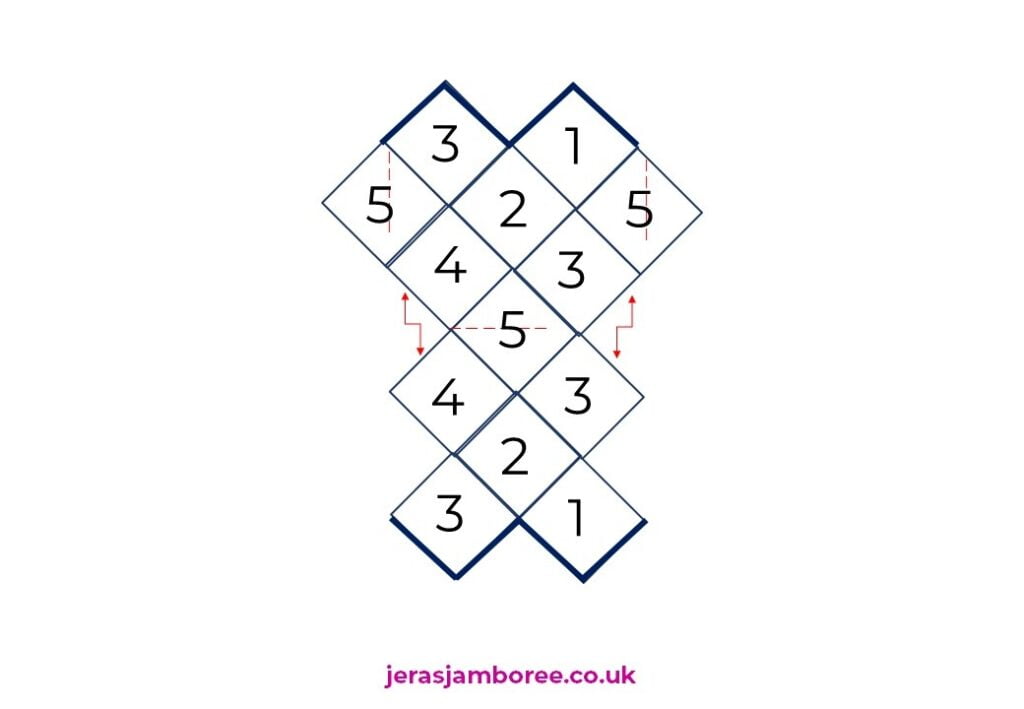
The first step is to join the granny squares together in strips. Use the photo below to help you.
Next, fold the bag as noted in the diagram above and join the two solid granny squares at the side to form the body of the tote bag. Use the photo below to help you.
The two flower granny squares at the top of the bag on both front and back should not be joined together as this forms the opening.


Border and Handles
With RS facing outwards, attach yarn 4 – 5 sts before a side valley.
Round 1: Ch1, dc in same st, dc around working 2 dc in the peaks (corner-sps of the granny square) and dc2tog in the valleys.
Handles begin in Round 2.
Round 2: ch1, dc in same st, dc around work dc2tog in the first valley, dc to first peak, ch80 (this is for the handles), sk the next valley and join to the next peak (which is on the opposite side). Do not twist the chain. Dc to valley working dc2tog in valley, dc to the next peak, ch80, sk the next valley and join to the next peak, dc to ch1, join with sl st to ch1.
Round 3: ch1, dc in same st, dc around (incl chs for handles) remembering to dc2tog in the valleys on the side of the bag, sl st to ch1.
Round 4 and 5 as round 3 but sk the st in the valleys. Fasten off and weave in ends.
Round 6 and 7 are worked on the inner edge.
Round 6: Attach yarn with a sl knot to the dc on front of the bag which is next to the handle. Ch1, dc in same st, dc around, skipping centre stitch of the front valley, sl st to ch1
Round 7: ch1, dc in same st, dc around (you are now working on the opposite side of the starting ch for the handles), This time around, dc2tog in the valley. Fasten off. Weave in ends.
Rep Row 6 and 7 on the opposite side of the bag (you are now working over the centre back and inside edges of the handle on that side). Fasten off. Weave in ends.
Instructions US Crochet Terms
Flower Granny Square
(make 10 flower granny squares following the color sequences)
Ch4, join with sl st to form a ring
Round 1: (RS) ch1, 8sc into ring, join with a sl st to first sc
Round 2: ch4, 3tr-bob in same sc, ch4, sl st same st, *(sl st, ch4, 3tr-bob, ch4, sl st) in next sc * rep around (8 petals). Fasten off and weave in ends
Round 3: Join new color with sl st to any sl st between petals, ch3, dc in same st, ch3, *2 dc in next sl st between petals, ch3, *rep around, join with sl st to top of ch 3 (16dc, 8 ch3-sps). Fasten off. Weave in ends
Round 4: Join new color with sl st to any ch3-sp, ch3, (2dc, ch1, 3dc) in same sp, ch2, 2sc in next ch3-sp, ch2, *(3dc, ch1, 3dc) in next ch3-sp, ch2, 2sc in next ch3-sp *rep around, join with sl st to first top of ch3 (24 dc, 4 ch1-sps, 8sc and 8 ch2-sps). Do not fasten off.
Round 5: ch3, dc in next 2 sts, *[1dc, ch2, 1dc] in ch1-sp, dc in next 3 sts, 2dc in ch2-sp, dc in next 2 dc, 2dc in ch2-sp, dc in next 3 sts * rep around (56 dc, 4 ch1-sp)
Round 6: rep round 5. (64 dc, 4 ch1-sp) Fasten off. Weave in ends.
Solid Treble Granny Squares
Make 3 in Yarn E
Ch4, join with a sl st to form a ring
Round 1: ch4, 3dc into ring, ch2 (corner sp), 3dc, ch2, 3dc, ch2, 2dc, sl st to 3rd chain of ch4
Round 2: sl st into corner sp, ch4, 2dc in same corner sp, *1dc into each st to corner sp, [2dc, ch2, 2dc] into corner sp, * rep to last corner sp, dc into corner sp, sl st to 3rd ch of ch4
Round 3 – 5: rep round 2.
Fasten off and weave in ends.
Joining the granny squares
The first step is to join the granny squares together in strips. Use the photo below to help you.
Next, fold the bag as noted in the diagram above and join the two solid granny squares at the side to form the body of the tote bag. Use the photo below to help you.
The two flower granny squares at the top of the bag on both front and back should not be joined together as this forms the opening.
Border and Handles
With RS facing outwards, attach yarn 4 – 5 sts before a side valley.
Round 1: Ch1, sc in same st, sc around working 2 sc in the peaks (corner-sps of the granny square) and sc2tog in the valleys.
Handles begin in Round 2.
Round 2: ch1, sc in same st, sc around work, sc2tog in the first valley, sc to first peak, ch80 (this is for the handles), sk the next valley and join to the next peak (which is on the opposite side).
Do not twist the chain.
Sc to valley working sc2tog in valley, sc to the next peak, ch80, sk the next valley and join to the next peak, sc to ch1, join with sl st to ch1.
Round 3: ch1, sc in same st, sc around (incl chs for handles) remembering to sc2tog in the valleys on the side of the bag, sl st to ch1.
Round 4 and 5 as round 3 but sk the st in the valleys.
Fasten off and weave in ends.
Round 6 and 7 are worked on the inner edge.
Round 6: Attach yarn with a sl knot to the sc on front of the bag which is next to the handle. Ch1, sc in same st, sc around, skipping centre stitch of the front valley, sl st to ch1
Round 7: ch1, sc in same st, sc around (you are now working on the opposite side of the starting ch for the handles), This time around, sc2tog in the valley.
Fasten off. Weave in ends.
Rep Row 6 and 7 on the opposite side of the bag (you are now working over the centre back and inside edges of the handle on that side).
Fasten off. Weave in ends.
Happy crocheting!
Copyright Notice
The pattern and photographs of this design are the property of Sharon Goodwin at Jera’s Jamboree. This pattern and design are subject to copyright and are for personal, non-commercial use only. You may not share, resell, alter or redistribute this pattern in part or in whole. You may, however, sell any finished items you make. If you would like to include this pattern in a roundup, you may take one photo and link back to this pattern.