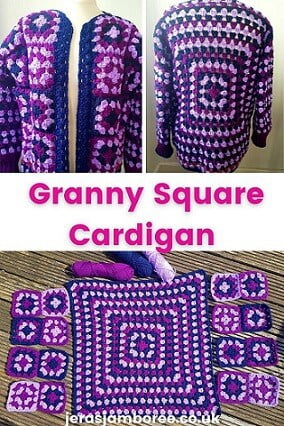
Using classic granny squares, this crochet cardigan is beginner-friendly and easy to customise to your own measurements.
My granny square cardigan design uses one large granny square for the back and smaller granny squares for the front, making it a relaxing project that works up quickly.
Once the squares are joined, the sleeves are crocheted in granny stitch and the cardigan is finished with a simple edging.
Whether you’re new to crocheting garments or looking for a comfortable layering piece, my free crochet pattern will guide you step-by-step so you can create a stylish handmade cardigan.
Sizing is made-to-measure using your chest measurements for the width. The length is entirely up to you!
Construction is the same for all sizes.
Jump to: Measurements | UK Terms Crochet Pattern | US Terms Crochet Pattern
Why You’ll Love My Granny Square Cardigan Pattern
- Beginner-friendly construction using classic granny squares
- Made-to-measure sizing for a comfortable fit
- Perfect project for using colours from your yarn stash
- Relaxing repeat that’s easy to pick up and crochet anytime
- A stylish cardigan you can wear year-round
Design Inspiration for the Stella Granny Square Cardigan
My mother-in-law (Stella) was coming to stay for a break and when we go out for retail therapy, she always buys a top or a cardigan.
I had her favourite colours in my stash, wanted a project I could pick up in short bursts of time and something that was quick and easy to make. Designing this crochet granny square cardigan pattern fitted the bill exactly 🙂
Skill Level
Easy
Measurements
My Stella granny square cardigan is made-to-measure.
Large granny square (back): Measure your chest circumference with a tape measure and divide by 2 (for the front and back). Add between 5 – 10cm for movement (known as positive ease).
Smaller granny squares (front): 2 columns of granny squares for each side (left and right) are needed so you need to divide your chest measurement by 4 (don’t forget to add positive ease!).
Sleeves: Measure the length of your sleeves by either using a favourite sweater or cardigan and using the same length or try on the sleeve as you crochet for the perfect fit.

Jera’s Jamboree receives payments for affiliate advertising. This is at no extra cost to you. As an Amazon Associate I earn from qualifying purchases. Please see my disclosure policy for more information.
Materials
- You can use any weight yarn – I used Aran/Worsted weight yarn;1 skein each of Big Twist in Lilac, Purple and Varsity Navy Blue (380 yards/ 347 meters / 170g) plus extra yarn from the Emu Classic Aran range that was in my stash (Lilac, Purple and Navy)
- 5mm crochet hook
- Stitch Markers
- Tape Measure
- Yarn needle
Yarn Choices
My original sample cardigan is crocheted using aran / worsted weight yarn, which creates a fabric that is warm, structured, and perfect for everyday wear. However, my granny square design is very adaptable and can be made with different yarn weights depending on the look and feel you want.
Using Aran or Worsted Weight Yarn
Aran (UK) or worsted (US) #4 weight yarn gives the cardigan a comfortable thickness and good structure. The granny squares hold their shape well, and the finished garment works nicely as a light outer layer for cooler days.
This yarn weight also makes the cardigan quick to crochet, which is ideal if you enjoy projects that work up relatively fast.
Using DK Weight Yarn
If you prefer a lighter cardigan, you can use DK #3 weight yarn instead.
Because DK yarn is thinner than aran, your finished cardigan will:
- Feel lighter and more breathable
- Have more drape
- Work well as a spring or summer layering piece
The granny squares will also come out smaller, so you may need to add extra rounds to the squares or additional squares to reach the same measurements.
Using Chunky or Bulky Yarn
Chunky or bulky yarn will create a cosy, statement cardigan with a thicker fabric.
With this yarn weight:
- The granny squares will be larger
- The cardigan will work up very quickly
- The finished garment will be warm and substantial
You may need fewer rounds per square or fewer squares overall to maintain the intended size.
How Different Yarn Weights Affect the Cardigan
If you’d like to customise your granny square cardigan crochet pattern, choosing a different yarn weight is an easy way to change the look and feel of the finished garment.
The yarn weight you choose will change how your cardigan looks, feels, and fits. Use the guide below to help you decide which yarn weight works best for your project.
| Yarn Weight | How your Cardigan Will Look | Fit & Fabric | Pattern Adjustments |
| DK (Light Worsted) | Lighter, softer look with more drape | Breathable and comfortable for spring or mild weather | Granny squares will be smaller, so you may need extra rounds or additional squares |
| Aran / Worsted (Recommended) | Classic granny square cardigan look | Balanced warmth and structure | Follow the pattern as written |
| Chunky / Bulky | Bold, cosy cardigan with larger stitches | Thick, warm fabric suitable for colder weather | Squares will be larger, so you may need fewer rounds or fewer squares |
Tips When Substituting Yarn
When using a different yarn weight, the most important thing to do is check your measurements as you go.
To ensure the cardigan fits comfortably:
- Crochet a test granny square first
- Measure it against the pattern measurements
- Adjust the number of rounds or squares if needed
Because this cardigan is constructed from granny squares, it’s easy to customise the size by adjusting the number of rounds or squares until you reach your desired fit.
Stitches and Abbreviations
dc = double crochet / US single crochet
tr = treble crochet / US double crochet
- blo = back loop only
- ch = chain
- rep = repeat
- sl st = slip stitch
- st/s = stitch/es
- sp = space
- ea = each
- tog = together
- sk = skip
- WS = wrong side
- RS = right side
- RHS = right hand side
Visit my stitch library for instructions and inspiration.
How My Cardigan Is Constructed
The large classic granny square for the back is worked first. The size is worked out using your chest circumference measurement.
How to determine the size of your granny square is in the Measurements section.
Smaller classic granny squares are crocheted next.
For the sample size of M/L and using Aran/Worsted (weight #4) I crocheted 16 squares of 4 rounds each for the front of the cardigan.

These granny squares are sewn together to form two columns. For the sample size of M/L, I needed 4 granny squares in each column lengthways to match the back.
Length is added to the cardigan by crocheting granny cluster stitches to the bottom making sure the front and the back match. This is where you get to choose the length. For a longer cardigan, just keep repeating the cluster rows at the hem until you reach your desired length.

The sleeves are crocheted separately and begin with a ribbed cuff. To match the granny squares, the sleeves are worked in rounds of granny cluster stitches. The sleeve is sewn into the armhole.

The edging for the front of the granny square cardigan is made by crocheting rows of slip stitches.
To assemble, the shoulders are seamed, making sure there is an opening of 20cm (10 cm either side of the middle of the back) for the neck opening. The sleeves are sewn in next followed by continuing to sew the side seam.

You can use any combination of colours or granny square motifs, making this cardigan unique to you (I think any of the flower squares in this roundup would look fab!).
Keeping your crafting costs down? Using your odds and ends from your stash will work well for this project.
If you enjoy working this project, there are other designs you will probably like in this roundup of free granny square cardigan patterns.
My Pattern Notes
- Chain 1 does not count as a stitch.
- Chain 2 counts as a treble crochet (US double crochet).
- Chain 4 counts as a treble and 1 chain.
- Granny squares start with a ch4 to begin and slip stitch into the first chain to join.
- Large granny square (back) and smaller granny squares (front) have chain 1 space between clusters.
- No chain spaces are used between clusters on the sleeves.
- Weave a length of yarn through the last stitch when crocheting the sleeves to guide you for where to work the last stitch of each round (the closing stitch isn’t worked into).
- Use a standing stitch to join new yarn colour: make a slip knot on your hook, insert into chain space, yarn over, double/treble crochet.
- Weaving in ends for each square before crocheting the next one is less overwhelming!
- When sewing in the sleeves, match the clusters.
- Read through the pattern before you start.
- Sample size is M/L

Granny Square Cardigan Instructions UK Crochet Terms
Back
Classic Granny Square
Round 1: ch4, 2 tr into 1st ch, *ch2, 3tr into same ch, *rep 2 more times, ch2, sl st to top of 1st tr to join.
Fasten off.
Round 2: join new colour into any corner sp with a standing st, [ch2, 2tr, ch2, 3tr], *ch1, [3tr, ch2, 3tr], * rep 2 more times, ch1, join with a slt st to top of tr.
Fasten off.
Round 3: join new colour in any corner sp with a standing st, [ch2, 2tr, ch3, 3tr], *ch1, 3tr in ch1-sp, [3tr, ch2, 3tr] into corner sp, *rep round, ch1, join with a sl st to top of tr.
Rep round 3 fastening off each colour and rejoining until you reach your chest measurement.
If you are making a cropped granny square cardigan, you won’t need to add any length.
If you are crocheting a longer cardigan, you will need to add rows of granny cluster stitches until you reach your desired length.
Final row: ch1, sl st in this st and ea st across.
Fasten off and weave in ends.
Front
Smaller granny squares.
Use the classic granny square pattern as for back.
For each granny square, continue until you reach the measurement of your chest divided by 4.
For this sample size M/L I crocheted 16 granny squares of four rounds each.
As for the back, stop here for a cropped cardigan. For a longer cardigan, continue as back until you match the length of the back.
Sleeve (make 2)
Cuff
Ch11
Row 1: dc 2nd ch from hook, dc blo to last st, dc in last st, turn
Row 2: ch1, dc in 1st st, dc blo to last st, dc in last st, turn
Row 3 – 24: rep row 2
Before moving on, wrap the cuff around your wrist to make sure it is comfortable.
Ch1, bring the bottom of the cuff to the top and double crochet both sides tog to join. This is the WS
DO NOT FASTEN OFF

Working in rounds
Round 1: ch1, pick up 36 dc evenly around cuff, sl st to join
Turn work inside out to continue working on the RS
Round 2: ch2, tr in same st, tr across, sl st to join
Granny stitch begins
Use the same colour you used for round 1 and 2
Round 3: ch3, 2 tr into same st, *sk 2 sts, 3 tr into next st, * rep round, join with a sl st. Fasten off this colour
Rejoin yarn between any granny cluster
Round 4: ch3, 2tr in same sp, *3 tr between each granny cluster, * rep round, join with a sl st
Rep round 4 changing colour to your desired length.
OPTIONAL: rejoin a different colour yarn to the cuff, ch1, sl st in this st and round. Fasten off.
Weave in ends.
How to assemble granny square cardigan
Front
Join the columns of granny squares for the left and right front either:
- Sl st squares together – for a patchwork effect, sew with WS facing inwards (the seam will show on the RS of the cardigan) or with RS facing inwards (no seams will show)
- Sewing squares together using whip stitch – work with the RS facing inwards
I assembled the granny squares by sewing two together and then each group of two going down the column.

Once joined together, place the granny square panels on top of the back and check the gap between the front and left isn’t too wide.
If it is too wide, rejoin yarn and work rows of granny stitch clusters. Keep in mind there is also a double crochet border. Make sure you work the rows on the edge that will be the centre (and not the side seam).
Shoulder seams
With RS facing inwards, find the centre of the back and place a stitch marker 10cm to the left and another stitch marker 10cm to the right for the neck opening.
Seam the front panels from the edge of the front towards the stitch marker in the middle for both right and left.
Sleeves and Side Seam
Pin the sleeves in place and matching the clusters, sew around the armhole beginning from underneath the armhole.
When you reach where you started, DO NOT FASTEN OFF. Continue sewing the side seam matching the clusters.
Fasten off and weave in ends.
Edging
Front and back of neck
Row 1: Rejoin colour of your choice to the neck opening on the RHS, ch1, dc evenly along the front right, along the back of the neck and the left front, turn
Row 2: ch1, sl st in the same st and ea st along. Fasten off and sew in ends.
Front Opening
Rejoin yarn at the bottom of the left opening, ch1, sl st in this st and ea st across. Fasten off and weave in ends.
Rep above for the right opening.
Granny Square Cardigan Instructions US Crochet Terms
Back
Classic Granny Square
Round 1: ch4, 2 dc into 1st ch, *ch2, 3dc into same ch, *rep 2 more times, ch2, sl st to top of 1st dc to join.
Fasten off.
Round 2: join new colour into any corner sp with a standing st, [ch2, 2dc, ch2, 3dc], *ch1, [3dc, ch2, 3dc], * rep 2 more times, ch1, join with a slt st to top of dc.
Fasten off.
Round 3: join new colour in any corner sp with a standing st, [ch2, 2dc, ch3, 3dc], *ch1, 3dc in ch1-sp, [3dc, ch2, 3dc] into corner sp, *rep round, ch1, join with a sl st to top of dc.
Rep round 3 fastening off each colour and rejoining until you reach your chest measurement.
If you are making a cropped granny square cardigan, you won’t need to add any length.
If you are crocheting a longer cardigan, you will need to add rows of granny cluster stitches until you reach your desired length.
Final row: ch1, sl st in this st and ea st across.
Fasten off and weave in ends.
Front
Smaller granny squares.
Use the classic granny square pattern as for back.
For each granny square, continue until you reach the measurement of your chest divided by 4.
For this sample size M/L I crocheted 16 granny squares of four rounds each.
As for the back, stop here for a cropped cardigan. For a longer cardigan, continue as back until you match the length of the back.
Sleeve (make 2)
Cuff
Ch11
Row 1: sc 2nd ch from hook, sc blo to last st, sc in last st, turn
Row 2: ch1, sc in 1st st, sc blo to last st, sc in last st, turn
Row 3 – 24: rep row 2
Before moving on, wrap the cuff around your wrist to make sure it is comfortable.
Ch1, bring the bottom of the cuff to the top and double crochet both sides tog to join. This is the WS
DO NOT FASTEN OFF
Working in rounds
Round 1: ch1, pick up 36 sc evenly around cuff, sl st to join
Turn work inside out to continue working on the RS
Round 2: ch2, dc in same st, dc across, sl st to join
Granny stitch begins
Use the same colour you used for round 1 and 2
Round 3: ch3, 2 dc into same st, *sk 2 sts, 3 dc into next st, * rep round, join with a sl st. Fasten off this colour
Rejoin yarn between any granny cluster
Round 4: ch3, 2dc in same sp, *3 dc between each granny cluster, * rep round, join with a sl st
Rep round 4 changing colour to your desired length.
OPTIONAL: rejoin a different colour yarn to the cuff, ch1, sl st in this st and round. Fasten off.
Weave in ends.
Assembly
Front
Join the columns of granny squares for the left and right front either:
- Sl st squares together – for a patchwork effect, sew with WS facing inwards (the seam will show on the RS of the cardigan) or with RS facing inwards (no seams will show)
- Sewing squares together using whip stitch – work with the RS facing inwards
I assembled the granny squares by sewing two together and then each group of two going down the column.
Once joined together, place the granny square panels on top of the back and check the gap between the front and left isn’t too wide.
If it is too wide, rejoin yarn and work rows of granny stitch clusters. Keep in mind there is also a double crochet border. Make sure you work the rows on the edge that will be the centre (and not the side seam).
Shoulder seams
With RS facing inwards, find the centre of the back and place a stitch marker 10cm to the left and another stitch marker 10cm to the right for the neck opening.
Seam the front panels from the edge of the front towards the stitch marker in the middle for both right and left.
Sleeves and Side Seam
Pin the sleeves in place and matching the clusters, sew around the armhole beginning from underneath the armhole.
When you reach where you started, DO NOT FASTEN OFF. Continue sewing the side seam matching the clusters.
Fasten off and weave in ends.
Edging
Front and back of neck
Row 1: Rejoin colour of your choice to the neck opening on the RHS, ch1, dc evenly along the front right, along the back of the neck and the left front, turn
Row 2: ch1, sl st in the same st and ea st along. Fasten off and sew in ends.
Front Opening
Rejoin yarn at the bottom of the left opening, ch1, sl st in this st and ea st across. Fasten off and weave in ends.
Rep above for the right opening.
Happy crocheting!
Copyright Notice
The pattern and photographs of this design are the property of Sharon Goodwin at Jera’s Jamboree. This pattern and design are subject to copyright and are for personal, non-commercial use only. You may not share, resell, alter or redistribute this pattern in part or in whole. You may, however, sell any finished items you make. If you would like to include this pattern in a roundup, you may take one photo and link back to this pattern.
If you crochet this granny square cardigan, I’d love to see your version!
You’re very welcome to share your progress, ask questions, or show off your finished project in the Jera’s Jamboree Crochet Community on Facebook.
Join the community here:
https://www.facebook.com/groups/jerasjamboreecrochetcommunity
Seeing your makes always makes my day!
