I was asked by someone in the café where I volunteer at a craft club if I had a lap blanket crochet pattern. I happened to be working on my Queen of Diamonds poncho at the time (it was over my legs as I was crocheting) and thought how great the design would look for a blanket! I knew I had yarn in my stash I could use, so it was a no-brainer to use the same technique to create a lap blanket!
This lap blanket is an easy project, doesn’t use much yarn and is suitable for lots of people of all different ages (think the elderly, children, travellers or for anyone who loves to snuggle in a cozy blanket). If you’re looking for a last-minute gift, this blanket would be perfect!
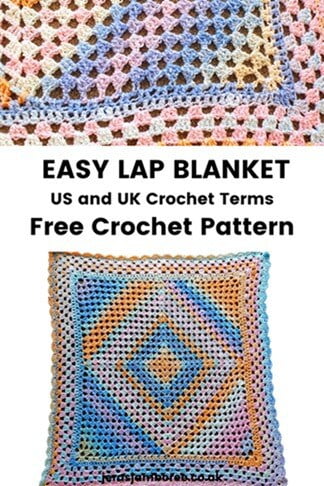
The free pattern is below in UK and US crochet terms.

How the lap blanket crochet pattern is worked
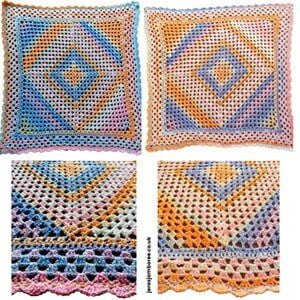
My latest blanket pattern begins with a granny square which is transformed into a diamond at the centre before continuing to be worked as a granny square. The scalloped border adds elegance as well as giving the lap blanket a professional finish.
Section 1 of the pattern is a classic granny square. I use chain 4 and slip stitch into the first chain to form a ring to work into (if you use a magic circle that is fine too).
Section 2 works on decreasing the sides of the granny square to change the shape to a diamond.
Section 3 works two rounds to set up before the granny square continues.

After trying several borders, I opted for scallops. I think it adds a fab finish to the blanket! A round of single crochet (US)/double crochet (UK) is worked first to set up ready to crochet the scallop border.
I wanted to add here that if you would like to make yours bigger than a lap blanket, continue with round 6 of section 3 until you reach your desired size and then work the border.
I’ve named the pattern ‘Princess of Diamonds’ – it seemed appropriate as it was inspired by my Queen of Diamonds poncho!
I’ve used the same technique in my Countess of Diamonds shrug pattern which gives the garment a unique twist.
Jera’s Jamboree receives payments for affiliate advertising. This is at no extra cost to you. As an Amazon Associate I earn from qualifying purchases. Please see my disclosure policy for more information.
Yarn Options
I used Woolcraft’s Cotton Candy yarn for this lap blanket – the same yarn I used for my poncho pattern.
I bought this yarn in the two colourways when it was on sale quite a while ago and was fed up seeing it sitting there in my stash! If you can still get hold of it, it is great value for money. It’s so soft and perfect for blankets and wearables (anything that is going to be next to your skin). It washes up well too!
A lightweight chunky yarn, I felt it worked up similarly to Aran/Worsted weight. If you’re substituting the yarn, crocheting your swatch will help you decide on yarn and hook size. Having said that, gauge is not critical for this project but maintaining your tension is.
You only need 920yds/840m for this project which you might already have in your stash.

Pattern Notes
- Chain 3 counts as a stitch
- Chain 4 counts as a stitch
- Rounds are joined with a slip stitch to the top of the turning chain and then slip stitch to the corner space
- Section 1 classic granny square is worked in rounds
- Section 2 corners are worked in decreasing rows. After the first corner, rejoin yarn for each of the remaining 3 sides with wrong side facing in any chain 2 space
- Section 3 first two rounds are to set up for the granny square. Rejoin yarn on the right side in any corner. Don’t forget to work chain 1 before and after corner spaces.
- Section 3 first round – you will be working into the chain spaces as well as the corner spaces from section 2. The image below shows the chain spaces and previous corner spaces. Checking each side stitch counts in round 1 will ensure you have equal sides.

- Scallop border is worked in rounds. Rejoin yarn in any corner space
- Weave in ends as you go

Skill Level
Easy
Materials
- 6mm /J-10 Crochet Hook
- 920yds/840m /300g Woolcraft Lightweight Chunky Yarn
- Scissors
- Yarn needle
Stitches and Abbreviations
| UK Crochet Terms | US Crochet Terms |
| Double Crochet (dc) | Single Crochet (sc) |
| Treble Crochet (tr) | Double Crochet (dc) |
| Double Treble Crochet (dtr) | Treble Crochet (tr) |
- Chain (ch)
- Slip Stitch (sl st)
- Space/s (sp/s)
- Repeat (rep)
- Skip (sk)
- Yarn Round Hook (yrh)
- Right Side (RS)
- Wrong Side (WS)
- Opposite (opp)

Measurements
Approximately 80cm X 80cm (including border)
Gauge
7 rounds = 10cm X 10cm
Gauge is not critical for this project
Instructions Granny Square Lap Blanket Crochet Pattern – UK Terms
Section 1 – classic granny square worked in rounds
Ch4, join with a sl st to 1st ch to form a ring
Round 1: ch3, 2tr, ch2, * 3tr, ch2, * rep 2 more times, sl st to top of ch3, sl st to corner sp, ch3
Round 2: [2tr, ch2, 3tr] in corner sp, *ch1, [3tr, ch2, 3tr] in corner sp, * rep around, ch1, sl st to top of ch3, sl st to corner sp, ch3
Round 3: [2tr, ch2, 3tr] in corner sp, *ch1, 3tr in ch1-sp, ch1, [3tr, ch2, 3tr] in corner sp, * rep to last corner sp, ch1, 3tr in ch1-sp, ch1, sl st to top of ch3, sl st to corner sp, ch3
Round 4: [2tr, ch2, 3tr] in corner sp, *ch1, 3tr in ch1-sp, ch1, 3tr in ch1-sp, ch1, [3tr, ch3, 3tr] in corner sp, * rep to last corner sp, ch1, 3tr in ch1-sp, sl st to top of ch3, sl st to corner sp, ch3
Round 5: rep round 4 working [3tr, ch2, 3tr] in corner sps, ch1 before and after corner sps, 3tr in ea ch1-sp, ch1 before and after each 3tr
Round 6 – 13: rep round 4
Round 14: rep round 4, ch4, turn
Do not fasten off
Section 2 – working the corners in decreasing rows
Row 1: sk 3 tr of corner sp, [3tr, ch1] in ea ch1-sp to final ch1-sp, 3tr in final ch1-sp, dtr in ch2-sp of corner, ch4, turn
Row 2: sk 3 tr, [3tr, ch1] in ea ch1-sp to final ch1-sp, 3tr in final ch1-sp, dtr in final st, ch4, turn
Rows 3 – 12 : rep row 2
Row 13: yrh, insert hook in ch1-sp, yrh, pull up a loop, yrh, pull through 2 loops, yrh twice, insert hook in final dtr, yrh, pull up a loop, yrh, pull through 2 loops twice, yrh, pull through all loops on hook
Fasten off
Rep for the remaining 3 sides, rejoining yarn with WS facing in any ch2-sp
Section 3 – continuing to work the granny square in rounds
Rejoin yarn on the RS in any corner
Round 1: ch3, [2tr, ch2, 3tr] in corner, ch1, *2tr in ea ch4-sp, 1tr between 3tr from section 2 corner sp, ch1, [3tr, ch2, 3tr] in corner, ch1, *rep around, join with sl st to top of ch3, sl st to corner sp, ch3
Round 2: [2tr, ch2, 3tr] in corner sp, *tr in ea tr and ch1-sp to corner sp, [3tr, ch2, 3tr] in corner sp, *rep around, join with sl st to top of ch3, sl st to corner sp, ch3
Round 3: [2tr, ch2, 3tr] in corner sp, *[ch1, sk 2 sts, 3tr in next st, ch1] to corner sp, [3tr, ch2, 3tr] in corner sp, rep around, ch1, sl st to top of ch3, sl st to corner sp, ch3
Round 4: [2tr, ch3, 3tr] in corner sp, *ch1, 3tr in ch1-sps to corner sp, ch1, [3tr, ch2, 3tr] in corner sp, rep around, ch1, join with sl st to top of ch3, sl st to corner sp
Round 5 and 6: rep round 4
Do not fasten off
Border
Row 1: [3dc, ch2, 3dc] in corner sp, dc in ea tr to corner sp, sk ch1-sps, *rep around, join with sl st to first dc, sl st to corner sp, ch1
Row 2: dc in ch2-sp, *sk 1 st, 5tr in next st, sk 1 st, dc in next st, * rep around, sl st to ch1.
Fasten off
Make sure all ends weaved in.

Instructions Granny Square Lap Blanket Crochet Pattern – US Terms
Section 1 – classic granny square worked in rounds
Ch4, join with a sl st to 1st ch to form a ring
Round 1: ch3, 2dc, ch2, * 3dc, ch2, * rep 2 more times, sl st to top of ch3, sl st to corner sp, ch3
Round 2: [2dc, ch2, 3dc] in corner sp, *ch1, [3dc, ch2, 3dc] in corner sp, * rep around, ch1, sl st to top of ch3, sl st to corner sp, ch3
Round 3: [2dc, ch2, 3dc] in corner sp, *ch1, 3dc in ch1-sp, ch1, [3dc, ch2, 3dc] in corner sp, * rep to last corner sp, ch1, 3dc in ch1-sp, ch1, sl st to top of ch3, sl st to corner sp, ch3
Round 4: [2dc, ch2, 3dc] in corner sp, *ch1, 3dc in ch1-sp, ch1, 3dc in ch1-sp, ch1, [3dc, ch3, 3dc] in corner sp, * rep to last corner sp, ch1, 3dc in ch1-sp, sl st to top of ch3, sl st to corner sp, ch3
Round 5: rep round 4 working [3dc, ch2, 3dc] in corner sps, ch1 before and after corner sps, 3dc in ea ch1-sp, ch1 before and after each 3dc
Round 6 – 13: rep round 4
Round 14: rep round 4, ch4, turn
Do not fasten off
Section 2 – working the corners in decreasing rows
Row 1: sk 3 dc of corner sp, [3dc, ch1] in ea ch1-sp to final ch1-sp, 3dc in final ch1-sp, tr in ch2-sp of corner, ch4, turn
Row 2: sk 3 dc, [3dc, ch1] in ea ch1-sp to final ch1-sp, 3dc in final ch1-sp, tr in final st, ch4, turn
Rows 3 – 12 : rep row 2
Row 13: yrh, insert hook in ch1-sp, yrh, pull up a loop, yrh, pull through 2 loops, yrh twice, insert hook in final tr, yrh, pull up a loop, yrh, pull through 2 loops twice, yrh, pull through all loops on hook
Fasten off
Rep for the remaining 3 sides, rejoining yarn with WS facing in any ch2-sp
Section 3 – continuing to work the granny square in rounds
Working on RS, rejoin yarn to any corner
Round 1: ch3, [2dc, ch2, 3dc] in corner, ch1, *2dc in ea ch4-sp, 1dc between 3dc from section 2 corner sp, ch1, [3dc, ch2, 3dc] in corner, ch1, *rep around, join with sl st to top of ch3, sl st to corner sp, ch3
Round 2: [2dc, ch2, 3dc] in corner sp, *dc in ea dc and ch1-sp to corner sp, [3dc, ch2, 3dc] in corner sp, *rep around, join with sl st to top of ch3, sl st to corner sp, ch3
Round 3: [2dc, ch2, 3dc] in corner sp, *[ch1, sk 2 sts, 3dc in next st, ch1] to corner sp, [3dc, ch2, 3dc] in corner sp, * rep around, ch1, sl st to top of ch3, sl st to corner sp, ch3
Round 4: [2dc, ch3, 3dc] in corner sp, ch1, *[3dc in ch1-sps to corner sp, ch1], [3dc, ch2, 3dc] in corner sp, * rep around, ch1, join with sl st to top of ch3, sl st to corner sp
Round 5 and 6: rep round 4
Do not fasten off
Border
Row 1: [3sc, ch2, 3sc] in corner sp, sc in ea dc to corner sp, sk ch1-sps, *rep around, join with sl st to first sc, sl st to corner sp, ch1
Row 2: sc in ch2-sp, *sk 1 st, 5dc in next st, sk 1 st, sc in next st, * rep around, sl st to ch1.
Fasten off
Make sure all ends weaved in.
Happy crocheting 🙂
Copyright Notice
The pattern and photographs of this design are the property of Sharon Goodwin at Jera’s Jamboree. This pattern and design are subject to copyright and are for personal, non-commercial use only. You may not share, resell, alter or redistribute this pattern in part or in whole. You may, however, sell any finished items you make. If you would like to include this pattern in a roundup, you may take one photo and link back to this pattern.