Looking for a fun and stylish crochet project? My Raspberry Ripple hat is a fabulous way to add a pop of colour to your wardrobe while keeping cool in the sun.
In this post, you’ll find everything you need to crochet your own including materials, how the pattern is worked and step-by-step instructions written in US crochet terms.
Alternatively, you can upgrade to the PDF version (ad free) in my Etsy and Ravelry stores.

Jera’s Jamboree receives payments for affiliate advertising. This is at no extra cost to you. As an Amazon Associate I earn from qualifying purchases. Please see my disclosure policy for more information.
My free granny square bucket hat pattern is beginner-friendly and a great way to play with colour combinations. You probably have the yarn you need in your stash keeping you well within budget for your crafting costs.
With only four granny squares, a crown and a brim, this easy bucket hat is also a really quick project! It should only take about 4 hours before you’ll be wearing yours.
If you need help, reach out for support in the Facebook group. We’d love to see your finished project too!

- Why you'll Love to Crochet my Bucket Hat
- Skill Level
- Supplies and Materials
- Gauge
- Glossary
- Abbreviations
- Measurements
- How the Granny Square Bucket Hat Pattern is Worked
- Pattern Notes
- Related Granny Square Patterns
- Testimonials
- Purchase the easy-to-read print-friendly PDF (ad free)
- Bucket Hat Instructions US Crochet Terms
- Save to Pinterest
- Copyright Notice
- Bookmark this Content to Save for Later
Why you’ll Love to Crochet my Bucket Hat
Looking for a bucket hat pattern without granny squares? I have an easy crochet bucket hat too!

Skill Level
You will need to be able to:
- work in rounds
- increase by working two stitches into the same space
- work single crochet (sc)
- work double crochet (dc)
- work a bobble stitch (3-bob / 4-bob)
Supplies and Materials
- DK cotton : 50g Yarn A (white); 50g Yarn B (lighter pink); 50g Yarn C (dark pink)
- 4mm crochet hook
- Tape measure
- Scissors
- Yarn needle
Yarn Choices
I’m wearing my bucket hat during the summer months so needed to use a yarn that would keep my head cool.
I used DROPS Muskat which is made from 100% Egyptian mercerized cotton. It is spun from multiple thin strands making it extremely strong, durable and perfect for wearables! The leftover yarn I had from this project I used on my Maisie poncho.
I’ve enjoyed working with this yarn.
- Content: 100% Cotton
- Weight/length: 50 g = approx 100 m
- Care: Machine wash on gentle cycle 40°C / Dry Flat
- Made in: EU
- Raw material origin: Egypt
This yarn has an Oeko-Tex® certification (certificate number 951032), Standard 100, Class I. This means that it has been tested and found completely free from harmful chemicals and that it is safe for human use. Class I is the highest level, and it means the yarn is suitable for babies (ages 0-3)
I’ve crocheted my brim in stripes using the three colours of my flower granny squares but you could also crochet in one colour.
You can substitute any DK yarn but I would recommend cotton if you’re planning on wearing your hat during the warmer months.
Gauge
13 double crochet stitches and 8 rows with a 5mm hook = 4” / 10cm
Don’t worry if your gauge is different to mine, use my stitch gauge converter to adjust your stitches.
Glossary
Stitches
Special stitches for the flower granny square:
3-Bobble Stitch (3-bob): yarn over, insert hook into stitch, pull up a loop, yarn over, draw through 2 loops on hook, [yarn over, insert hook into same stitch, pull up a loop, yarn over, draw through 2 loops on hook] 2 times more (4 loops on hook), yarn over and draw through all 3 loops.
4-Bobble Stitch (4-bob): yarn over, insert hook into stitch, pull up a loop, yarn over, draw through 2 loops on hook, [yarn over, insert hook into same stitch, pull up a loop, yarn over, draw through 2 loops on hook] 3 times more (5 loops on hook), yarn over and draw through all 5 loops.
- Single Crochet (sc)
- Double Crochet (dc)
Abbreviations
- ch = chain
- dc = double crochet / US single crochet
- tr = treble crochet / US double crochet
- sl st = slip stitch
- yo = yarn over
- st = stitch
- lp/s = loops
- beg = beginning
- sp = space
- blo = back loop only (work into the back loop of the stitch)
Measurements
One size to fit head circumference 21” / 53.5cm
How the Granny Square Bucket Hat Pattern is Worked
My easy crochet bucket hat is made from 100% cotton and suitable for wearing all year (substituting a wool blend will keep you cosy during the colder months).
- The pattern is worked in rounds for the granny squares, crown and brim.
- Four granny squares using three colours are crocheted first. The granny squares are then joined to each other to form a strip as in the image below.

Next, the crown is crocheted using single crochet in rounds.

- The crown is pinned to the granny square strip and joined using single crochet.


- The strip is joined as a circle once it has been sewn on to the crown.
- Finally, the brim is crocheted in single crochet. The yarn is re-joined to the bottom edge of the strips and stitches picked up evenly. 4 rows of increases are worked to obtain the flop/wave of the brim. Increases for the brim are made by crocheting 2 stitches in the same space.

Pattern Notes
- This pattern is written in US Crochet Terms.
- Chain 1 does not count as a stitch.
- Chain 3 counts as a double crochet.
- Colours are written like this Yarn A (white); Yarn B (lighter pink); Yarn C (dark pink)
- Colour changes take place on the last pull through before the new round of colour begins
- If you would like to follow my colour scheme: Square 1 and 2 – round 1 and 2 in Yarn A, Round 3 in Yarn B, Round 4 and 5 in Yarn C; Square 3 and 4 – round 1 and 2 in Yarn B, Round 3 in Yarn A, Round 4 and 5 in Yarn C
- Whichever colour scheme you choose, use a light colour for the crown in the warmer months (you want the sun to be reflected) and a darker colour in the colder months (to absorb the heat from the sun).
- I’ve joined the crown to the granny squares using single crochet but you could also whip stitch/slip stitch.
- To obtain a patchwork effect with single crochet, join the squares with a lighter colour and with right side facing outwards. Make sure you crochet through both loops.
- Weave in ends as you go.
- Use ‘how the pattern is worked’ alongside these pattern notes and the instructions will help you to be successful in finishing your bucket hat.
Related Granny Square Patterns
- Free Modern Granny Square Cardigan Patterns
- Granny Square Projects and Patterns
- Granny Square Poncho Victoria
- Granny Square Scarf
- Granny Square Cardigan Stella
- Granny Square Lap Blanket
- Queen of Diamonds Poncho
Testimonials
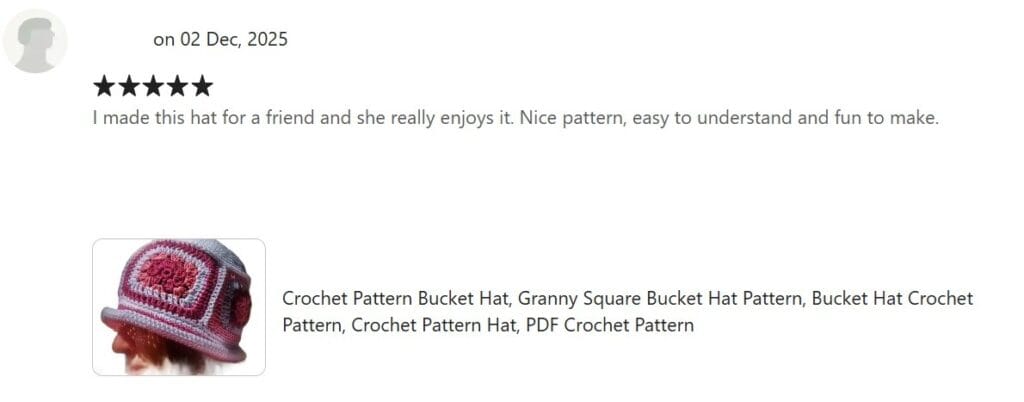
5 star Etsy review 2nd December 2025: “I made this hat for a friend and she really enjoys it. Nice pattern, easy to understand and fun to make.”

5 stars – “The item met my expectations” Source: Etsy 21st October 2023

4 stars “Nice pattern for hat ok” Source: Etsy 9th September 2023

5 stars “I love this cute pattern. So many color variations to make with this. Pattern seems simple to follow and will be a quick work up.” Source: Etsy 21st June 2023

5 stars “I enjoyed making this, easy to follow and a fun way to use up some of Nanny’s stash!” Source: Etsy 1st April 2023.
Purchase the easy-to-read print-friendly PDF (ad free)
The PDF of this bucket hat pattern includes everything you need:
- how to work the stitches
- how the pattern is worked
- pattern notes
- clear written instructions
Hooked on Sunshine Blog Hop March 23rd to 29th 2025
Bucket Hat Instructions US Crochet Terms
Flower granny square (make 4)
See pattern notes for colour scheme.
Using colour A, B or C, ch4, join with sl st to first ch to form a ring
Round 1: (RS) ch1, 8sc into ring, join with sl st to first sc (8dc)
Round 2: ch3, [yo, insert hook into same st as ch3, pull up a lp, yo, draw through 2 lps on hook] 3 times (4 lps on hook), yo, draw through all 4 lps, ch2: [4-bob in next sc, ch2] around, join with a sl st to 3rd ch of beg ch3. Fasten off and weave in ends (8 x 4-bob, 8 x ch2-sp)
Round 3: Join Yarn A, B or C with a sl st to any first ch2-sp, ch3, 2dc in same sp, ch1, (3-bob, ch3, 3-bob) in next ch2-sp, ch1, *3dc in next ch2-sp, ch1, (3-bob, ch3, 3-bob) in next ch2-sp, ch1 *rep around, join with sl st to first dc. Fasten off and weave in ends (12 dc, 8 x 3-bob, 8 x ch1-sp, 4 x ch3-sp)
Round 4: Join Yarn A, B or C with a sl st to any corner sp, ch3, dc, ch1, 2dc in corner sp, *dc to next corner sp, 2dc, ch1, 2dc in corner sp * rep around, join with a sl st to first dc (46dc, 4 x ch1-sp)
Round 5: rep round 4
Fasten off and sew in ends
Crown
With Yarn C
Ch4, sl st in first chain to make a ring
Round 1: 6sc into magic ring
Round 2: (2sc into next sc) 6 times (12 sts)
Round 3: (1sc into each of next sc, 2sc in next sc) 6 times (18 sts)
Round 4: (1sc into each of next 2sc, 2sc into next sc) 6 times (24sts)
Round 5: (1sc into each of next 3sc, 2sc into next sc) 6 times (30 sts)
Round 6: (1sc into each of next 4sc, 2sc into next sc) 6 times (36sts)
Round 7: (1sc into each of next 5sc, 2sc into next sc) 6 times (42sts)
Round 8: (1sc into each of next 6sc, 2sc into next sc) 6 times (48 sts)
Round 9: (1sc into each of next 7sc, 2sc into next sc) 6 times (52 sts)
Round 10: (1sc into each of next 8sc, 2sc into next sc) 6 times (60sts)
Round 11: (1sc into each of next 9sc, 2sc into next sc) 6 times (66st)
Round 12: (1sc into each of next 10sc, 2sc into next sc) 6 times (72 sts)
Round 13: (1sc into each of next 11sc, 2sc into next sc) 6 times (78 sts)
Round 14: (1sc into each of next 12sc, 2sc into next sc) 6 times (84 sts)
Round 15: (1sc into each of next 13sc, 2sc into next sc) 6 times (90 sts)
Round 16: (1sc into each of next 14sc, 2sc into next sc) 6 times (96sts)
Round 17: 1sc into each sc
Do not fasten off
Joining the squares to the crown
Pin the joined granny squares evenly around the crown and using the yarn from the crown, join, either with sc or sl st.
Join the final granny square seam.
Brim
With RS facing outwards and Yarn C join with a sl st to any granny square st.
Round 1: 1sc into each st evenly around
Round 2: 1sc blo into each st
Round 3: *[1sc into each of next 5sc, 2sc into next dc] * rep around
Change to Yarn B
Round 4: 1sc into each dc
Round 5: *[1sc into each of next 9sc, 2sc into next sc] * rep around
Round 6: 1sc into each sc
Change to Yarn A
Round 7: 1sc into each sc
Round 8: *[1sc into each of next 5sc, 2sc into next sc] *rep around
Round 9: 1sc into each sc
Change to Yarn C
Round 10: *[1sc into each of next 11sc, 2sc into next sc] * rep around
Round 11 and 12: 1sc into each sc
Ss into next sc, fasten off. Weave in ends
Congratulations! Your bucket hat is finished and ready to wear
Copyright Notice
The pattern and photographs of this design are the property of Sharon Goodwin at Jera’s Jamboree. This pattern and design are subject to copyright and are for personal, non-commercial use only. You may not share, resell, alter or redistribute this pattern in part or in whole. You may, however, sell any finished items you make. If you would like to include this pattern in a roundup, you may take one photo and link back to this pattern.
Save to Pinterest
No time now? Save the pin below to your favourite board to come back later.

Bookmark this Content to Save for Later
To bookmark this content using the Grow.me app on Jera’s Jamboree, all you need to do is click the blue heart on the right-hand side of the screen and the Grow.me app will pop up.
If you don’t have a Grow account you will need to enter your email and create a password.
Once you’ve created an account, every time you want to bookmark content on my blog (or any others that use Grow), simply login to your Grow account.
If you forget your password, click the “forgot password” link and follow the prompts. Please note that I’m unable to assist with resetting Grow passwords or accessing your Grow account, so be sure to save your login information in a safe place.
With your Grow account you can:
- Share and bookmark posts.
- Subscribe to Jera’s Jamboree email crochet newsletter.
- Unlock content available only to subscribers.