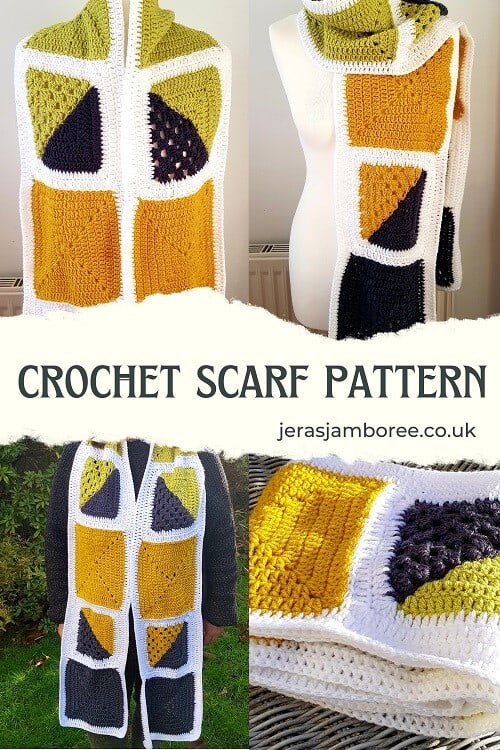
This easy crochet scarf pattern consists of granny squares and granny triangles that form geometric shapes and give an eye-catching design.
I’ve mixed up solid granny squares with solid and classic triangles to give this retro technique a modern spin.
Adding in a pop of colour gives even more interest!
Using the yarn you already have in your stash makes this scarf a low cost project.
This crochet scarf would make a quick and easy gift for either men or women. Choosing colours to suit your recipient will add that much-loved personalisation to your homemade gift.
Jera’s Jamboree receives payments for affiliate advertising. This is at no extra cost to you. As an Amazon Associate I earn from qualifying purchases. Please see my disclosure policy for more information.

Instructions are available in UK crochet terms and US crochet terms.
- Design Inspiration
- Related Granny Square Patterns
- How the pattern is worked
- Yarn Choices
- Pattern Notes
- Level
- Materials
- Stitches and Abbreviations
- Measurements
- Tension/Gauge
- Related Crochet Scarf Patterns:
- Arabella Scarf Instructions UK Crochet Terms
- Arabella Scarf Instructions US Crochet Terms
- Join the Facebook Community
- Copyright Notice
- Bookmark this Content to Save for Later
Join the Facebook Community
Join us to share your projects, discover new patterns, swap tips and tricks, and connect with a warm, welcoming community that loves all things crochet!
What You’ll Find:
- Inspiring patterns and tutorials
- Themed posts
- A supportive space to ask questions and share your progress
- Friendly chats with fellow yarn lovers
Join Our Crochet Facebook Group Now!
Don’t forget to answer the questions and accept the group rules.
Design Inspiration
This design came together by chance … I wanted to use my yarn stash and crochet something I didn’t have to think about. I didn’t have enough time to get into a bigger project.
And as the larger squares and smaller triangles were in an untidy pile on the sofa next to me, I knew they would look great together in a sequence.

Sometimes you just need to just step back for inspiration to come don’t you!
This easy crochet scarf pattern uses treble crochet (US double crochet).
Related Granny Square Patterns
- Free Modern Granny Square Cardigan Patterns
- Granny Square Projects and Patterns
- Granny Square Poncho Victoria
- Granny Square Scarf
- Granny Square Cardigan Stella
- Granny Square Bucket Hat
- Granny Square Lap Blanket
- Queen of Diamonds Poncho
How the pattern is worked
This crochet scarf pattern is worked in 6 solid granny squares, 4 solid triangles/half granny squares and 4 classic triangles/half granny squares.
Two different colours of the granny triangles are joined together to make a square. Two further rounds of white are crocheted (to make them the same size as the solid granny squares).

Once all the squares are joined together, I have added a simple border of 2 rows of treble crochet in white to give a professional finish.
You will need:
6 solid granny squares of 7 rounds each in 3 different colours. If you want to follow my colour sequence you will need:
- Mustard x 2
- Lime Green x 2
- Navy Blue x 2
4 solid triangles/half granny squares of 5 rounds each in the following colours:
- Mustard x 1
- Lime Green x 1
- Navy Blue x 2
4 classic triangles/half granny squares of 5 rounds each in the following colours:
- Mustard x 1
- Lime Green x 1
- Navy Blue x 2

Yarn Choices
I’ve used DK yarn from my stash so it’s a mixture of different brands. I used my Wraps Per Inch tool to make sure my tension and gauge would be constant. This is such a fab tool (and reasonably priced too) if you have odds and ends leftover from projects that don’t have ball bands.
If you enjoy working with granny squares, have a browse of these granny square projects and patterns
Pattern Notes
- A 4.5mm hook is used for all granny squares and granny triangles.
- A 3.5mm hook is used for the border.
- Granny squares and granny triangles start with a magic circle. You can use chains and work into the first chain if you prefer.
- Chain 3 counts as a stitch.
- Chain 4 counts as a treble and chain 1 space.
- Granny squares are worked in rounds. Turning your work at the end of each round will keep your squares straight (this is optional).
- Granny triangles are worked in rows and you must turn your work to start a new row.
- Weaving in ends as you go makes it easier than leaving them all to do at the end.
- Blocking your squares will ensure they’re all the same size (especially if you’re using different brands).
- If you’re not following my colours and placement, lay your squares/triangles out on a flat surface and play around until you’re happy with how they look. Take a photo on your phone and use it to remind you when you’re joining the squares together.
- Join the squares using the method you prefer.
- Follow the sequence chart for joining the two triangles together and placement of the different colour granny squares:

Level
Easy

Materials
- DK – small amounts in 4 different colours
- 4.5mm crochet hook
- 3.5mm crochet hook (border)
- Scissors
- Yarn needle
Stitches and Abbreviations
- MC = Magic Circle
- Ch/s = chain/s
- Tr = treble crochet
- Sl st = slip stitch
- Ch-sp/s = chain space/s
- Ea = each
- Rep = repeat
- Prev = previous
- RS = right side
Measurements
23cm/9” (W) X 104cm/41” (L)
Tension/Gauge
Tension/Gauge is not critical for this project as blocking will ensure all squares are the same size.

Related Crochet Scarf Patterns:
Looking for more one skein projects? You might also like these patterns:
- 30+ Free and Easy Crochet Scarf Patterns
- 17+ Free Infinity Scarf Crochet Patterns
- 15+ Free and Easy Lightweight and Lacy Crochet Scarf Patterns
- Ombre Crochet Infinity Scarf
- Granny Square Scarf
- Lacy Scarf
- Zig Zag Scarf
- Mosaic Crochet Scarf
- Bobble Stitch Scarf
- Celtic Weave Scarf
Arabella Scarf Instructions UK Crochet Terms
Solid Granny Squares (make 6 – 2 x Mustard, 2 x Lime Green, 2 x Navy Blue)
Ch4, sl st to first ch to make a ring and work into the ring as follows:
Round 1: ch3, 2tr, [ch2, 3tr] 3 times, ch2, join with a sl st in top of ch3 (12 sts and 4 ch-sps)
Round 2: ch3, 1 tr in ea of next 2 sts, [2tr, ch2, 2tr] in next ch-sp, *1tr in ea of next 3 sts, [2tr, ch2, 2tr] in next ch-sp, rep from * twice more, join with a sl st to top of ch3 (28 sts and 4 ch-sps)
Round 3 – 7: rep round 2 working tr into sts before ch-sp, [2tr, ch2, 2tr] into each ch-sp
Fasten off and weave in ends.
Best gifts for crocheters? Get inspired with my gift guide
Classic Triangles/Half Granny Squares (make 4 – 1 x Mustard, 1 x Lime Green, 2 x Navy Blue)
Ch4, sl st to first ch to form ring and work into the ring as follows:
Row 1: ch4 (counts as a tr and ch-1 sp), 3tr, ch2, 3tr, ch1, tr, turn
Row 2: ch4, working into the first ch1-sp, [tr3], ch1, in the next ch2-sp [tr3, ch2, tr3], ch1, [tr3] in the last ch1-sp, ch1 and tr in the last ch1-sp (from ch4 of prev row), turn
Row 3: ch4, [tr3, ch1] in ea ch1-sp on the first side, [tr3, ch2, tr3] in the ch2-sp at the tip of the triangle, [ch1, tr3] in ea ch1-sp on the second side, ch1, 1tr in last ch1-sp (from ch4 of prev row).
Row 4 and 5: rep round 3
Fasten off and weave in ends.
Solid Granny Triangle (make 4 – 1 x Mustard, 1 x Lime Green, 2 X Navy Blue)
Ch4, sl st to first ch to form a ring and work into the ring as follows:
Row 1: ch3, 6tr into ring, turn
Tighten MC
Row 2: ch3, 2tr into same st as ch3, 5tr into next st (creates corner of triangle), 1 tr in ea of next 2 sts, 3tr into last st, turn
Row 3: ch3, 2tr into same st as ch3, 1tr into next 6 sts, 5tr into next st (corner of triangle), 1tr into ea of the next 6 sts, 3tr into last st, turn
Row 4 and 5: rep round 3
Fasten off and weave in ends.
Joining and enlarging the solid and classic granny triangles
Join the solid and classic granny triangles together to make squares following the colour matches in the Pattern Notes.
Re-join yarn (white) and complete 2 rounds of Round 2 from the Solid Granny Squares instructions.
Fasten off and weave in ends.
Assembly
Join granny squares together (using whichever method you prefer) following the sequence in the Pattern Notes.
Scarf Border
Change to 3.5mm crochet hook.
With RS facing, re-join yarn to any tr.
Round 1: ch3, tr in each tr, in ea corner sp tr5
Round2: rep round 1.
Fasten off and weave in ends.
Arabella Scarf Instructions US Crochet Terms
Solid Granny Squares (make 6 – 2 x Mustard, 2 x Lime Green, 2 x Navy Blue)
Ch4, sl st to first ch to make a ring and work into the ring as follows:
Round 1: ch3, 2dc, [ch2, 3dc] 3 times, ch2, join with a sl st in top of ch3 (12 sts and 4 ch-sps)
Round 2: ch3, 1 dc in ea of next 2 sts, [2dc, ch2, 2dc] in next ch-sp, *1dc in ea of next 3 sts, [2dc, ch2, 2dc] in next ch-sp, rep from * twice more, join with a sl st to top of ch3 (28 sts and 4 ch-sps)
Round 3 – 7: rep round 2 working dc into sts before ch-sp, [2dc, ch2, 2dc] into each ch-sp
Fasten off and weave in ends.
Best gifts for crocheters? Get inspired with my gift guide
Classic Triangles/Half Granny Squares (make 4 – 1 x Mustard, 1 x Lime Green, 2 x Navy Blue)
Ch4, sl st to first ch to make a ring and work into the ring as follows:
Row 1: ch4 (counts as dc and ch-1 sp), 3dc, ch2, 3dc, ch1, dc, turn
Row 2: ch4, working into the first ch1-sp, [dc3], ch1, in the next ch2-sp [dc3, ch2, dc3], ch1, [dc3] in the last ch1-sp, ch1 and dc in the last ch1-sp (from ch4 of prev row), turn
Row 3: ch4, [dc3, ch1] in ea ch1-sp on the first side, [dc3, ch2, dc3] in the ch2-sp at the tip of the triangle, [ch1,dcr3] in ea ch1-sp on the second side, ch1, 1dc in last ch1-sp (from ch4 of prev row).
Row 4 and 5: rep round 3
Fasten off and weave in ends.
Solid Granny Triangle (make 4 – 1 x Mustard, 1 x Lime Green, 2 X Navy Blue)
Ch4, sl st to first ch to form a ring and work into the ring as follows:
Row 1: ch3, 6dc into ring, turn
Row 2: ch3, 2dc into same st as ch3, 5dc into next st (creates corner of triangle), 1 dc in ea of next 2 sts, 3dc into last st, turn
Row 3: ch3, 2dc into same st as ch3, 1dc into next 6 sts, 5dc into next st (corner of triangle), 1dc into ea of the next 6 sts, 3dc into last st, turn
Row 4 and 5: rep round 3
Fasten off and weave in ends.
Joining and enlarging the solid and classic granny triangles
Join the solid and classic granny triangles together to make squares following the colour matches in the Pattern Notes.
Re-join yarn (white) and complete 2 rounds of Round 2 from the Solid Granny Squares instructions.
Fasten off and weave in ends.
Assembly
Join granny squares together (using whichever method you prefer) following the sequence in the Pattern Notes.
Scarf Border
Change to 3.5mm crochet hook.
With RS facing, re-join yarn to any dc.
Round 1: ch3, dc in each dc, in ea corner sp dc5
Round2: rep round 1.
Fasten off and weave in ends.
Happy crocheting!
Copyright Notice
The pattern and photographs of this design are the property of Sharon Goodwin at Jera’s Jamboree. This pattern and design are subject to copyright and are for personal, non-commercial use only. You may not share, resell, alter or redistribute this pattern in part or in whole. You may, however, sell any finished items you make. If you would like to include this pattern in a roundup, you may take one photo and link back to this pattern.
Bookmark this Content to Save for Later
To bookmark this content using the Grow.me app on Jera’s Jamboree, all you need to do is click the blue heart on the right-hand side of the screen and the Grow.me app will pop up.
If you don’t have a Grow account you will need to enter your email and create a password.
Once you’ve created an account, every time you want to bookmark content on my blog (or any others that use Grow), simply login to your Grow account.
If you forget your password, click the “forgot password” link and follow the prompts. Please note that I’m unable to assist with resetting Grow passwords or accessing your Grow account, so be sure to save your login information in a safe place.
With your Grow account you can:
- Share and bookmark posts.
- Subscribe to Jera’s Jamboree email crochet newsletter.
- Unlock content available only to subscribers.