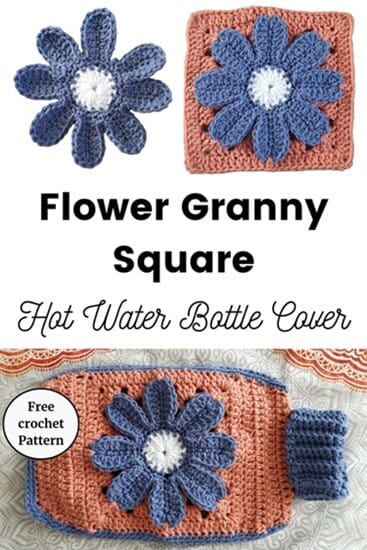
I’m excited to share with you this year’s hot water bottle cover refresh! My retro-meets-modern design combines an 8-petal flower crochet granny square with a simple envelope construction to create the perfect cozy companion.
It’s a fun, stash-busting crochet project that lets you play with colour combinations and once finished, your cover will keep you warm and snug on chilly evenings.
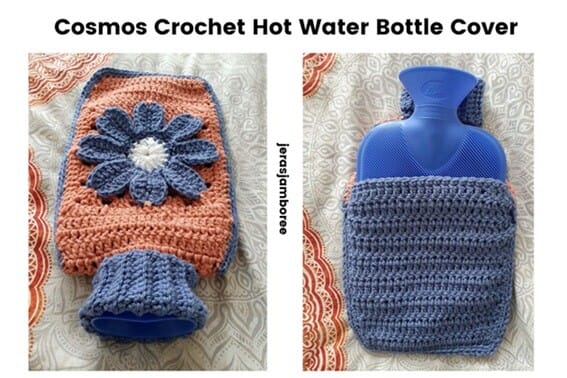
Every couple of years, I design a new cover to replace my old one, and the Cosmos feels like a fresh, cheerful update for this season. Whether you go bold or soft with your colours, each cover has its own charm — no two will ever look the same!
The full crochet pattern is free below, however, if you prefer to work from a PDF, this pattern is available in my Etsy and Ravelry stores.
Jump to: Materials | Flower Granny Square Instructions | Free Crochet Pattern | Pin for Later
Skill Level
Easy (increasing and decreasing to shape the cover, basic crochet stitches, envelope closure)
Measurements
My Cosmos hot water bottle cover fits a standard 2 litre hot water bottle.
Actual size of hot water bottle: 37cm x 20.5cm
Finished size of cover: 38cm x 22cm (positive ease for partially filled hot water bottle)
Flower Granny Square: 20cm x 20cm
Jera’s Jamboree receives payments for affiliate advertising. This is at no extra cost to you. As an Amazon Associate I earn from qualifying purchases. Please see my disclosure policy for more information.
Materials
- Chunky/Bulky Yarn (#5): Yarn A (white) small amount for centre of flower; Yarn B (blue) 149yds/136m; Yarn C (orange) 149yds/136m
- 6mm Crochet Hook (flower granny square)
- 5mm Hook (rest of the cover)
- Dressmaker Pins
I use these plum head and butterfly pins
- Scissors
- Yarn Needle
Yarn Choices
I used Paintbox Simply Chunky which is yarn I had left over from my chunky stripes throw and this project seemed like a good use of the smaller amounts!
Although it’s 100% acrylic, it does have a cotton texture and my dye lot numbers are soft.
This yarn is hardwearing and easy to care for at a 30 degrees machine wash – your cover should stay in shape and be usable not just for one colder season but last for many (unless you want a refresh! Every couple of years I refresh my hot water bottle cover – 2021 it was my owl cover, 2023 it was my cable cover and this year I’ve designed the Cosmos cover).
When I tested the thickness of the yarn, it came in at 7 wraps per inch (wpi) which falls in the middle of #5 chunky weight (chunky/bulky = 6 to 8 wpi). With this in mind, you can substitute any chunky yarn. And because you only need smaller amounts of 3 colours, you might have exactly what you need already in your yarn stash.
Gauge
With a 5mm hook
13 stitches and 8 rows of double crochet = 4” x 4”

Stitches You Need to Know
- Single crochet (sc)
- Single crochet 2 together (sc2tog)
- Single crochet back loop only (scblo)
- Double crochet (dc)
- Double crochet 2 together (dc2tog)
- Slip stitch (sl st)
If you need help working any of these stitches, instructions are in my stitch library.
Abbreviations
I have used these common abbreviations in my pattern:
- Beginning (beg)
- Chain/s (ch/s)
- Decrease (decr)
- Each (ea)
- Increase (incr)
- Remaining (rem)
- Repeat (rep)
- Right Hand Side (RHS)
- Right Side (RS)
- Space/s (sp/s)
- Stitch/es (st/s)
- Wrong Side (WS)
How to Crochet the Cosmos Crochet Hot Water Bottle Cover
In this section, I’m setting out the process of crocheting the cover.
After the diagram, the numbered notes correspond to the numbers on the image.
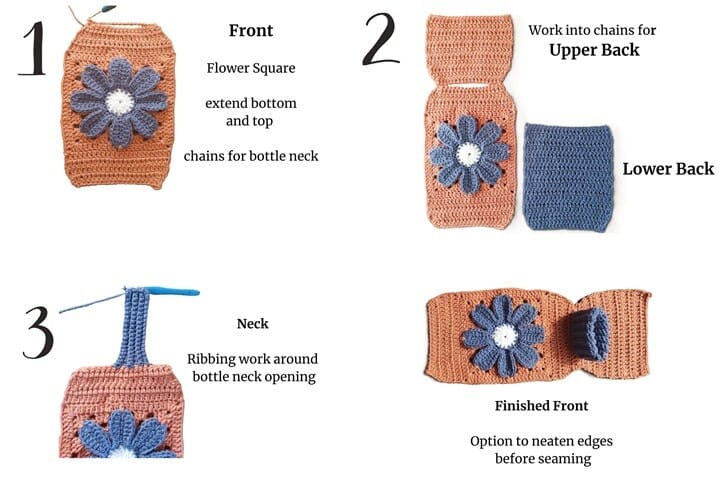
- The front begins with the flower granny square. The square is extended at the bottom first and then at the top. Shaping at the bottom and top are made by working 2 stitches together on either side of the cover. Once extended, chains are made for the bottle/cover neck. Yarn is not fastened off.
- The upper back continues by working into the chains. Increases are made to match the shaping on the front. Increases are made by working 2 stitches in the first and last stitches. Yarn is fastened off. The lower back is worked separately from the bottom to the top. Increases are made to match the front cover.
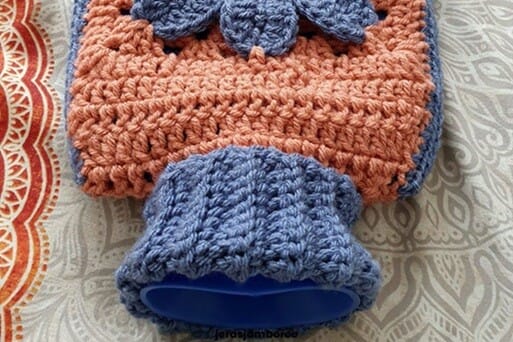
- Ribbing around the neck opening is worked to a double height so that it can be folded over around the neck opening.
Before assembly, you have the option to neaten the edges with Yarn B. I would recommend you do this as it coordinates the colours and makes it easier to not only work the seam but you’ll be working the seam through one colour (you’ll be seaming through both Yarn A and Yarn B if you don’t).
The edging is a round of single crochet. This is repeated all around on both front and back.
Assembly instructions are included in the written instructions – I didn’t want to repeat myself 🙂
Ready to take your granny squares to the next level? You’ll find plenty of inspiration in my granny square cardigan patterns roundup.
Pattern Notes
- Instructions for the flower square are separate to the instructions for the pattern.
- Chain 1 does not count as a stitch.
- Flower square chain 3 counts as a double crochet.
- Rest of cover chain 2 counts as a double crochet.
- The flower granny square is worked with a 6mm hook.
- The rest of the cover is worked with a 5mm hook.
- Lower Back row 1, work in back bumps of chain.
- Repeated instructions are worked between *
- Stitches worked in the same stitch are shown like this [ ]
- Rounds are joined with a slip stitch.
- The top of each cosmos petal in the granny square is the space between the posts of the top two double crochet stitches (not the stitches but between the posts)
- When seaming the sides and bottom of the cover, make sure you are working through the three layers of the envelope closure.
- Weave in ends as you go.

Hosted by Lisa from Green Fox Farms Designs, this hop is running from November 3rd to 23rd 2025. Each day a free pattern will be available from 9am CST (3pm GMT) to 8.59 EST (2.59 GMT) the next day. You will need to visit the event page each day to be directed to the day’s pattern. Click here to be taken to the event page.
If you’re here after November 12th 2025 for the Crochet Hygge blog hop, you’ve missed my free pattern. There’s still opportunities for free patterns until 25th November!
Purchase the easy-to-read print-friendly PDF (ad free)
The PDF of this pattern includes everything you need:
- how to work the stitches
- how the pattern is worked
- pattern notes
- clear written instructions
- printable row counter
Cosmos Flower Granny Square Instructions (US terms)
Below you’ll find photos, written instructions, and exactly what you’re doing in each round.
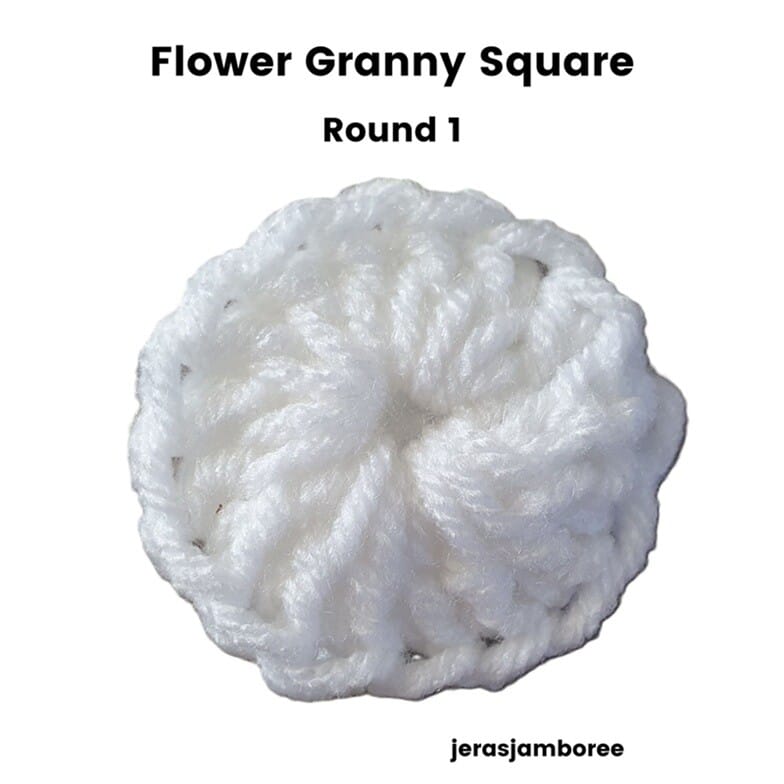
With Yarn A and 6mm hook
Ch4, sl st to 1st ch to join, ch3
Round 1: 15dc into centre of ring, join (16dc)
Fasten off and weave in ends
(creates the centre of the flower)
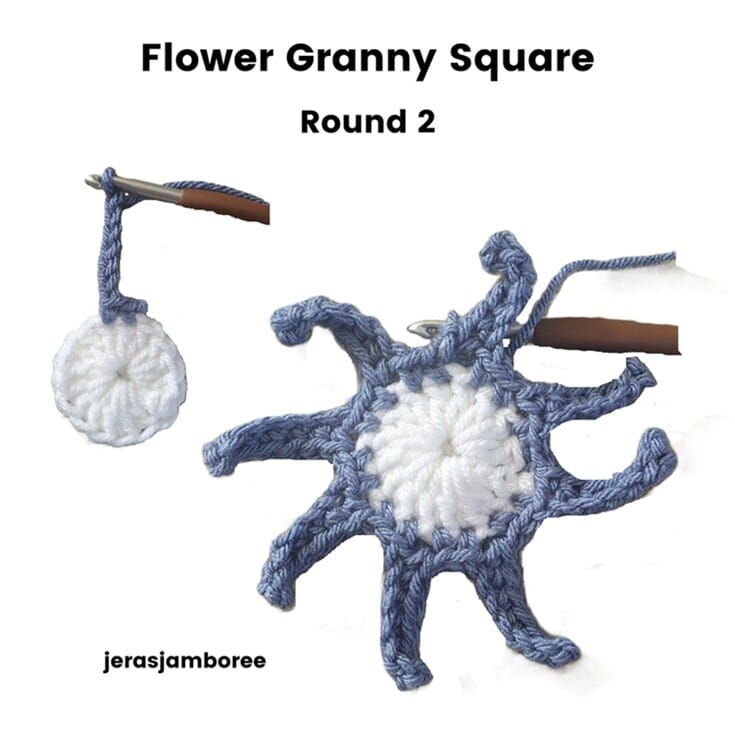
Join Yarn B in any st
Round 2: *sc in next 2 sts, ch7, working back down ch, sc in 2nd ch from hook, sc in next 5 chs, * rep around, sl st through 1st sc of round
(sets up petals)
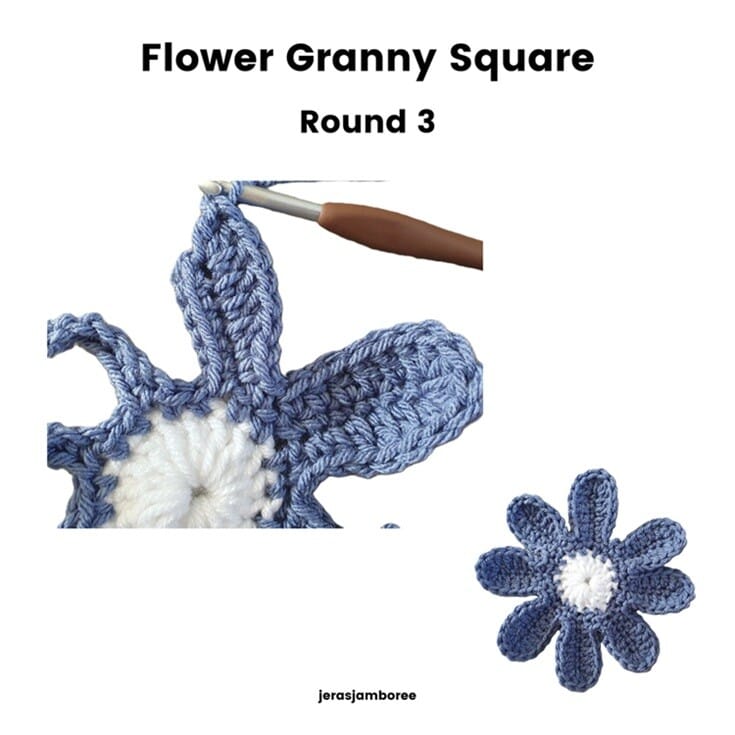
Continuing with Yarn B
Round 3: sc in next sc, working up petal, *sc in 1st st, hdc in next st, dc in next 3 sts, 3dc in last st, working back down petal, 3dc in next st, dc in next 3 sts, hdc in next st, sc in next st, sc in next st, * rep around, sl st through next st to join
Fasten off
(shapes petals)
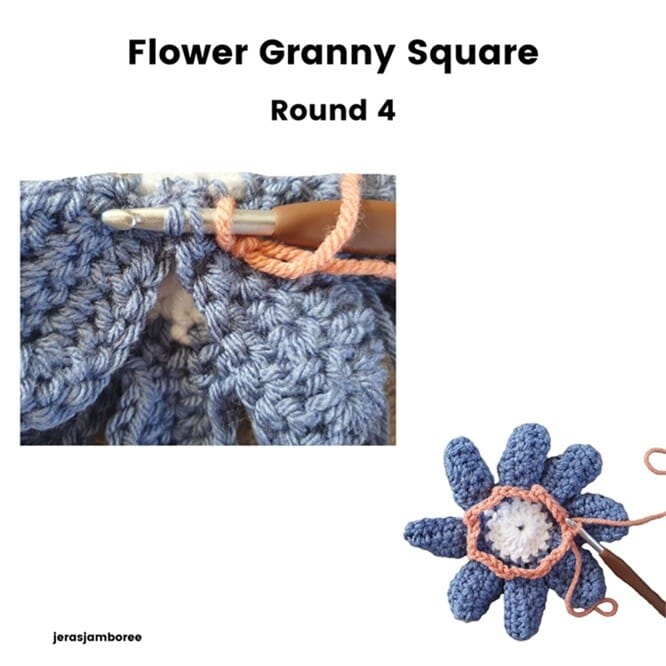
With Yarn C, place a slip knot on hook
Working on WS and using 1st sc of petals from round 3 (top left photo above)
Round 4: * insert hook on inner side of 2 adjoining petals, sc, ch4, * rep around, sl st through 1st sc of round
(makes a chain on the back of the flower to work the granny stitch in the following round)
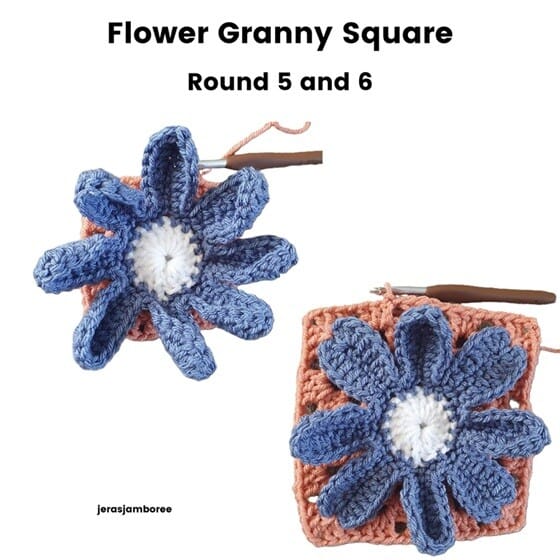
Continuing with Yarn C and working on RS around ch4 from prev round
Round 5: ch3, [2dc, ch1] around 1st ch4, [3dc, ch2, 3dc, ch1] around 2nd ch4, [3dc, ch1] around 3rd ch4, [3dc, ch2, 3dc, ch1] around 4th ch4, [3dc, ch1] around 5th ch4, [3dc, ch2, 3dc, ch1] around 6th ch, [3dc, ch1] around 7th ch, [3dc, ch2, 3dc, ch1] around 8th ch4, sl st to beg ch3 to join, sl st to ch-1 sp
(uses chains from previous round to work a granny stitch round)
Round 6
Ch3, [2dc, ch1] in 1st ch1-sp
[3dc, ch1] in ea following ch-1 sp, [3dc, ch2, 3dc, ch1] in ea ch-2 corner sp around, sl st to beg ch3 to join, sl st to ch-1 sp
(Granny stitch round)
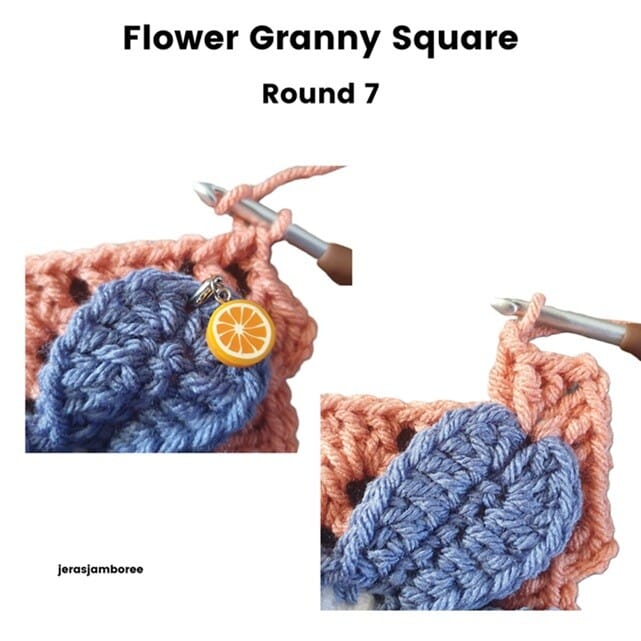
Continuing with Yarn C
Top of each petal is the space between posts of 2 top dc
Round 7: [2dc, ch1] in 1st ch-1 sp
in ea ch-2 corner sp, 1dc, yarn over, insert hook through top st of petal and into ch-2 sp, yarn over, pull through to complete the dc, 1dc, ch2, 1dc in same corner sp, insert hook through same top st of petal and into ch-2 sp, yarn over, pull through to complete the dc, 1dc in same corner sp
apart from 1st ch-1 sp, in ea ch-1 sp, [3dc, ch1]
(secures top of 4 Cosmos petals to corner spaces while working granny stitch)
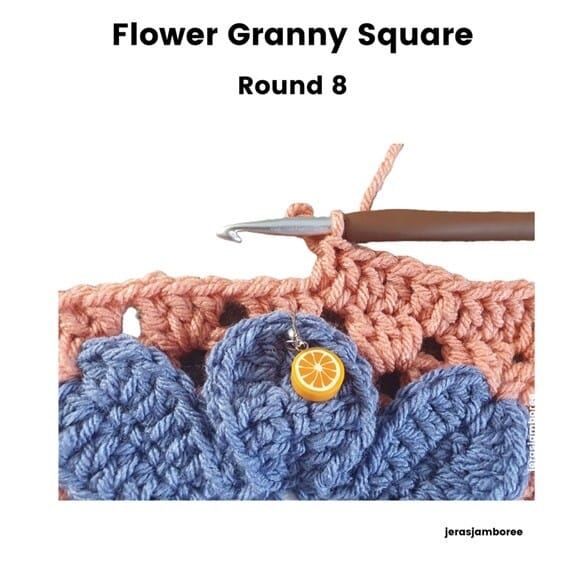
Continuing with Yarn C
Top of each petal is the space between posts of 2 top dc
Round 8: ch3, dc in next 2 sts, *dc in ch1-sp, dc in next 3 sts, [3dc, ch2, 3dc] in corner sp, dc in next 3 sts, dc in ch1-sp, dc in next 3 sts, dc in ch1-sp, dc in next st, yarn over, insert hook in top st of petal and through dc, yarn over, pull through (dc made), dc in next st, dc in ch-1 sp, dc in next 3 sts, * rep around, join with sl st to beg ch3
Fasten off
(secures remaining petals to central 3dc group of granny stitch while working double crochet)
Granny square complete
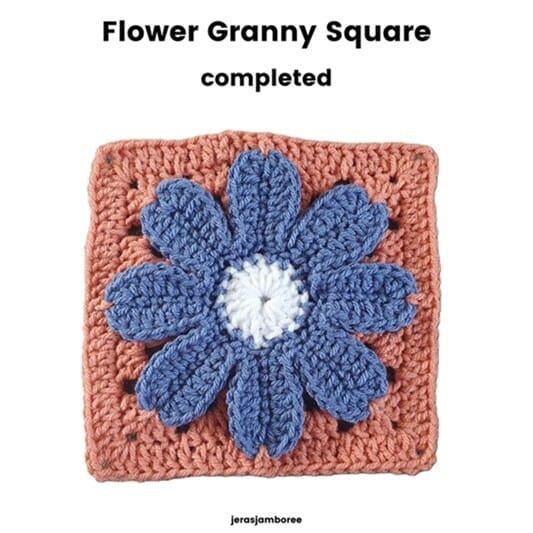
If you’d like to try more flower-inspired motifs, check out my free flower granny square pattern roundup for more beautiful designs.
Cosmos Crochet Hot Water Bottle Cover Instructions (US terms)
Make 1
Flower Granny square (see separate section)
Change to 5mm hook for rem pattern
Extending the bottom of the granny square
Choose which is the top and which is the bottom of the granny square
Rejoin Yarn C on RS at the bottom in ch-2 sp, ch2
Row 1: dc in ea st across working last dc in ch-2 sp, ch2, turn (24 sts)
Row 2: dc in ea st across, ch2, turn (24 sts)
Row 3 (decr): dc2tog, dc to last 2 sts, dc2tog, ch2, turn (22 sts)
Row 4 (decr): rep row 3, ch1, turn (20 sts)
Row 5 (decr): sc2tog, sc to last 2 sts, sc2tog (18 sts)
Fasten off
Extending the top of the granny square
Rejoin yarn C on RS at top of granny square in ch2-sp
Row 1: dc in ea st across, working last dc in ch-2 sp, ch2, turn (24 sts)
Row 2 (decr): dc2tog, dc to last 2 sts, dc2tog, ch2, turn (22 sts)
Row 3 (decr): rep row 2 (20 sts)
Row 4 (decr): rep row 2, ch1, turn (18 sts)
Row 5 (neck opening): sc in 1st st, sc in next 2 sts, ch2, sk 12 sts, sc in last 3 sts, ch2, turn
DO NOT FASTEN OFF (pattern continues on upper back)
Upper Back
Row 1 (incr): dc in 1st st, dc in next 2 sts, dc in ea of 12 chs, dc in next 2 sts, 2dc in last st, ch2, turn (20 sts)
Row 2 (incr): dc in 1st st, dc across to last st, 2dc in last st, ch2, turn (22 sts)
Row 3 (incr): rep row 2 (24 sts)
Row 4 – 11: dc in ea st across, at end of last row, ch1, turn (24 sts)
Row 12: sl st in ea st across
Fasten off
Front and Upper Back complete
Lower Back
With Yarn B
Ch 21
Row 1: sc in 2nd ch from hook, sc in ea ch across, ch2, turn (20 sts)
Row 2 (incr): dc in 1st st, dc in ea st across to last st, 2dc in last st, ch2, turn (22 sts)
Row 3 (incr): rep row 2 (24 sts)
Row 4 – 17: dc in ea st across, ch1, turn (24 sts)
Row 18: sl st in ea st across
Fasten off
Lower Back complete
Ribbed Neck
With Yarn B and 5mm hook, working on RS, join yarn at neck edge on RHS
Ch 18
Working back down ch
Sc in 2nd ch from hook, sc in ea ch to neck edge, sl st in next 2 sts on neck edge, turn
*Working back up sts
Scblo to last st, sc in last st, ch1, turn
Sc in 1st st, scblo to neck edge, sl st in next 2 sts on neck edge
* rep around
Ribbed Seam
Sl st through 1 loop on ea ribbing edge to close
Fasten off
Fold over ribbed neck
Optional Edging (to neaten and coordinate)
Front, Upper Back, Lower Back
Front and Upper Back
Working on RS with Yarn B and 5mm hook
Join yarn at bottom right (as you look at cover) and work sc evenly around front and upper back placing 3 sc in last st of corners
Join with sl st
Fasten off
Lower Back
Rep edging instructions around the edges of lower back
Fasten off
Assembly
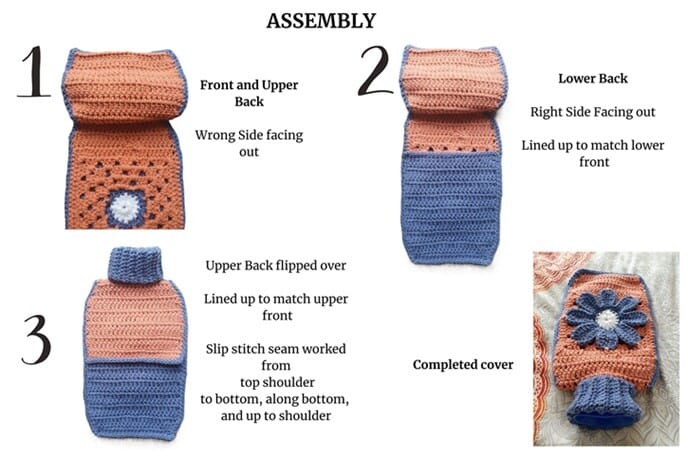
To assemble the cover:
- Place the front and upper back flat with the wrong side facing outwards.
- The lower back is placed right side facing outwards at the bottom of the cover, lined up to match the lower front.
- The upper back is flipped over and lined up to match the upper front.
Pin in place.
The seam is made on the right side of the work from the shoulder of the cover to the bottom, along the bottom, and back up to the shoulder on the opposite side.
With Yarn B, slip stitch evenly to close, making sure you work through all 3 layers of fabric for the envelope closure.
Congratulations! You have finished your hot water bottle cover.
Copyright Notice
The pattern and photographs of this design are the property of Sharon Goodwin at Jera’s Jamboree. This pattern and design are subject to copyright and are for personal, non-commercial use only. You may not share, resell, alter or redistribute this pattern in part or in whole. You may, however, sell any finished items you make. If you would like to include this pattern in a roundup, you may take one photo and link back to this pattern.
I hope you enjoy crocheting the Cosmos Hot Water Bottle Cover! Its mix of floral texture and cozy stitches making it a lovely seasonal project — or a wonderful handmade gift for someone special.
If you’d like to explore more hot water bottle cover designs, take a look at my roundup of 13+ crochet hot water bottle covers (also includes tips and advice for safe use of hot water bottles).
If you love granny square projects, you might also enjoy my easy crochet granny square bag patterns — perfect for using up leftover yarn!
I always love seeing your finished makes — don’t forget to share in my Jera’s Jamboree Crochet Community so I can admire your creations 🙂
Save to Pinterest
Love this project but want to save it for later? Pin the image below to your favourite board to come back to when you have more time.