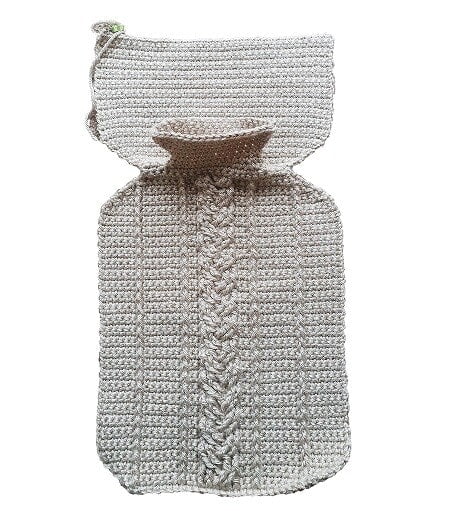
If you’re looking to add both warmth and style to your chilly nights, this crochet pattern for a hot water bottle cover could be just what you need.
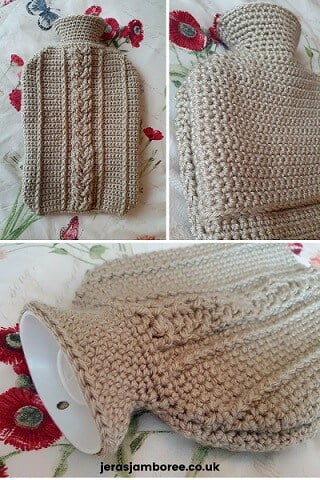
I’ve combined front post stitches with the braided cable stitch in this design, resulting in a project that not only keeps your hot water bottle snug but also showcases your intermediate crochet skills.
Jera’s Jamboree receives payments for affiliate advertising. This is at no extra cost to you. As an Amazon Associate I earn from qualifying purchases. Please see my disclosure policy for more information.
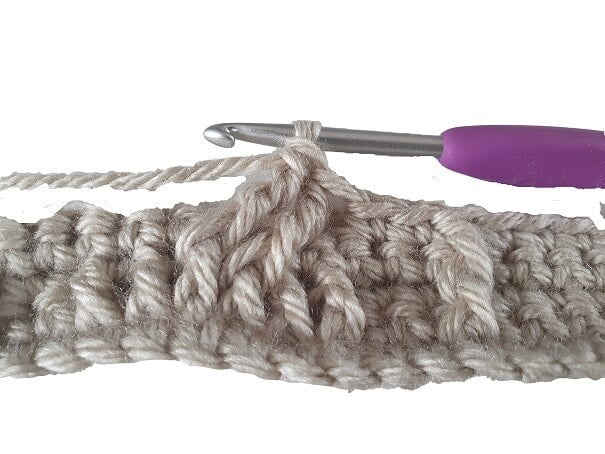
The front post stitches and braided cables are worked in rows below creating a lovely textured fabric.
I’ve used a smaller hook than recommended for worsted/aran weight yarn. This gives a tighter stitch with denser definition and is a safety feature. No burning fingers!
- Design Inspiration
- How to get this crochet pattern
- Skill Level
- Supplies and Materials
- Yarn Choices
- Gauge
- Stitches and Abbreviations
- Measurements
- How the Hot Water Bottle Pattern is Worked
- Related Hot Water Bottle Cover Crochet Patterns
- Pattern Notes
- Hot Water Bottle Cover Testimonials
- Purchase the easy-to-read, print-friendly PDF (ad free)
- Testimonials
- Hot Water Bottle Instructions UK Crochet Terms
- Hot Water Bottle Instructions US Crochet Terms
- Copyright Notice
Design Inspiration
I designed a hot water bottle cover a couple of years ago and so mine is overdue for a refresh!
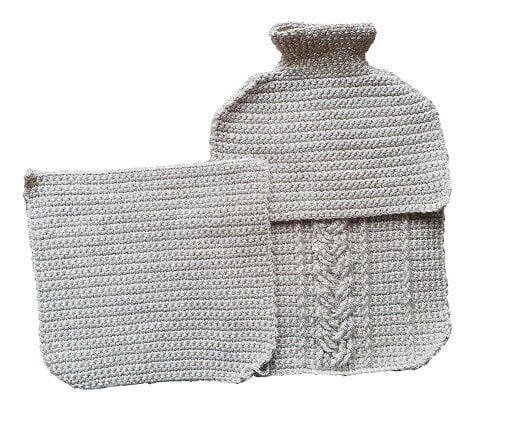
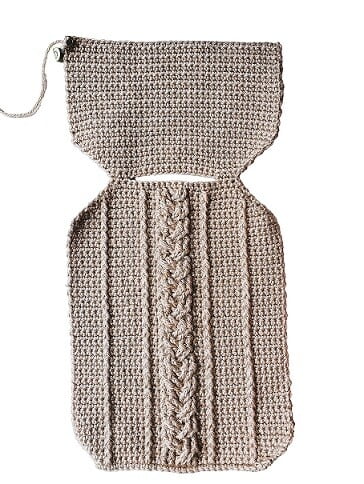
I wanted an envelope closure this time and after trial and error, figured out how to construct the cover so that the neck is covered but it’s also easy to get the hot water bottle in and out.
It worked so well that I used the same envelope closure on my Cosmos cover too!
I’ve rated this project at an intermediate level because of the combination of crochet stitches, the shaping (increases and decreases) and the seaming. You do need experience of working cables to be able to complete this pattern.
There are different styles of hot water bottle covers. Once you’ve crocheted this one, why not give other designs a go!
How to get this crochet pattern
Option 1: Keep scrolling to get this pattern for free
Option 2: Purchase the easy-to-read, print-friendly PDF (ad free)
Skill Level
Intermediate – recommended experience of working the braided cable stitch

Supplies and Materials
- 4mm crochet hook
- Worsted/Aran yarn ; 184g (326 yards / 299 meters)
- Pins/stitch markers
- Scissors
- Yarn Needle
Yarn Choices
I used Lion Brand Heartland in the colour Dry Tortugas. This #4 weight yarn is durable and easy to care for. Made with 100% acrylic fibre, I’ve found it is beautifully soft, perfect for a project you want to snuggle up with such as a hot water bottle cover. All the shades are inspired by the natural beauty of the American landscape – each colour represents a national park or landmark!
| Yarn Fibre Content | 100% Acrylic |
| Weight | Worsted/Aran #4 |
| grams | 142 |
| yards | 251 |
| meters | 230 |
| Care | Machine Wash, Machine Dry |
Crochet.com have a wide range of colours and ship to the UK as well as other destinations. If you order £40 and over, you’ll qualify for free shipping to the UK. I’ve ordered a few times and have had no problems with delivery (time or arriving in good condition). Recommended!

Gauge
Using a 4mm hook, 19 rows and 14 stitches = 10cm X 10cm
If you’re gauge is different from mine, using my stitch gauge converter will adjust your stitches.
Stitches and Abbreviations
| UK Stitches | US Stitches |
| Double Crochet (dc) | Single Crochet (sc) |
| Front Post Treble Below (fptr-bel) : The stitch is made around the post of the stitch 3 rows below so that the stitch being made sits at the front of the work. Yarn over, insert hook between the stitches 3 rows below to the right of the stitch and out again on the left, yarn over and pull through the first 2 loops, yarn over, pull through the remaining 2 loops | Front Post Double Below (fpdc-bel): The stitch is made around the post of the stitch 3 rows below so that the stitch being made sits at the front of the work. Yarn over, insert hook between the stitches 3 rows below to the right of the stitch and out again on the left, yarn over and pull through the first 2 loops, yarn over, pull through the remaining 2 loops |
| Front Post Double Treble Below (fpdtr-bel): The stitch is made around the post of the stitch 3 rows below so that the stitch being made sits at the front of the work. Yarn over twice, insert hook between the stitches 3 rows below to the right of the stitch and out again on the left, yarn over and pull through the first 2 loops, yarn over, pull through 2 loops, yarn over pull through the remaining 2 loops | Front Post Treble Below (fptr-bel): The stitch is made around the post of the stitch 3 rows below so that the stitch being made sits at the front of the work. Yarn over twice, insert hook between the stitches 3 rows below to the right of the stitch and out again on the left, yarn over and pull through the first 2 loops, yarn over, pull through 2 loops, yarn over pull through the remaining 2 loops |
| Double Crochet 2 Together (dc2tog): Insert hook into stitch, yarn over, pull through, insert hook into the next stitch, yarn over, (3 loops on hook), yarn over, pull through all 3 loops. | Single Crochet 2 Together (sc2tog): Insert hook into stitch, yarn over, pull through, insert hook into the next stitch, yarn over, (3 loops on hook), yarn over, pull through all 3 loops. |
- Ch = chain
- Ea = each
- St/s = stitch/es
- Rep = repeat
- Incr = increase
- Decr = decrease
- RS = right side
- Sl st = slip stitch
Measurements
14” / 35.5cm (h) X 9” / 23cm (w) to fit a 2 litre hot water bottle
The envelope closure measures 6cm / 2.5”
How the Hot Water Bottle Pattern is Worked
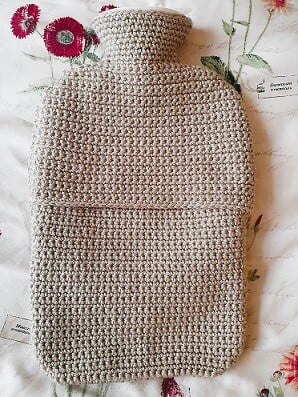
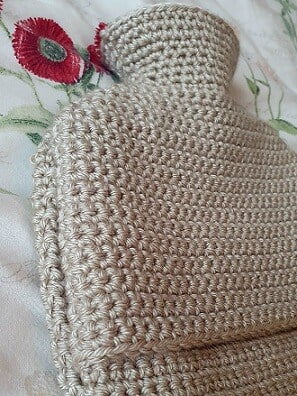
The Moonbeam pattern is worked in two pieces, a lower back, and a front/upper back.
The lower back is worked first in double crochet (UK) / single crochet (US).
The front has braided cable stitch in the middle of the cover. Front post stitches are used either side to add more texture and balance the symmetry of the design.

The front also uses double crochet (UK) / single crochet (US) stitches.
I’ve used skipped chains to create the neck opening and then the upper back is worked in double crochet (UK) / single crochet (US) stitches to match the lower back.
Yarn is rejoined to the neck to create the shaping. The neck is worked in decreases and increases on the right side of the fabric in the same stitches as the lower back.
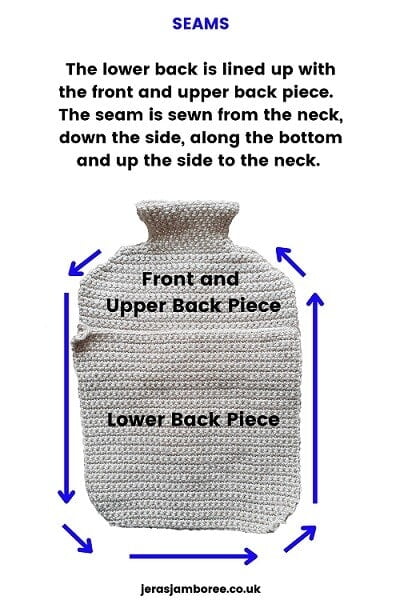
Once all pieces are crocheted the seams are sewn on the wrong side of the fabric.
Related Hot Water Bottle Cover Crochet Patterns

Pattern Notes
- Chain 1 does not count as a stitch.
- Front and back are worked in rows.
- Neck of the cover is worked in rounds.
- Pattern uses UK Front Post Treble AND Front Post Double Treble / US Front Post Double AND Front Post Treble. Read the pattern carefully.
- Front Post stitches are worked around the post of the stitch in the third row below.
- The braided cable stitch uses 6 stitches and is made from crocheting Front Post Double Treble Below (Fpdtr UK) / Front Post Treble Below (Fptr US) in the third row below, skipping stitches and then working in those skipped stitches either in front of the stitches made or behind the stitches. You do need experience of working cables to be able to complete this pattern.
- Stitch counts are in parentheses at the end of a row ie; (26 dc, 4 fptr-bel, 6 fpdtr-bel) this means the row consists of 26 double crochet stitches, 4 front post treble below stitches, 6 front post double treble below stitches.
- Increases are made by working 2 stitches in the first and last stitch of a row.
- Decreases are made by working 2 stitches together in the first and last stitch of a row.
- Be careful you don’t twist the row of chains in row 59 on the front piece.
Before we dive into the pattern, be sure you have your hot water bottle handy so that you can check the fit as you go.
Grab your materials, find a cozy spot, and let’s get started on creating a crochet hot water bottle cover that will keep you warm and stylish.
Happy crocheting!
Hot Water Bottle Cover Testimonials
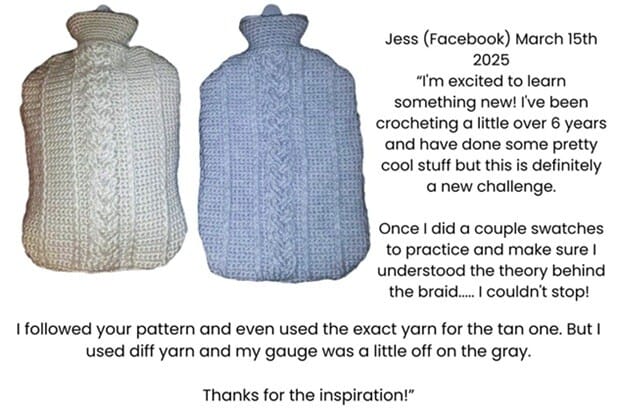
Jess (Facebook) March 15th 2025 – I’m excited to learn something new! I’ve been crocheting a little over 6 years and have done some pretty cool stuff but this is definitely a new challenge. Once I did a couple swatches to practice and make sure I understood the theory behind the braid….. I couldn’t stop! I followed your pattern and even used the exact yarn for the tan one. But I used diff yarn and my gauge was a little off on the gray. Thanks for the inspiration!

Purchase the easy-to-read, print-friendly PDF (ad free)
Included in the digital crochet pattern is:
- how the pattern is worked
- pattern notes
- clear written instructions
Testimonials
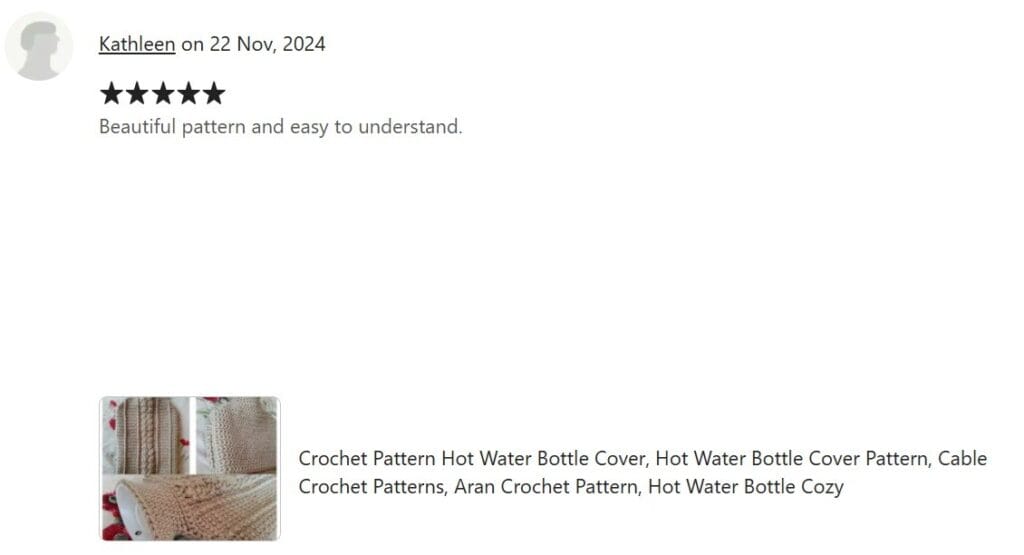
22 Nov 5 Star Etsy review. Text reads “Beautiful pattern and easy to understand.”
Hot Water Bottle Instructions UK Crochet Terms
Lower Back
With a 4mm hook, ch31
Row 1: dc in 2nd ch from hook, dc across, ch1, turn (30 dc)
Row 2: dc in ea st across, ch1, turn
Row 3 (incr): 2dc in 1st st, dc to last st, 2dc in last st, ch1, turn (32 dc)
Row 4 – 6 (incr): rep row 3 (38 dc)
Row 7 – 42: rep row 2
Fasten off.
Weave in ends.
Front
With a 4mm hook, ch31
Row 1: dc in 2nd ch from hook, dc across, ch1, turn (30 dc)
Row 2: dc in ea st across, ch1, turn
Row 3 (incr): 2dc in 1st st, dc in next st, fptr-bel in next st, dc in next 6 sts, fptr-bel in next st, dc in next 2 sts, fptr-bel in next 6 sts, dc in next 2 sts, fptr-bel in next st, dc in next 6 sts, fptr-bel in next st, dc in next st, 2dc in last st, ch1, turn (22 dc, 10 fptr-bel)
Row 4 (incr): 2dc in 1st st, dc in ea st to last st, 2dc in last st, ch1, turn (34 dc)
Row 5 (incr): 2dc in 1st st, dc in next 3 sts, fptr-bel in next st, dc in next 6 sts, fptr-bel in next st, dc in next 2 sts, sk 2 sts, fpdtr-bel in next 2 sts, working behind the 2 sts just made fpdtr-bel in sk sts, fpdtr-bel in next 2 sts, dc in next 2 sts, fptr-bel in next st, dc in next 6 sts, fptr-bel in next st, dc in next 3 sts, 2dc in last st, ch1, turn (26 sc, 4 fpdc-bel, 6 fptr-bel)
Row 6: rep row 4 (38 dc)
Row 7: dc in next 6 sts, fptr-bel in next st, dc in next 6 sts, fptr-bel in next st, dc in next 2 sts, fpdtr-bel in next 2 sts, sk 2 sts, fpdtr-bel in next 2 sts, working in front of sts fpdtr-bel in 2 sk sts, dc in next 2 sts, fptr-bel in next st, dc in next 6 sts, fptr-bel in next st, dc in next 6 sts, ch1, turn (28 dc, 4 fptr-bel, 6 fpdtr-bel)
Row 8: dc in ea st across, ch1, turn (38 dc)
Row 9: dc in next 6 sts, fptr-bel in next st, dc in next 6 sts, fptr-bel in next st, dc in next 2 sts, sk 2 sts, fpdtr-bel in next 2 sts, working behind 2 sts just made, fpdtr-bel in 2 sk sts, fpdtr-bel in next 2 sts, dc in next 2 sts, fptr-bel in next st, dc in next 6 sts, fptr-bel in next st, dc in next 6 sts, ch1, turn (28 dc, 4 fptr-bel, 6 fpdtr-bel)
Row 10: rep row 8
Row 11 rep row 7
Row 12: rep row 8
Row 13: rep row 9
Row 14: rep row 8
Row 15: rep row 7
Row 16: rep row 8
Row 17: rep row 9
Row 18: rep row 8
Row 19: rep row 7
Row 20: rep row 8
Row 21: rep row 9
Row 22: rep row 8
Row 23: rep row 7
Row 24: rep row 8
Row 25: rep row 9
Row 26: rep row 8
Row 27: rep row 7
Row 28: rep row 8
Row 29: rep row 9
Row 30: rep row 8
Row 31: rep row 7
Row 32: rep row 8
Row 33: rep row 9
Row 34: rep row 8
Row 35: rep row 7
Row 36: rep row 8
Row 37: rep row 9
Row 38: rep row 8
Row 39: rep row 7
Row 40: rep row 8
Row 41: rep row 9
Row 42: rep row 8
Row 43: rep row 7
Row 44: rep row 8
Row 45: rep row 9
Row 46: rep row 8
Row 47: rep row 7
Row 48: rep row 8
Row 49: rep row 9
Row 50: rep row 8
Row 51 (decr): dc2tog, dc in next 4 sts, fptr-bel in next st, dc in next 6 sts, fptr-bel in next st, dc in next 2 sts, fpdtr-bel in next 2 sts, sk 2 sts, fpdtr-bel in next 2 sts, working in front, fpdtr-bel in 2 sk sts, dc in next 2 sts, fptr-bel in next st, dc in next 6 sts, fptr-bel in next st, dc in next 4 sts, dc2tog, ch1, turn (26 dc, 4 fptr-bel, 6 fpdtr-bel)
Row 52: (decr): dc2tog, dc to last 2 sts, dc2tog, ch1, turn (34 dc)
Row 53 (decr): dc2tog, dc in next 2 sts, fptr-bel in next st, dc in next 6 sts, fptr-bel in next st, dc in next 2 sts, sk 2 sts, fpdtr-bel in next 2 sts, working behind sts just made, fpdtr-bel in sk sts, dc in next 2 sts, fptr-bel in next st, dc in next 6 sts, fptr-bel in next st, dc in next 2 sts, dc2tog, ch1, turn (22 dc, 4 fptr-bel, 6 fpdtr-bel)
Row 54: (decr): rep row 52 (30 dc)
Row 55: (decr): dc2tog, fptr-bel in next st, dc in next 6 sts, fptr-bel in next st, dc in next 2 sts, fpdtr-bel in next 2 sts, sk 2 sts, fpdtr-bel in next 2 sts, working in front, fpdtr-bel in 2 sk sts, dc in next 2 sts, fptr-bel in next st, dc in next 6 sts, fptr-bel in next st, dc2tog, ch1, turn (18 dc, 4 fptr-bel, 6 fpdtr-bel)
Row 56 (decr): rep row 52 (26 dc)
Row 57 (decr): dc2tog, dc in next 5 sts, fptr-bel in next st, dc in next 2 sts, sk 2 sts, fpdtr-bel in next 2 sts, working behind sts just made, fpdtr-bel in sk sts, dc in next 2 sts, fptr-bel in next st, dc in next 5 sts, dc2tog, ch1, turn (16 dc, 2 fptr-bel, 6 fpdtr-bel)
Row 58 (decr): rep row 52 (22 dc)
Row 59: dc in next 3 sts, ch16, sk 16 sts, dc in next 3 sts, ch1, turn (6 dc, ch16)
Pattern continues working on upper back. DO NOT FASTEN OFF
Upper Back
Row 1 (incr): 2 dc in 1st st, dc in next 2 sts, dc in ea of 16 chs, dc in next 2 sts, 2 dc in last st, ch1, turn (24 dc)
Row 2 (incr): 2dc in 1st st, dc across to last st, 2dc in last st, ch1, turn (26 dc)
Row 3 – 8 (incr): rep row 2 (38 dc)
Row 9: dc in ea st across, ch1, turn
Row 10 – 28: rep row 9
Fasten off.
Weave in ends.
Shaping Neck
Rejoin yarn on RS neck opening
(16 sts front and 16 sts back = 32 sts total)
Round 1 (decr): dc in first st, dc2tog, dc in next 11 sts, dc2tog twice, dc in next 11 sts, dc2tog, dc in last st, sl st to top of ch1, ch1 (28 dc)
Round 2 (decr): dc in first st, dc2tog, dc in next 9 sts, dc2tog twice, dc in next 9 sts, dc2tog, dc in last st, sl st to top of ch1, ch1 (24 dc)
Round 3: dc in ea st around, sl st to top of ch1, ch1 (24 dc)
Round 4: rep round 3
Round 5 (incr): dc in first st, 2dc in next st, dc in next 9 sts, 2 dc in next st twice, dc in next 9 sts, 2 dc in next st, dc in last st, sl st to top of ch1, ch1 (28 dc)
Round 6 (incr): dc in first st, 2dc in next st, dc in next 11 sts, 2 dc in next st twice, dc in next 11 sts, 2 dc in next st, dc in last st, sl st to top of ch1, ch1 (32 dc)
Round 7 (incr): dc in first st, 2dc in next st, dc in next 13 sts, 2 dc in next st twice, dc in next 13 sts, 2 dc in next st, dc in last st, sl st to top of ch1 (36 dc)
Round 8 and 9: rep round 3
Fasten off.
Weave in ends.
Assembly
Turn front/upper back inside out to work on WS
Line up lower back and pin in place.
Sew seam from neck, down the side, along the bottom, up side to neck. Use image in pattern notes as a guide.
Fasten off.
Weave in ends.
Hot Water Bottle Instructions US Crochet Terms
Lower Back
With a 4mm hook, ch31
Row 1: sc in 2nd ch from hook, sc across, ch1, turn (30 sc)
Row 2: sc in ea st across, ch1, turn
Row 3 (incr): 2sc in 1st st, sc to last st, 2sc in last st, ch1, turn (32 sc)
Row 4 – 6 (incr): rep row 3 (38 sc)
Row 7 – 42: rep row 2
Fasten off.
Weave in ends.
Front
With a 4mm hook, ch31
Row 1: sc in 2nd ch from hook, sc across, ch1, turn (30 sc)
Row 2: sc in ea st across, ch1, turn
Row 3 (incr): 2sc in 1st st, sc in next st, fpdc-bel in next st, sc in next 6 sts, fpdc-bel in next st, sc in next 2 sts, fpdc-bel in next 6 sts, sc in next 2 sts, fpdc-bel in next st, sc in next 6 sts, fpdc-bel in next st, sc in next st, 2sc in last st, ch1, turn (22 sc, 10 fpdc-bel)
Row 4 (incr): 2sc in 1st st, sc to last st, 2sc in last st, ch1, turn (34 sc)
Row 5 (incr): 2sc in 1st st, sc in next 3 sts, fpdc-bel in next st, sc in next 6 sts, fpdc-bel in next st, sc in next 2 sts, sk 2 sts, fptr-bel in next 2 sts, working behind the 2 sts just made fptr-bel in sk sts, fptr-bel in next 2 sts, sc in next 2 sts, fpdc-bel in next st, sc in next 6 sts, fpdc-bel in next st, sc in next 3 sts, 2sc in last st, ch1, turn (26 sc, 4 fpdc-bel, 6 fptr-bel)
Row 6: rep row 4 (38 sc)
Row 7: sc in next 6 sts, fpdc-bel in next st, sc in next 6 sts, fpdc-bel in next st, sc in next 2 sts, fptr-bel in next 2 sts, sk 2 sts, fptr-bel in next 2 sts, working in front of stitches, fptr-bel in 2 sk sts, sc in next 2 sts, fpdc-bel in next st, sc in next 6 sts, fpdc-bel in next st, sc in next 6 sts, ch1, turn (28 sc, 4 fpdc-bel, 6 fptr-bel)
Row 8: sc in ea st across, ch1, turn (38 sc)
Row 9: sc in next 6 sts, fpdc-bel in next st, sc in next 6 sts, fpdc-bel in next st, sc in next 2 sts, sk 2 sts, fptr-bel in next 2 sts, working behind 2 sts just made, fptr-bel in 2 sk sts, fptr-bel in next 2 sts, sc in next 2 sts, fpdc-bel in next st, sc in next 6 sts, fpdc-bel in next st, sc in next 6 sts, ch1, turn (28 sc, 4 fpdc-bel, 6 fptr-bel)
Row 10: rep row 8
Row 11 rep row 7
Row 12: rep row 8
Row 13: rep row 9
Row 14: rep row 8
Row 15: rep row 7
Row 16: rep row 8
Row 17: rep row 9
Row 18: rep row 8
Row 19: rep row 7
Row 20: rep row 8
Row 21: rep row 9
Row 22: rep row 8
Row 23: rep row 7
Row 24: rep row 8
Row 25: rep row 9
Row 26: rep row 8
Row 27: rep row 7
Row 28: rep row 8
Row 29: rep row 9
Row 30: rep row 8
Row 31: rep row 7
Row 32: rep row 8
Row 33: rep row 9
Row 34: rep row 8
Row 35: rep row 7
Row 36: rep row 8
Row 37: rep row 9
Row 38: rep row 8
Row 39: rep row 7
Row 40: rep row 8
Row 41: rep row 9
Row 42: rep row 8
Row 43: rep row 7
Row 44: rep row 8
Row 45: rep row 9
Row 46: rep row 8
Row 47: rep row 7
Row 48: rep row 8
Row 49: rep row 9
Row 50: rep row 8
Row 51 (decr): sc2tog, sc in next 4 sts, fpdc-bel in next st, sc in next 6 sts, fpdc-bel in next st, sc in next 2 sts, fptr-bel in next 2 sts, sk 2 sts, fptr-bel in next 2 sts, working in front, fptr-bel in 2 sk sts, sc in next 2 sts, fpdc-bel in next st, sc in next 6 sts, fpdc-bel in next st, sc in next 4 sts, sc2tog, ch1, turn (26 sc, 4 fpdc-bel, 6 fptr-bel)
Row 52: (decr): sc2tog, sc to last 2 sts, sc2tog, ch1, turn (34 sc)
Row 53 (decr): sc2tog, sc in next 2 sts, fpdc-bel in next st, sc in next 6 sts, fpdc-bel in next st, sc in next 2 sts, sk 2 sts, fptr-bel in next 2 sts, working behind sts just made, fptr-bel in sk sts, sc in next 2 sts, fpdc-bel in next st, sc in next 6 sts, fpdc-bel in next st, sc in next 2 sts, sc2tog, ch1, turn (22 sc, 4 fpdc-bel, 6 fptr-bel)
Row 54: (decr): rep row 52 (30 sc)
Row 55: (decr): sc2tog, fpdc-bel in next st, sc in next 6 sts, fpdc-bel in next st, sc in next 2 sts, fptr-bel in next 2 sts, sk 2 sts, fptr-bel in next 2 sts, working in front, fptr-bel in 2 sk sts, sc in next 2 sts, fpdc-bel in next st, sc in next 6 sts, fpdc-bel in next st, sc2tog, ch1, turn (18 sc, 4 fpdc-bel, 6 fptr-bel)
Row 56 (decr): rep row 52 (26 sc)
Row 57 (decr): sc2tog, sc in next 5 sts, fpdc-bel in next st, sc in next 2 sts, sk 2 sts, fptr-bel in next 2 sts, working behind sts just made, fptr-bel in sk sts, sc in next 2 sts, fpdc-bel in next st, sc in next 5 sts, sc2tog, ch1, turn (16 sc, 2 fpdc-bel, 6 fptr-bel)
Row 58 (decr): rep row 52 (22 sc)
Row 59: sc in next 3 sts, ch16, sk 16 sts, sc in next 3 sts, ch1, turn (6 sc, ch16)
Pattern continues working on upper back. DO NOT FASTEN OFF
Upper Back
Row 1 (incr): 2sc in 1st st, sc in next 2 sts, sc in ea of 16 chs, sc in next 2 sts, 2sc in last st, ch1, turn (24 sc)
Row 2 (incr): 2sc in 1st st, sc across to last st, 2sc in last st, ch1, turn (26 sc)
Row 3 – 8 (incr): rep row 2 (38 sc)
Row 9: sc in ea st across, ch1, turn
Row 10 – 28: rep row 9
Fasten off.
Weave in ends.
Shaping Neck
Rejoin yarn on RS neck opening
(16 sts front and 16 sts back = 32 sts total)
Round 1 (decr): sc in first st, sc2tog, sc in next 11 sts, sc2tog twice, sc in next 11 sts, sc2tog, sc in last st, sl st to top of ch1, ch1 (28 sc)
Round 2 (decr): sc in first st, sc2tog, sc in next 9 sts, sc2tog twice, sc in next 9 sts, sc2tog, sc in last st, sl st to top of ch1, ch1 (24 sc)
Round 3: sc in ea st around, sl st to top of ch1, ch1 (24 sc)
Round 4: rep round 3
Round 5 (incr): sc in first st, 2sc in next st, sc in next 9 sts, 2sc in next st twice, sc in next 9 sts, 2sc in next st, sc in last st, sl st to top of ch1, ch1 (28 sc)
Round 6 (incr): sc in first st, 2sc in next st, sc in next 11 sts, 2sc in next st twice, sc in next 11 sts, 2sc in next st, sc in last st, sl st to top of ch1, ch1 (32 sc)
Round 7 (incr): sc in first st, 2sc in next st, sc in next 13 sts, 2sc in next st twice, sc in next 13 sts, 2sc in next st, sc in last st, sl st to top of ch1 (36 sc)
Round 8 and 9: rep round 3
Fasten off.
Weave in ends.
Assembly
Turn front/upper back inside out to work on WS
Line up lower back and pin in place.
Sew seam from neck, down the side, along the bottom, up side to neck. Use image in pattern notes as a guide.
Fasten off.
Weave in ends.
Copyright Notice
The pattern and photographs of this design are the property of Sharon Goodwin at Jera’s Jamboree. This pattern and design are subject to copyright and are for personal, non-commercial use only. You may not share, resell, alter or redistribute this pattern in part or in whole. You may, however, sell any finished items you make. If you would like to include this pattern in a roundup, you may take one photo and link back to this pattern.
Happy crocheting!