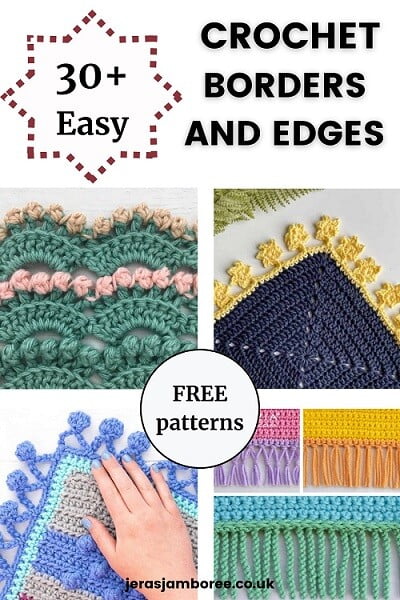
You can transform a simple blanket into a work of art, elevate a shawl, or give a personal touch to a cherished garment simply by adding crochet borders or edgings.
You’ll find free patterns and tutorials in this resource I’ve gathered together that will kick start your inspiration and give you the tools to work magic on your projects.
- What are crochet borders and edgings?
- Why crochet a border or edging?
- Troubleshooting Common Problems with Crochet Borders and Edgings
- Exploring Stitches and Techniques for Stunning Crochet Borders and Edgings
- Crochet Edging Patterns
- Single Crochet Border / Half Double Crochet Border
- Double Crochet Border
- Front Post and Back Post Crochet Edging
- Crochet Shell Border
- Crochet Scallop Edge
- Crochet Picot Edging
- Bobble Crochet Border
- Crochet Ruffle Edging
- Crochet Lace Edging
- More creative borders and edgings for your projects
- 23. Pom Pom Border
- 24. Curling Waves Crochet Border Tutorial
- 25. Flower Border Edging
- 26. Floral Border
- 27. V-Stitch Border Edging
- 28. Granny Block Stitch Border
- 29. Blanket Stitch Edging
- 30. Woven Crochet Edging
- 31. Granny Square Crochet Borders
- 32. Crochet Star Border
- 33. Crochet Little Stars Border
- 34. Camel Stitch Border (using one color)
- 35. Camel Stitch Border (using different colors)
- 36. Crab Stitch Border (on coasters)
- 37. Crochet Candy Cane Border
- 38. Adding straight edges
- 39. Crochet Ribbing/Trim
- 40. Berry Stitch Edging
- 41. Chevron Border Edging
- 42. Crochet Puff Edge Stitch
- 43. How to make a crochet fringe edging (with chains)
- 44. Twisted Fringe, Knotted/Double Knotted Fringe
- Related Crochet Blanket Patterns
What are crochet borders and edgings?
Crochet borders and edgings are decorative elements that are added to finished crochet projects, such as blankets, garments, shawls, or even accessories for your home like tablecloths, wall hangings or pillows. They improve the overall appearance of the project and provide a polished, finished look.
From picots to shell patterns, these embellishments bring texture, structure, and visual interest to crochet projects.
Today I’m exploring a variety of crochet borders and crochet edging patterns that will help to inspire your creativity.
Why crochet a border or edging?
Why do projects even need a border? Here are 7 reasons why:
- Finishing Touch: to provide a polished and perfect finishing touch to a crochet project. They create a defined edge and give a sense of completion to the overall design. Without a border, the edges of the project may appear unfinished or uneven.
- Structural Support: to help reinforce the edges of a crochet item. They add stability and prevent the edges from stretching or becoming misshapen over time. This is especially important for items like blankets or garments that may undergo regular use and washing.
- Visual Enhancement: an opportunity to add visual interest and decorative elements to a crochet project. They can enhance the overall aesthetic and make the item more appealing. Different stitch patterns, textures, and color combinations can be used to create unique and eye-catching designs.
- Concealing Imperfections: can be used to hide any imperfections or mistakes made during the main body of the project. If there are minor inconsistencies or uneven edges, a well-designed border can help camouflage those flaws and create a more polished appearance.
- Concealing Yarn: to hide the yarn strands carried along the back of the work. An enclosed or envelope border can be used in colorwork such as mosaic crochet to hide the yarn strands. This border is designed to cover these carried yarns, creating a neat and polished finish. Take a look at this comprehensive tutorial for how to crochet an envelope border for your mosaic projects.
- Personalization: Adding a border or edging allows you to personalize your crochet project and make it unique. You can choose a border that matches your style, complements the color scheme, or adds a special touch. It’s an opportunity to showcase your creativity and make the project your own.
- Functional Purposes: Depending on the project, they can serve functional purposes as well. For example, a border on a blanket can provide extra warmth and insulation, while a border on a tablecloth can help keep it in place or prevent fraying.
Overall, we use crochet borders and edgings because they contribute to the design and appearance of a project while providing structural support and a professional finish.
Whether working on a simple or intricate crochet item, adding a border or edging can take it to the next level and make it truly stand out!

Troubleshooting Common Problems with Crochet Borders and Edgings
Here are some common problems that I could think of that you might find when working on borders and edgings, along with possible solutions:
- Uneven or Wavy Edges: If your border or edging is coming out uneven or wavy, it could be due to inconsistent tension or not working the correct number of stitches. Make sure you maintain an even tension throughout your work and count your stitches carefully, ensuring you are working the correct number of stitches in each section or round.
- Curling or Flaring Edges: Sometimes, crochet borders may curl inward or flare outward, causing the project to lose its shape. This can happen when the border is too tight or too loose compared to the main body of the project. Adjusting your hook size or stitch tension may help alleviate this issue. If the border is too tight, try using a larger hook or loosening your tension. If it’s too loose, use a smaller hook or tighten your tension.
- Gaps or Holes in the Border: If you notice gaps or holes in your border or edging, it may be due to missed stitches or accidental yarn overs. Double-check your stitch count to ensure you’re not skipping stitches or accidentally adding extra ones. Pay attention to the stitch placement and yarn overs to maintain an even and consistent stitch pattern.
- Crooked Borders: Crooked borders can occur if you’re not working your stitches directly into the corresponding stitches or spaces from the previous row or round. Make sure you’re inserting your hook into the appropriate stitch or space as instructed in the pattern and that your stitches are aligned correctly.
- Tension Mismatch: If your border or edging looks noticeably tighter or looser compared to the rest of your project, it may be due to a tension mismatch. Crocheters tend to have a natural loose or tight tension. If this is the case, you can try adjusting your tension by consciously making your stitches tighter or looser to achieve a more consistent appearance. Alternatively, you can use a different hook size to match the tension of the main body of your project.
- Yarn Management: Working borders and edgings can involve changing yarn colors or joining new yarn. Ensure that your color changes or yarn joins are secure and tidy. Weave in loose ends as you go or at the end to keep your project neat and professional.
For quick reference, you’ll find the information above summarised in the table below:
| Problem | Possible Solutions |
| Uneven or Wavy Edges | Maintain consistent tension |
| Count stitches accurately | |
| Curling or Flaring Edges | Adjust hook size or tension |
| Ensure the border matches the main body tension | |
| Gaps or Holes in the Border | Double-check stitch count and placement |
| Pay attention to yarn overs and stitch placement | |
| Crooked or Misaligned Borders | Work stitches directly into the correct stitches |
| Tension Mismatch | Adjust tension or use a different hook size |
| Yarn Management | Secure color changes and yarn joins neatly |
| Weave in loose ends as you go or at the end |
By being mindful of these common issues and using the right solution, you can overcome challenges to create beautiful borders and edgings.
Exploring Stitches and Techniques for Stunning Crochet Borders and Edgings
Crochet border patterns and edgings can be created using a variety of stitches and techniques.
I’ve included the most common stitches and techniques used for borders and edgings; what they are and why you might use them. Alongside this, you’ll find tutorials and patterns for each border or edging.
Before moving on to the free patterns, it’s worth noting that blankets are one of the most popular projects where borders and edgings are commonly used.
There are a couple of questions I’m asked a lot at craft club, the most often asked question is how many stitches are needed for corner spaces on a crochet blanket border.
How many stitches for corner spaces can vary depending on width of the border, the stitch pattern used, and the overall size of the blanket.
As an example, my Tangerine Dreams blanket pattern has 3 rounds for the border. The first is a round of single crochet stitches and I used 3 single crochets in the corner spaces. The second round is crossed double crochet stitches and I used 1 double crochet, 2 chains and 1 double crochet in the corner spaces. The third round is single crochet stitches but this time I used 2 single crochet, 2 chains and 2 single crochet in the corner space. This combination of stitches and chains meant the corners laid flat.
I’ve found the best way to decide the right number of stitches needed in corner spaces is to test the border on a swatch or a small section of blanket to see how it works. Once you find the right balance, you can use the same number of corner stitches throughout the entire border to maintain consistency.
As a general guide, crochet borders for blankets are worked three stitches in a corner space and for a more rounded and prominent corner, four stitches.
Another common question I’m asked is whether to add chains between stitches in the corner spaces (you’ll see above in my example I added chains between stitches in the 2nd and 3rd rounds of the border).
Adding chains accommodates the height of the stitches worked along the sides of the blanket which allows the corners to lay flat and prevent them from becoming too tight or puckered. My advice is to chain two or three and see the effect it has. And remember that whatever you decide to use, you use on all corners!
Crochet Edging Patterns
Click on the numbered border to be taken directly to the pattern or tutorial that uses the specific border.
Most patterns and tutorials are written using US crochet terminology.
For my UK crocheters, the table below is a conversion of basic crochet stitches from US to UK.
| US Crochet Terms | UK Crochet Terms |
|---|---|
| single crochet (sc) | double crochet (dc) |
| half double crochet (hdc) | half treble crochet (htr) |
| double crochet (dc) | treble crochet (tr) |
| treble (tr) | double treble (dtr) |
| double treble (dtr) | triple treble (trtr) |
Thank you to the crochet community for being so generous with sharing their free patterns and tutorials with me. This resource wouldn’t be so helpful without them!
Happy crocheting!
Jera’s Jamboree receives payments for affiliate advertising. This is at no extra cost to you. As an Amazon Associate I earn from qualifying purchases. Please see my disclosure policy for more information.
Single Crochet Border / Half Double Crochet Border
This is a simple and versatile border that can be worked with a single color or multiple colors. It involves working a round of single crochet stitches or half double stitches evenly spaced around the edge of the project. This border creates a clean and neat finish.
1.Single Crochet Border

I often find a single crochet border is all that’s needed to give structure and added interest to a project such as my Noughts and Crosses mosaic blanket.
Not only did the single border in orange tie all of the colors together, it also helped to hide the yarn ends from the color changes. The border doesn’t detract from the pattern.
2.Single and Half Double Crochet Border

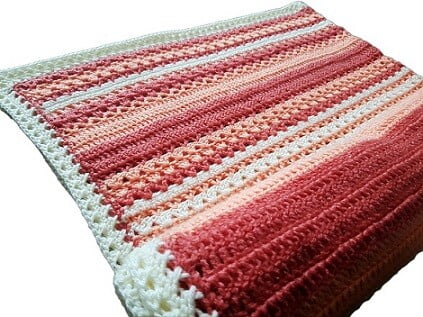
I used a single crochet border to straighten the edges of my Shell Bay blanket followed by a double crochet border.
I used white as opposed to the turquoise as I felt it gave the blanket a lovely clean finish.
Double Crochet Border
This is another versatile and commonly used crochet technique for creating borders and edgings. It involves working double crochet stitches around the edge of a project, providing a clean and structured finish.
3. Double Crochet Border

A round of double crochet to straighten the edges followed by 2 rounds of double crochet in white give a lovely finish to this filet blanket.
4.Double Border (crossed double stitches)

The crochet blanket edging on this pattern uses double crochet but crosses the stitch over. It complements the cable stitch of the blanket and is worked in the same color as the blocks of single crochet stitches.
For a comparison of the same border worked with different stitches and color, take a look at my Bunny Peek-a-Boo blanket.
5. Double Crochet Border for Beginners

This tutorial for adding a double border to projects is a great resource if you’re just starting out.
As well as step-by-step photos, you can also follow a video tutorial. There are also tips to help you achieve the perfect border.
Front Post and Back Post Crochet Edging
Front post and back post crochet borders are techniques used to create textured and visually appealing borders. They involve working stitches around the posts of the stitches in the previous rows, rather than into the top loops. These techniques create raised ridges or “ribs” on the surface of the border, adding depth and dimension to your crochet projects.
These two free tutorials will show you how to use these techniques to add a professional finish to your projects.
6. Front Post Edging

This border is created in 6 rounds and has 1 chain in the corner spaces between stitches. Using a different color for the front post stitches really makes this edging pop and adds to the overall design.
7. Front Post Back Post Edging

This free pattern uses front post and back post in half double crochet stitches to create a border.
Corner spaces also use a chain 1 between stitches.
As well as the written pattern, you’ll find a link to video tutorials for left hand and right hand. A clear guide with text and photos is also available so whatever your preference is for learning, this designer has you covered.
Crochet Shell Border
The shell border consists of a series of crochet stitches worked into the same stitch or space to form a shell-like pattern. Shells are usually made using double crochet, but they can also be created with other stitches like treble crochet or half double crochet. This border adds a lovely scalloped or wavy effect.
8. Shell Border
(2double crochet, chain 1, 2 double crochet, chain 1, 2 double crochet in one stitch)

The perfect example of the finishing touches for a garment is this edging used on my Fiona poncho (bottom photo in the image above).
This border is worked in 5 rows and is easy to do.
Have fun!
9. Crochet Shell Border
(5 double crochet stitches)

I used this shell border on a hem to lengthen a tank top.
The shells in this pattern are 5 double crochets and are worked in round 4 of the hem.
You could use the same border on other projects (such as shawls, table runners, jar covers etc)
It’s very easy to do!
10. Crochet Shell Border
(3 double crochet stitches)

I’ve included my Day at the Beach crochet blanket as a comparison to the edging above.
This border is worked in 3 rounds with the shells worked into the 3rd round.
11. Crochet Shell Border
(single crochet, half double crochet, double crochet)

This perfect crochet border on my light and lacy triangle shawl uses different height stitches to achieve the shell shape.
I chose this edging because it complements the pattern of the shawl.
I must admit I enjoy browsing different borders, either in advance of planning a project or when I’m at the stage where a border is needed. A great resource is the Every Which Way book – 139 patterns with written instructions with symbol charts so plenty to choose from!
12. Sawtooth Crochet Edging Tutorial

The border is completed in 3 rounds. The first is single crochet in the back loop (3 single crochets in the corner), the second is a round of treble, chain 1, skip 1 and finally, the sawtooth edge is made by working a treble, chain 3, single crochet in the same stitch.
This is a written tutorial and a video tutorial.
Crochet Scallop Edge
The scallop edge is similar to the shell crochet border. The stitches are worked in groups to form a scalloped edge.
13. Crochet Scallop Edge Pattern

An easy blanket worked in half double crochet comes alive with this gorgeous, scallop crochet border.
To set the blanket up ready for the scallop three rounds are worked. One, a round of single crochet (with 3 stitches in the corner) and two rounds of double crochet (with 3 stitches in the corner). The scalloped edge is worked by skipping stitches then working 11 double treble crochets in the next stitch. An easy technique that gives the wow factor 🙂
I’ve used a scallop border on my Princess of Diamonds lap blanket. It really gives that something extra and makes it stand out.

Crochet Picot Edging
Picots are small, decorative loops created by making a chain and slip stitching back into the chain to form a loop. They can be used in various types of borders and edgings to add a delicate and ornamental touch. Picots are often used in combination with other stitches to create interesting patterns.
14. Picot Edging Asymmetrical Shawl

Instead of my asymmetrical scarf ending on a row of double crochet, I chose to add a picot border as a design element to make it unique.
I used chain 5 with a slip stitch into the first chain to make the picot.
15. Crochet Washcloth with Picot or Crab Stitch Border

This free washcloth pattern gives you two options for finishing off – a picot border and crab stitch border.
The picot edging is made by chaining 3 and slip stitching into the first chain.
The crab stitch border uses double crochet and works left to right instead of the typical right to left.
The designer has also included a video tutorial to help you.
If you’d like to focus on the picot border, you’ll find a tutorial as a stand-alone from the same designer with photos and video tutorial to show you how the picot is made.
16. How to Crochet a Picot Border

This picot border is worked by chaining 3 and then slip stitching into the base of the chain 3.
The designer has provided a picture tutorial, video tutorial and written instructions.
17. Crochet Border for Granny Square Blanket

This border is very similar to the one above but using different yarn and different colors has given it a different appearance. Both give a fabulous finish!
It’s always worth your time to experiment to see what works for your project.
Bobble Crochet Border
Bobbles are raised stitches that create a textured effect. They are made by working several stitches (typically double crochet) into the same stitch or space and then closing them together at the top with a single crochet. Bobbles can be spaced evenly or placed at regular intervals along the edge, depending on the desired effect.
You’ll find two different but fabulous tutorials for how to crochet a bobble border in this section.
18.Crochet Bobble Border Tutorial

Achieved by chaining stitches and working the bobble into the chain, this bobble border adds a fun and playful element to any project.
The designer has added a photo tutorial as well as a video tutorial. Give it a go, I think you’ll love it!
19. How to Crochet a Bobble Border on a Blanket

With this bobble border, a foundation round of half double crochet is worked first. The bobble round is worked with a cluster of 5 double crochets for the bobble and instead of chaining as in the pattern above, slip stitches are made before the work on the next bobble.
The designer has provided a video walkthrough so if you’re not clear what you need to do from the written instructions, you have another option to help you create this fab border.
Crochet Ruffle Edging
The ruffle edging is typically work in multiple rounds of stitches, gradually increasing the number of stitches in each round. This results in a flared or ruffled effect. The ruffles can be delicate and small or big and bold. This border adds a frilly, whimsical touch.
20. Crochet Ruffle Edging
This is a great resource for the different ruffle edgings you can add to your projects.
The designer includes instructions for different stitches from the simple to the fancy.
Crochet Lace Edging
Crochet lace edging is a delicate and intricate technique that adds a touch of elegance and sophistication to crochet projects. It features intricate stitch patterns that resemble lace, creating a lacy border along the edges of a crochet item.
I’ve included tutorials as well as a crochet pattern.
21. Jasmine Lace Edging Crochet Pattern

Made from 4 rows per motif, this stunning lace edging pattern uses puff stitches and extended stitches.
As well as written instructions, the designer has created a left-handed and right-handed video tutorial.
Use on blankets, tablecloths, short sleeves and more to give your project an elegant touch.
22. Crochet Sunflower Table Runner (with a lace border)

This stunning lace edging is worked in only 3 rounds with the final round making use of a chain 3 picot. I think this looks very regal!
If you also wanted to crochet the table runner, there is a filet chart with instructions on how to use it.
This pattern includes written instructions and a video tutorial.
This would look fab as a wall hanging too!
More creative borders and edgings for your projects
The different borders and edgings below give you further opportunities to add creativity and uniqueness to your crochet projects.
23. Pom Pom Border

Before working the pom pom border, a round or row of single crochet stitches is crocheted. This gives a solid edge to work the chains and pom poms.
Made in four easy steps, this free pattern includes a photo tutorial to help you.
I think this adds a fun and playful finish to any project.
24. Curling Waves Crochet Border Tutorial

This two-row border is easy but gives such a unique finish!
The first round is worked by chains, skipping stitches and single crochet. The waves are made in the next round (or row) from working a double crochet and then working over the stem of the double crochet just made.
This designer has a photo guide and video tutorial so even if you’re not feeling very confident, following the clear steps will lead you to success.
25. Flower Border Edging

The flower border I used on my Orchid Blaze blanket is completed in 5 rounds with a final round of half treble.
I’ve used 2 double crochets, chain 2, 2 double crochets in my corner spaces.
This is an intermediate project.
26. Floral Border

Jazz up your afghan or throw with this gorgeous floral edging (I’m also thinking it would make a unique hem of a sweater or poncho).
The tutorial includes suggestions for setting up this border. As well as the written instructions you have a choice to follow either a left-handed video tutorial or right-handed.
27. V-Stitch Border Edging

I wanted to try using a V-Stitch border on my Pastel Dreams blanket.
It turned out well!
To set the foundation for the border I used single crochets with the corner spaces using single crochet, chain 2, single crochet. This made it easy to work the V-stitches.
The next round I worked treble crochet V-Stitches with 2 treble crochets, chain 2, 2 treble crochets in the corner space.
For structural support, the third round is simply double crochets using 3 double crochets, chain 2, 3 double crochets in the corner spaces. Easy but effective!
28. Granny Block Stitch Border

Not only is this crochet border stitch easy, but using different colors and a different number of rounds will give you a unique finish every single time.
Don’t worry if you haven’t worked the granny block stitch before, the designer has included a video tutorial and also, a step-by-step photo tutorial that includes text.
29. Blanket Stitch Edging

This edging creates the look of a traditional blanket stitch which is worked in 2 different colors to make it pop.
Completed in 3 quick rounds of crochet stitches using all 3 of the basic stitches in the rounds, you can make it unique by working additional rounds of the Round 2 creating depth to the edging.
Written instructions are accompanied by a video tutorial making it easy to learn.
30. Woven Crochet Edging

This woven border is so effective and a good introduction to this technique (I’ve wanted to try weaving with a shawl – it’s on my list to try!).
Crocheted in a neutral color, the border is made unique by weaving in a thread of 5 of the main blanket colors.
It’s much easier than it looks!
Scroll down the pattern for the border instructions.
31. Granny Square Crochet Borders

You’ll be shown how to crochet 5 easy borders for your individual granny squares with the written instructions in this tutorial:
- Double crochet
- V-Stitch
- Reverse Treble Crochet
- Shell Stitch
- Ruffles
Links to individual video tutorial will show you each step needed to crochet these edgings.
If you enjoy crocheting granny squares you might be interested in these patterns:
32. Crochet Star Border

How cute is this border!
Worked the magic ring? The designer has used this technique in a creative way to make those stars.
Step-by-step photos with accompanying instructions AND a video tutorial will help you work this stunning border.
Experiment adding to different projects and you’ll see the effect adding this element has on your project.
33. Crochet Little Stars Border

These gorgeous tiny stars are crocheted around the post of stitches and use picot stitch to form the stars. Very creative 🙂
Clear photos and text show you the steps you need to do. There’s also a video tutorial if you’re not feeling quite confident enough to have a go on your own.
34. Camel Stitch Border (using one color)

This video tutorial shows you how to work this border using one color. You don’t need a specific number of stitches making it easy to adapt for lots of different projects.
35. Camel Stitch Border (using different colors)

The camel stitch border uses half double crochets worked in the third loop and gives the blanket a solid finish (as well as looking great!).
Use contrasting or complementary colors to add a fab finish to your border.
36. Crab Stitch Border (on coasters)

This designer has used the crab stitch border on a set of coasters. If you haven’t worked this border before, this is a fabulous project to gain some experience.
Follow the written instructions and if you’re not sure, there’s a video tutorial for you too.
37. Crochet Candy Cane Border

This free pattern will teach you how to crochet this fun candy cane border.
As well as photos, the designer has included a video tutorial.
I think this would look fab on lots of different projects. Give it a go!
38. Adding straight edges

This easy and very simple technique will have the edges of all your crochet projects looking neat.
Take a look! You won’t regret it.
39. Crochet Ribbing/Trim

Adding this ribbing on your crochet hats and sweaters will give your projects a polished and professional look.
Follow the written instructions or video tutorial and get crocheting.
40. Berry Stitch Edging

Learn how to crochet this berry edging with this 1-minute video.
A great alternative to puff stitch, use this border on blankets, dishcloths and washcloths.
41. Chevron Border Edging
The gentle waves make this a stunning border to use on your unisex crochet blankets.
You’ll find written instructions for the four rounds plus video tutorials for right-hand and left-hand crocheters.
42. Crochet Puff Edge Stitch

Written instructions and a video tutorial will show you how to crochet a puff edge border.
Tip: Be aware – the puff stitch is a yarn eater! Factor this into your yarn allowance before you start crocheting your border.
43. How to make a crochet fringe edging (with chains)

This tutorial shows you how to use chains to crochet a fringe.
The length of the chain can vary from project to project and your personal preference. Experiment and see what works.
I think this fringe would look amazing on scarves or ponchos, adding that boho vibe to your makes.
44. Twisted Fringe, Knotted/Double Knotted Fringe

Follow the instructions to make these 3 different tassels:
- Twisted
- Knotted
- Double-knotted
Click over to Facebook to watch how to create these fringes too.
It’s always handy to have a few fringe designs you can choose from!
These are just a few of the crochet borders and edgings available to us. There are countless variations and combinations you can explore as well as using color changes to make the border stand out.
Experimenting with different options and techniques will help you to find the perfect border that complements your project and showcases your crochet skills. Have fun!
Related Crochet Blanket Patterns
If you enjoy working with a combination of stitches and techniques, you might like:
- Peek-a-Boo Bunny blanket
- Snowberry baby blanket
- Winter Nights blanket
- Tunisian Crochet blanket patterns
- Baby blanket patterns
Easy patterns with colour changes include:
Looking for a one colour, one-row repeat pattern or baby shower gift? The Tranquil Moments baby afghan is perfect for meeting those needs.
Wanting to design your own blanket or looking for an easy blanket crochet pattern? These simple blankets and instructions to create your own are just what you need.
Short on time? These baby blanket kits or modern blanket kits could be just what you need.