My crochet hot water bottle cover pattern can be adapted to any size and is a quick and easy crochet project for beginners and experienced crocheters alike.
It’s a great stash-busting project, keeping your crafting costs low.

Jera’s Jamboree receives payments for affiliate advertising. This is at no extra cost to you. As an Amazon Associate I earn from qualifying purchases. Please see my disclosure policy for more information.
Instructions are to fit a 1.5L hot water bottle but it’s easy to change the finished size.
You could adapt the pattern to make it bigger or smaller for use such as:
- a pouch
- a pyjama case
Chain an even number to extend the width, dividing the extra stitches by 2 (for left and right) to keep the owl tapestry in the centre.
Adding rows top and bottom to the tapestry chart will also keep the owl motif in the centre.
To make the crochet pouch smaller, do the opposite and reduce the starting chain and rows. The owl won’t fit onto a smaller pouch.

There’s also a variety of ways to change the crochet hot water bottle cover to make it unique to you such as:
- Use self-striping yarn and crochet the owl in a block of colour
- Use double crochet (US single crochet) and use the back instructions to make two panels the same

Go to the instructions UK Crochet Terms
Go to the instructions US Crochet Terms
Design Inspiration
With the heating thermostat turned down a couple of degrees, I wanted something easy to warm me up when I needed a boost. A hot water bottle was the perfect answer!
I wanted a crochet hot water bottle cover that was quick and easy but would also look fabulous.
My inspiration for the design is simple – I’ve loved owls for years.
I didn’t have to think too hard about the tapestry crochet I wanted to design for the front of my cover . I love how it turned out!
Love owls? You’ll find a fun owl pillow in this collection of free crochet pillow patterns. Crochet them both to make a fab set!
Related Hot Water Bottle Cover Crochet Patterns
How the pattern is worked
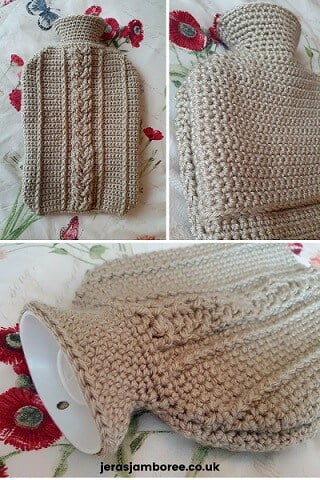
I’ve worked the crochet hot water bottle cover in two separate pieces – front and back – and then sewn them together.

I’ve used double crochet stitches (US single crochet) because the fabric needs to be dense to keep hands, feet and skin safe from the heat.
The owl motif in a contrasting colour is on the front of the cover.
I chose to place the owl low down so that the drawstring with pom poms doesn’t cover the owl.
The back is crocheted in double crochet (US single crochet) in one colour.
A row of chains and skipped stitches create the spaces where the drawstring pulls the cover closed.

The drawstring is made by crocheting a chain with the main and contrasting colour held together.
Two small pom poms are made and sewn onto the ends of the length of chained stitches.
If you haven’t made a pom pom before don’t worry! I have a free pom pom template you can download. I’ll also share instructions for how to make a pom pom in the written instructions.
Prefer an envelope closure on your cover? I have also designed a hot water bottle cover with an envelope closure to fit a 2L hot water bottle. If you’re interested, click on the highlighted text to go directly to the free pattern.
Related Tapestry Crochet Patterns
If you enjoy working this technique you might also like these patterns:
- Heart and Stripes Tote Bag
- Day at the Beach Blanket
- Peek-a-Boo Blanket
- Orchid Blaze Blanket
- Dog Sweater
- Crochet/Pillow Cover
- 20 Free Tapestry Crochet Patterns
Yarn
I used Emu Classic DK which is great value for money.
This is a wonderfully soft, smooth premium acrylic yarn that is great for everyday use.
I love that there’s so many colours (50!) making it easy to choose a colour palette that matches.
This yarn is easy care being machine washable at 40 degrees.
Pattern Notes
- Chain 1 does not count as a stitch
- Yarn A = dark colour
- Yarn B = lighter/contrasting colour
- The tapestry crochet is written in the format: dc x (how many stitches) (A or B). A or B represents the yarn colour, for example Row 2:
dc x 9 A = double crochet (US single crochet) in next 9 stitches with Yarn A
dc x 18 B = double crochet in next 18 stitches with Yarn B
dc x 9 A = double crochet in next 9 stitches with Yarn A
- Leave a long tail after fastening off for sewing the seams.
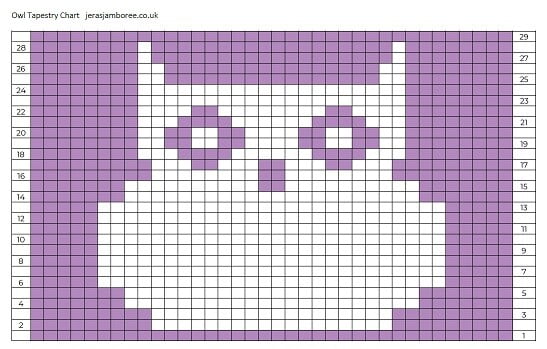
If you would prefer to work from the tapestry chart for the owl motif, you can download the tapestry chart PDF by clicking here.
Level
Beginner
Materials
- DK x 100g Colour A
- DK x 50g Colour B
- 4mm Crochet Hook
- Scissors
- Tapestry needle (for weaving in ends)
- To make the pom poms you will need:
- Pom pom template
- Yarn A and B
- Cardboard
- Glue stick
Stitches and Abbreviations
- Ch – chain
- T-ch – turning chain
- Dc – double crochet / US single crochet
- Sts – stitches
- Rep – repeat
- Sk – skip
Measurements
8.5inches/22cm (w) x 13.5inches/34cm (h)

Hot Water Bottle Cover Instructions UK Crochet Terms
Front
With Yarn A ch 36 + 1 (t-ch)
Row 1: dc 2nd ch from hook, dc to the end, turn (36 sts)
(owl tapestry begins in next row)
Row 2: ch1, dc x 9 A, dc x 18 B, dc x 9 A
Row 3: rep row 2
Row 4: ch1, dc x 7 A, dc x 22 B, dc x 7 A
Row 5: rep row 4
Row 6: ch1, dc x 5 A, dc x 26 B, dc x 7A
Row 7 – 13 rep row 6
Row 14: rep row 4
Row 15: ch1, dc x 7 A, dc x 10 B, dc x 2 A, dc x 10 B, dc x 7 A
Row 16: rep row 15
Row 17: ch1, dc x 9 A, dc x 3 B, dc x 2 A, dc x 3 B, dc x 2A, dc x 3 B, dc x 2 A, dc x 3 B, dc x 9 A
Row 18: ch1, dc x 8 A, dc x 3 B, dc x 4 A, dc x 6 B, dc x 4 A, dc x 3 B, dc x 8 A
Row 19: ch1, dc x 8 A, dc x 2 B, dc x 2 A, dc x 2 B, dc x 2 A, dc x 4 B, dc x 2 A, dc x 2 B, dc x 2 A, dc x 2 B, dc x 8 A
Row 20: rep row 19
Row 21: ch1, dc x 8 A, dc x 3 B, dc x 4 A, dc x 6 B, dc x 4 A, dc x 3 B, dc x 8 A
Row 22: ch1, dc x 8 A, dc x 4 B, dc x 2 A, dc x 8 B, dc x 2 A, dc x 4 B, dc x 8 A
Row 23: ch1, dc x 8 A, dc x 20 B, dc x 8 A
Row 24: rep row 23
Row 25: ch1, dc x 8 A, dc x 2 B, dc x 16 A, dc x 2 B, dc x 8 A
Row 26: rep row 25
Row 27: ch1, dc x 8 A, dc x 1 B, dc x 18 A, dc x 1 B, dc x 8 A
Row 28: rep row 27
(Row 28 is the end of the owl tapestry)
Row 29: ch1, dc to end of row with A
Row 30 – 50 rep row 29
(the next row creates the spaces for the drawstring)
Row 51: ch1, dc in base of ch1, *ch2 sk 2, dc x 2 * rep to last 2 sts, dc in last 2 sts
Row 52: ch1, dc in each dc, 2 x dc in each ch sp
Row 53 – 64 rep row 29
Fasten off leaving a long tail for sewing the seams
Back
Ch36 + 1 (t-ch)
Row 1: dc in 2nd ch from hook to the end of the row, turn
Row 2 -50: ch1, dc to the end of the row
Row 51 – 64 rep instructions for front
Fasten off leaving a long tail for sewing the seams
Hot Water Bottle Cover Instructions US Crochet Terms
Front
With Yarn A ch 36 + 1 (t-ch)
Row 1: sc 2nd ch from hook, sc to the end, turn (36 sts)
(owl tapestry begins in next row)
Row 2: ch1, sc x 9 A, sc x 18 B, sc x 9 A
Row 3: rep row 2
Row 4: ch1, sc x 7 A, sc x 22 B, sc x 7 A
Row 5: rep row 4
Row 6: ch1, sc x 5 A, sc x 26 B, sc x 7A
Row 7 – 13 rep row 6
Row 14: rep row 4
Row 15: ch1, sc x 7 A, sc x 10 B, sc x 2 A, sc x 10 B, sc x 7 A
Row 16: rep row 15
Row 17: ch1, sc x 9 A, sc x 3 B, sc x 2 A, sc x 3 B, sc x 2A, sc x 3 B, sc x 2 A, sc x 3 B, sc x 9 A
Row 18: ch1, sc x 8 A, sc x 3 B, sc x 4 A, sc x 6 B, sc x 4 A, sc x 3 B, sc x 8 A
Row 19: ch1, sc x 8 A, sc x 2 B, sc x 2 A, sc x 2 B, sc x 2 A, sc x 4 B, sc x 2 A, sc x 2 B, sc x 2 A, sc x 2 B, sc x 8 A
Row 20: rep row 19
Row 21: ch1, sc x 8 A, sc x 3 B, sc x 4 A, sc x 6 B, sc x 4 A, sc x 3 B, sc x 8 A
Row 22: ch1, sc x 8 A, sc x 4 B, sc x 2 A, sc x 8 B, sc x 2 A, sc x 4 B, sc x 8 A
Row 23: ch1, sc x 8 A, sc x 20 B, sc x 8 A
Row 24: rep row 23
Row 25: ch1, sc x 8 A, sc x 2 B, sc x 16 A, sc x 2 B, sc x 8 A
Row 26: rep row 25
Row 27: ch1, sc x 8 A, sc x 1 B, sc x 18 A, sc x 1 B, sc x 8 A
Row 28: rep row 27
(Row 28 is the end of the owl tapestry)
Row 29: ch1, sc to end of row with A
Row 30 – 50 rep row 29
(the next row creates the spaces for the drawstring)
Row 51: ch1, sc in base of ch1, *ch2 sk 2, sc x 2 * rep to last 2 sts, sc in last 2 sts
Row 52: ch1, sc in each sc, 2 x sc in each ch sp
Row 53 – 64 rep row 29
Fasten off leaving a long tail for sewing the seams
Back
Ch36 + 1 (t-ch)
Row 1: dc in 2nd ch from hook to the end of the row, turn
Row 2 -50: ch1, dc to the end of the row
Row 51 – 64 rep instructions for front
Fasten off leaving a long tail for sewing the seams
Finishing Off (UK and US)
Drawstring
With both Yarn A and Yarn B together, ch 100. Fasten off and sew in ends.
Thread the drawstring through the ch spaces in row 51.
Pom Poms
To finish off this crochet project, make two pom poms and sew on to the ends of the drawstring.
How to make a crochet pom pom
Download and print the pom pom template
You will need two of the same size pom pom makers from the template. For this crochet project:
- Cut out the smallest pom pom (from the template above) x 2
- Glue the pom pom templates to a piece of card (I use empty cereal boxes which are perfect)
- Cut out the pom pom template
- With a glue stick, lightly paste onto one side of the template
- Secure a length of yarn on the inside of the pom pom maker and place the other pom pom template over the top. The yarn is sandwiched between the two templates.
- Wrap the yarn around the pom pom maker, through the middle and over the side, ensuring your cover is even – the more wraps, the fuller your pom pom will be. Whilst you’re wrapping, make sure the yarn between the two pom pom makers is secure
- Loosely tie the yarn that is sandwiched between the two templates together once. Don’t knot it.
- Holding the two loose strands, cut the yarn between the two templates
- Keeping hold of the two strands, pull the cardboard away
- Tie the loose strands tightly and securely
- Using your scissors, shape the pompom
Pom Pom Photo Tutorial


Happy crocheting!
Copyright Notice
The pattern and photographs of this design are the property of Sharon Goodwin at Jera’s Jamboree. This pattern and design are subject to copyright and are for personal, non-commercial use only. You may not share, resell, alter or redistribute this pattern in part or in whole. You may, however, sell any finished items you make. If you would like to include this pattern in a roundup, you may take one photo and link back to this pattern.
var pfBtVersion=’3′;(function(){var js,pf;pf=document.createElement(‘script’);pf.type=’text/javascript’;pf.src=’//cdn.printfriendly.com/printfriendly.js’;document.getElementsByTagName(‘head’)[0].appendChild(pf)})();