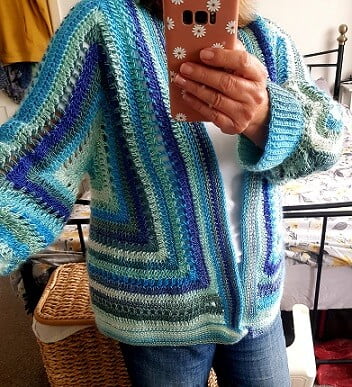
This free crochet hexagon cardigan pattern is for one of the easiest wearables you will ever make.
Jera’s Jamboree receives payments for affiliate advertising. This is at no extra cost to you. As an Amazon Associate I earn from qualifying purchases. Please see my disclosure policy for more information.
Not only is it easy to make but the pattern adapts easily to fit any size, child or adult.
You can use any yarn weight or fibre to crochet this hexagon cardigan as it is made to measure.
Cropped cardigan? Or longer cardigan? My pattern is so versatile that you can make your cardigan in any length you want!


If you can crochet a granny square you will be able to crochet the hexagons.
I’ve used basic crochet stitches – double crochet (US single crochet), treble crochet (US double crochet) and chains – making this project suitable for beginners.
The pattern is written in UK crochet terms and US crochet terms.

Design Inspiration
It’s difficult to find a cardigan that fits me well. I’m not very tall so the sleeves are ALWAYS too long. A petite fit is a bit hit and miss too.
I love the hexagon granny cardigans but wanted this cardigan to be a bit different. I knew it would be easy to crochet a hexagon cardigan made-to-measure.


How the pattern is worked
You can use any weight yarn and fibre for this pattern.
You will need to go up a hook size from the recommendation of your yarn for the body of the cardigan and down a hook size for the edging and cuffs.
I used Aran/Worsted weight yarn with a 6mm hook for the body and 4mm hook for the edging and cuffs.
Two hexagons are crocheted first. They are crocheted in rounds. The pattern is 3 rounds of treble crochet (US double crochet) and one round of treble, chain 1, skip one.
Once the hexagon is folded, the sleeve seam is made by working slip stitches.

*If you know you want to add length to the sleeves and a cuff – you can do so after joining the top seam of the sleeve. If like me, you weren’t sure, you can leave extending the sleeves to the end.*
Next, rows are added to the back of the cardigan from the top to the bottom. The extra rows are needed as space for the neck.

The two sides are sewn together either using slip stitch or double crochet (US single crochet).
If you wanted a cropped cardigan, you would then go on to edging the front/neck to finish your cardigan.
For a longer cardigan, the yarn is re-joined to the bottom of the cardigan to work the extra rows to extend the length.

The edging along the front and back of neck is worked in rows with double crochet (US single crochet) and a hook size smaller than recommended for the yarn you are using.
I realised once I’d done the edging and tried on my cardigan again, I wanted my cardigan to be longer! Instead of unpicking/frogging what I had done, I decided to repeat the edging above at the bottom of the cardigan. And that’s the beauty of crochet (or anything handmade) isn’t it – the imperfections are what make it unique 🙂

Finally, you will need to decide whether you want to extend the sleeves and/or add cuffs.
If you want to extend your sleeves, you’ll continue with the pattern used in the hexagon rounds. If you also want to add cuffs, you’ll need to leave space between the end of the sleeve and your wrist.
There are three rounds of decreasing before the cuffs are crocheted.
Double crochet in the back loops is used for the cuffs.
Basically, once the hexagons are crocheted, the pattern extends the width, the length, the sleeves and adds edging/cuffs.
Related Crochet Cardigan Patterns
- Planning your summer makes? Try this lacy summer cardigan, this bright striped cardigan or long-sleeved cardigan worked in open stitches could be just what you’re looking for. Browse these free summer crochet cardigans for inspiration.
- Two hexagons also look great as a pullover! Check out the Moon Shimmer sweater pattern.
- The Stella granny square cardigan is worked in one large granny square for the back and smaller squares for the front. This made-to-measure cardigan is an easy make. You’ll find different designs and constructions in this collection of free granny square cardigans.
- My hooded granny stitch cardigan is the perfect garment to wear during spring and summer
- Worked in 7 rectangles, the Selene long cardigan looks great worn with a dress or t-shirt and jeans. You’ll find different designs in this collection of free long cardigan patterns.
- If you’re wondering what to do with those odds and ends in your yarn stash (and a blanket just isn’t grabbing your interest), have a browse of these of patchwork cardigan patterns.
- Suitable for wearing all year, you’ll have this two-row repeat cardigan worked up in no time
- Style this lacy cardigan from day to night.
- With a cute block of hearts worked in filet crochet, the Amelia short-sleeve cardigan just might become one of your favourites.
Yarn
I used Hobbii Carnival in Copenhagen 05 (Aran/Worsted) which is 100% premium acrylic yarn.
It has a clear but gradual colour shift that I thought would work well for this project. I tried to match up the colour changes and I was successful in some places but not others!
It’s machine washable at 30 degrees making this ideal for wearables.
If this yarn isn’t available, a list of substitutes is available on YarnSub.
You could use any Aran/Worsted weight yarn with this pattern.
Pattern Notes
- Chain 1 does not count as a stitch
- Chain 3 does count as a stitch
- Hexagons start with chain 4 and slip stitch to first chain to make a circle but if you prefer to start with a magic circle, then that’s fine
- Hexagon rounds end with a slip stitch at the top of chain 3 and begin with slip stitches to the next corner space
- Hexagons should be ruffled and not ‘flat’


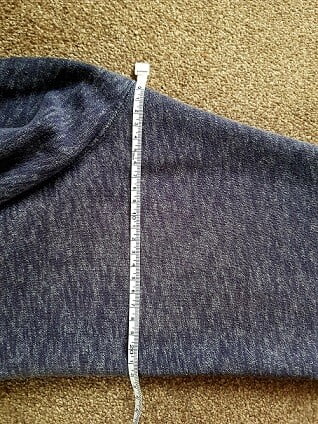
- The size of your hexagon is determined from the measurement of the width of your upper arm. You will need to measure round your arm (giving an extra 5 – 10cm for movement/positive ease). I measured a sleeve from one of my favourite sweaters. I crocheted a total of 14 rounds for my hexagons (I’m a UK 16)

- Do not fasten off when you finish the hexagon as you will continue with seaming the sleeves
- Once sleeves are seamed, try on and determine the extra rows needed at the back (space for your neck)
- The balloon shape for the sleeves is made by decreasing for 3 rounds before crocheting the cuffs
- The cuffs are made by continuing after decreases on the sleeve. Chain enough stitches from the end of the sleeve to your wrist. You will work back down the chain and slip stitch to the next stitch to work back up the cuff in back loops only and continue around to join the cuff with a slip stitch.


Level
Easy
Materials
- 600g Hobbii Carnival in Copenhagen 05
- Crochet hook – 6mm / 4mm
- Tape measure
- Scissors
- Yarn needle
Stitches and Abbreviations
Treble crochet (tr) / US double crochet (dc)
Double crochet (dc) / US single crochet (sc)
2 double crochet together (2dctog) / US 2 single crochet together (2sctog)
Back Loop Only (blo)
Need help to work these stitches? Follow the instructions in the stitch library.
- Ch = chain
- Sl st = slip stitch
- Rep = repeat
- Sp = space
- Sk = skip
- RS = right side
- WS = wrong side
- RH = right hand
- LH = left hand
- St/s = stitch/es
- Cont = continue
Measurements
Made to measure
Tension/Gauge
With a 6mm crochet hook, 16 treble crochets (US double crochets) and 7 rows = 4″ / 10cm
Crochet Hexagon Cardigan Instructions UK Crochet Terms
Hexagon (make 2)
Ch4, sl st in first ch to make a circle.
Round 1: ch3, [2tr into ring, ch2], *[3tr into ring, ch2], *rep 5 times, sl st to top of ch3, sl st to corner sp
Round 2: ch3, [2tr, ch2, 3tr], *[3tr, ch2, 3tr] tr to corner sp, *rep around, sl st to top of ch3, sl st to corner sp
Round 3: rep round 2
Round 4: ch3, [tr, ch1, sk1] to corner sp, *rep around, sl st to top of ch3, sl st to corner sp
3 repeats of round 2 and 1 round of round 4 complete the pattern.
Cont in pattern until desired measurement (see pattern notes)
Fold your hexagon with RS facing inwards.
DO NOT FASTEN OFF
Sleeve Seam
Working on the WS, sl st along the top of the sleeve.
Fasten off.
If you know you want to add length to your sleeves and cuffs, you can carry on working the sleeves. DO NOT FASTEN OFF but cont working with the same yarn you used to sl st the seam.
Extra rows on the back for neck space
Decide which side is the front and which side is the back.
You will be adding a 2 – 4” strip.
Working in rows, re-join yarn at the back.
Cont the hexagon pattern 3 rows tr, 1 row [tr, ch1, sk1] to your desired size.
(I crocheted 4 extra rows on each hexagon at the back for the neck space.)
DO NOT FASTEN OFF.
After the last turn of the second hexagon, join the LH and RH side with sl st along the rows at the back.
Length of the cardigan
If you are happy with the length of your cardigan then move on to front and neck edging.
If you want to add length, working on the RS, re-join yarn on the RH side and cont the hexagon pattern.
I added 4 more rows (I’m 5ft 1”).
Front and neck edging
Working on the RS, re-join yarn to the bottom of the RH side.
Ch1, dc in each st up the front, pick up sts evenly along the back of the neck and cont down.
You will edge up the left side, along the back of the neck and down the right side.
Try on your cardigan and decide how many rows for the edging.
I crocheted 9 rows of double crochet.
Extending the sleeves
Either re-join the yarn or cont after sl st the seam.
Cont in the pattern used for the hexagon to your desired length. Do not fasten off.
I didn’t need to extend my sleeves but I did want to add cuffs.
Cuffs
To decrease for the size of the cuffs, working in rounds:
Round 1 and 2: [dc, 2dctog] around, join with a sl st
Round 3: [3 x dc, 2dctog] around, join with a sl st
Measure from the end of the sleeve to your wrist and chain to match the measurement.
I chained 13.
Row 1: dc in 2nd ch from hook back down the ch to the last ch, dc in that st, sl st in the next st on the sleeve edge and turn.
Row 2: dc in first st, dc blo to the last st, dc in last st, turn
Rep the above until you reach the beginning of the cuff, sl st in each dc to join together.
Fasten off.
Crochet Hexagon Cardigan Instructions US Crochet Terms
Hexagon (make 2)
Ch4, sl st in first ch to make a circle.
Round 1: ch3, [2dc into ring, ch2], *[3dc into ring, ch2], *rep total 5 times, sl st to top of ch3, sl st to corner sp
Round 2: ch3, [2dc, ch2, 3dc], *[3dc, ch2, 3dc] tr to corner sp, *rep around, sl st to top of ch3, sl st to corner sp
Round 3: rep round 2
Round 4: ch3, [dc, ch1, sk1] to corner sp, *rep around, sl st to top of ch3, sl st to corner sp
3 repeats of round 2 and 1 round of round 4 complete the pattern.
Cont in pattern until desired measurement (see pattern notes)
Fold your hexagon with RS facing inwards.
DO NOT FASTEN OFF
Sleeve Seam
Working on the WS, sl st along the top of the sleeve.
Fasten off.
If you know you want to add length to your sleeves and cuffs, you can carry on working the sleeves. DO NOT FASTEN OFF but cont working with the same yarn you used to sl st the seam.
Extra rows on the back for neck space
Decide which side is the front and which side is the back.
You will be adding a 2 – 4” strip.
Working in rows, re-join yarn at the back.
Cont the hexagon pattern 3 rows tr, 1 row [tr, ch1, sk1] to your desired size.
(I crocheted 4 extra rows on each hexagon at the back for the neck space.)
DO NOT FASTEN OFF.
After the last turn of the second hexagon, join the LH and RH side with sl st along the rows at the back.
Length of the cardigan
If you are happy with the length of your cardigan then move on to front and neck edging.
If you want to add length, working on the RS, re-join yarn on the RH side and cont the hexagon pattern.
I added 4 more rows (I’m 5ft 1”).
Front and neck edging
Working on the RS, re-join yarn to the bottom of the RH side.
Ch1, dc in each st up the front, pick up sts evenly along the back of the neck and cont down.
You will edge up the left side, along the back of the neck and down the right side.
Try on your cardigan and decide how many rows for the edging.
I crocheted 9 rows of double crochet.
Extending the sleeves
Either re-join the yarn or cont after sl st the seam.
Cont in the pattern used for the hexagon to your desired length. Do not fasten off.
I didn’t need to extend my sleeves but I did want to add cuffs.
Cuffs
To decrease for the size of the cuffs, working in rounds:
Round 1 and 2: [sc, 2sctog] around, join with a sl st
Round 3: [3 x sc, 2sctog] around, join with a sl st
Measure from the end of the sleeve to your wrist and chain to match the measurement.
I chained 13.
Row 1: sc in 2nd ch from hook back down the ch to the last ch, sc in that st, sl st in the next st on the sleeve edge and turn.
Row 2: sc in first st, sc blo to the last st, sc in last st, turn
Rep the above until you reach the beginning of the cuff, sl st in each sc to join together.
Fasten off.
Happy crocheting!
Copyright Notice
The pattern and photographs of this design are the property of Sharon Goodwin at Jera’s Jamboree. This pattern and design are subject to copyright and are for personal, non-commercial use only. You may not share, resell, alter or redistribute this pattern in part or in whole. You may, however, sell any finished items you make. If you would like to include this pattern in a roundup, you may take one photo and link back to this pattern.

Hi Shaz, I love this pattern and want to try it. How much Hobby, Cardinal yarn would I need for a size L/XL?
Aida Castorena
Hi Aida, I’m thinking you mean Hobbii Carnival?
With this yarn, 8 balls (262 yds per 100g ball = 2096 yards total) should be enough for L/XL.
Thanks for sharing that you love the pattern. Let me know how you get on.
Shaz
Where can I print a pattern
Hi Jennifer, on a laptop or computer you can right click on the page anywhere and choose ‘print.’ You should then get the option to save as a PDF or send to a printer. Hope this helps. Sharon
Hi Jennifer, I’ve now added a PDF/Print button so you can save as a PDF and print off (without the ads). Hope that helps! Sharon