I enjoyed designing this crochet blanket pattern with it’s scene at the beach with beach huts, sand and sea.
It’s perfect for using in a variety of ways (baby blanket; summer themed conservatory; kept in beach hut for those windy days etc) and a fun way to practice stitches and (if you need to) gain confidence with your crocheting.

Jera’s Jamboree receives payments for affiliate advertising. This is at no extra cost to you. As an Amazon Associate I earn from qualifying purchases. Please see my disclosure policy for more information.
The different stitches I used to create the different elements:
- Double crochet / US single crochet
- Treble crochet / US double crochet
- Ripple stitch
- Cable stitch
- Wavy chevrons
The beach huts are crocheted using the two-directional flat tapestry crochet technique (crocheted in rows with turning at the end of the row).

I have rated this pattern as intermediate although if you are a confident beginner you should have a go! The stitches and technique are not difficult but you will need to concentrate. Read the pattern notes and instructions carefully before beginning.

Design Inspiration
My friend’s little one LOVES the beach and he has set a goal of visiting 52 beaches this year (we’re fortunate to live on the south coast and have relatively easy access to Dorset’s coastline). At the beginning of May he was up to beach number 8.
I wanted to create a beach scene where he could not only snuggle when reading or relaxing with his mum but also something he could use as a play mat. Like most children he has a vivid imagination and for those days when he can’t get to the beach, I’m thinking the blanket will help him to create his own beach scene.
I have left the sand and the sea empty for this reason – you could easily crochet seaside motifs to make the beach unique to you!
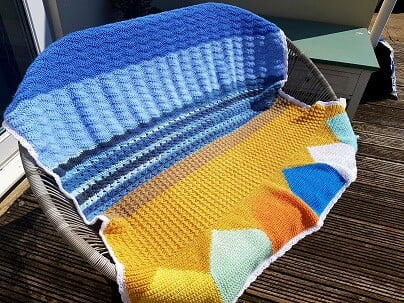
How the pattern is worked
The six beach huts are crocheted first in double crochet (US single crochet) using the tapestry crochet method. The motif includes the beach hut and surrounding sand.

They are crocheted separately and then joined together.
Two rows of double crochet (US single crochet) complete the sand on the boardwalk.
Where I live the sand around the beach huts is very fine (unless it’s blowing a hoolie and then the sand is in sand drifts). I thought this stitch was a great representation!
The sand leading to the sea is crocheted in ripple stitch. I thought this was great for the bumps and mounds. I’ve used a lighter colour and then when the sand moves closer towards the sea, a darker colour for the wet sand.

The surf and tide are crocheted in cable stitch. The cable reminds me of the push and pull of the tide and the surf.

The sea is completed in rows of wavy chevrons with colour changes to represent the depth of the water. The wavy chevrons are perfect for the ripples of the waves.
If you want to make a bigger blanket, increase the rows of wavy chevrons.
A border in white completes the blanket pattern.
Related Crochet Blanket Patterns
If you enjoy working with a combination of stitches and techniques, you might like:
- Candyfloss Horizon blanket
- Tangerine Dreams blanket
- Seaside Dreams blanket
- Noughts and Crosses blanket
- Galana filet blanket
- Orchid Blaze blanket
- Peek-a-Boo Bunny blanket
- Snowberry baby blanket
- Winter Nights blanket
- Tunisian Crochet blanket patterns
- Baby blanket patterns
- Lap Blanket Patterns
Easy patterns with colour changes include:
A relaxing crochet project is my Princess of Diamonds lap blanket. A continuous granny square with a difference!
Looking for a one colour, one-row repeat pattern or baby shower gift? The Tranquil Moments baby afghan is perfect for meeting those needs.
Wanting to design your own blanket or looking for an easy blanket crochet pattern? These simple blankets and instructions to create your own are just what you need.
Short on time? These baby blanket kits or modern blanket kits could be just what you need.
Make your project really stand out with these free crochet border and edging patterns.
Yarn
I have used DK yarn from my stash including:
You can substitute any DK yarn and colours for this blanket pattern.
Pattern Notes
- Chain 1 does not count as a stitch.
- Ch2 does count as a stitch.
- Chain 3 does count as a stitch.
- Instructions for the beach huts are written with MC = colour of the hut and CC = lighter colour of the sand for example, CC x 3, MC x 24, CC x 3
- Colour changes take place on the last pull through of the stitch before the colour change takes place.
- The unworked yarn is carried behind the active stitches being worked.
- The tapestry chart is available as a free PDF download as well as the written instructions.
- Cut yarn and weave in ends at the end of each block of stitches.
Level
Intermediate
Materials
Yarn:
BEACH HUTS
50g in following colours
- Yarn A = Stylecraft Special DK – white
- Yarn B = Deramores Studio DK – pale green
- Yarn C = Emu Classic DK – pumpkin
- Yard D = Emu Classic DK – soft mint
- Yarn E = Deramores Studio DK – yellow
- Yarn F = Deramores Studio DK – blue
SAND
100g in following colours
- Yarn G = Deramores Studio DK – butterscotch
- Yarn H = Deramores Studio DK – oatmeal
SEA
100g in following colours
- Yarn I = Emu Classic DK – lapis
- Yarn J = Emu Classic DK – azure
- Yarn K – Hayfield Spirit DK – melody
- Yarn L = Emu Classic DK – fog
- Yarn M = Emu Classic DK – peacock
- 4mm crochet hook
- Scissors
- Tapestry needle (for sewing in ends)
Stitches and Abbreviations
Ripple Stitch: *skip 2 stitches, [1 double crochet, 2 treble crochet] in next stitch *repeat
Cable Stitch: skip a stitch, treble crochet in next 3 stitches, working over the 3 treble just made, yarn over and insert hook into the skipped stitch. Pull up a loop to the height of the treble, yarn over and pull through 2 loops twice
Wavy Chevrons: 2 trebles in next treble, 1 treble crochet in next stitch, [treble 2 together over next 2 stitches] twice, 1 treble in next stitch, 2 trebles in next stitch, repeat across
Treble 2 Together (tr2tog): Yarn over, insert hook into next stitch, yarn over, pull yarn through stitch (4 loops on hook), yarn over, pull hook through 2 loops (2 loops on hook), yarn over, insert hook into the next stitch, yarn over, pull yarn through stitch (4 loops on hook), yarn over, pull hook through 2 loops (3 loops on hook), yarn over, pull hook through last 3 loops
- Ch = chain
- Dc = double crochet / US single crochet
- Tr = treble crochet / US double crochet
- MC = main colour
- CC = contrasting colour
- Sl knot = slip knot
- Sl st = slip stitch
- St/s = stitch/es
- Sk = skip
- Rep = repeat
- Sp = space
Tension/Gauge
17 sts = 10cm/4”; 20 rows = 10cm/4” in double crochet using 4mm hook
Don’t worry too much about the tension though!
Measurements
110cm / 43.5” (W) X 129cm / 50.75” (L)
Related Tapestry Crochet Patterns
If you enjoy working with this technique you might also like these patterns:
- Heart and Stripes Tote Bag
- Peek-a-Boo Blanket
- Orchid Blaze Blanket
- Dog Sweater
- Owl Hot Water Bottle Cover
- Crochet/Pillow Cover
- 20 Free Tapestry Crochet Patterns

Day at the Beach Crochet Blanket Pattern Instructions
Click here to download the tapestry chart PDF
BEACH HUTS (make six using colours A, B, C, D, E, F)
With MC ch31
Row 1: dc 2nd ch from hook, dc across turn
Row 2: ch1, dc across, turn
Row 3 – 20: rep row 2
Sl st CC to start the next row
Row 21: ch1, dc in 1st st, MC x 28, CC x 1, turn
Row 22: ch1, CC x 2, MC x 26, CC x 2, turn
Row 23: ch1, CC x 3, MC x 24, CC x 3, turn
Row 24: ch1, CC x 4, MC x 22, CC x 4, turn
Row 25: ch1, CC x 5, MC x 20, CC x 5, turn
Row 26: ch1, CC x 6, MC x 18, CC x 6, turn
Row 27: ch1, CC x 7, MC x 16, CC x 7, turn
Row 28: ch1, CC x 8, MC x 14, CC x 8, turn
Row 29: ch1, CC x 9, MC x 12, CC x 9, turn
Row 30: ch1, CC x 10, MC x 10, CC x 10, turn
Row 31: ch1, CC x 11, MC x 8, CC x 11, turn
Row 32: ch1, CC x 12, MC x 6, CC x 12, turn
Row 33: ch1, CC x 13, MC x 4, CC x 13, turn
Row 34: ch1, CC x 14, MC x 2, CC x 14
Fasten off
Sew beach huts together making sure they are all the right way up.
SAND
Join Yarn G with a sl knot to the top of the beach hut tapestry.
Row 1: ch1, dc across, turn
Row 2: rep row 1
Ripple stitch begins
Row 3: ch2, 2 tr in same st, *sk 2 sts, [1dc, 2tr] in next st, *rep to last 3 sts, sk 2 sts, dc in last st, turn
Row 4 – 27: rep row 3
Change to Yarn H
Row 28 – 35 rep row 3
Change to Yarn K
Cable stitch begins
SURF AND TIDE
Row 36: ch1, dc in across, turn
Row 37 – ch3, *sk next st, tr in next 3 sts, tr over the sk st, *rep across to last tr, tr in last st, turn
Row 38 – 39: rep row 36 and 37
Row 40 – 41: rep row 36 and 37
Row 42 – 44: rep row 37
Row 45 – 46: rep row 36 and 37
Row 47 – 48: rep row 36 and 37
Row 49 – 50: rep row 36 and 37
Row 51: ch1, dc across, turn
Wavy chevrons begin
SEA
Row 52: ch3, tr in base of ch3, tr in next st, [tr2tog over next 2 sts] twice, 1 tr in next st, 2 tr in next tr, *2tr in next tr, 1 tr in next st, [tr2tog over next 2 sts] twice, 1 tr in next st, 2 tr in next st, *rep across working last 2 tr in last st, turn
Row 53 and 54: rep row 52
Change to J
Row 55 – 66: rep row 52
Change to I
Row 66 – 80: rep row 52
Change to L
Row 81 – 83: rep row 52
Change to M
Row 84 – 97 rep row 52, turn
Change to A
BORDER
Round 1: ch1, *dc across to last st, [2dc, ch2, 2dc] in last st (this is now the corner sp of the blanket), carry on working a dc around the ends of the rows, picking up stitches evenly. * rep to ch1, join with a sl st
Round 2: ch1, dc around working [1dc, 2ch, 1dc] in each corner sp, join with a sl st
Round 3: ch1, sk 1st dc, *sk1, 3 tr in next dc, sk 1, 1 dc in next st, *rep around
Fasten off and sew in ends.
Happy crocheting!
Copyright Notice
The pattern and photographs of this design are the property of Sharon Goodwin at Jera’s Jamboree. This pattern and design are subject to copyright and are for personal, non-commercial use only. You may not share, resell, alter or redistribute this pattern in part or in whole. You may, however, sell any finished items you make. If you would like to include this pattern in a roundup, you may take one photo and link back to this pattern.
var pfBtVersion=’3′;(function(){var js,pf;pf=document.createElement(‘script’);pf.type=’text/javascript’;pf.src=’//cdn.printfriendly.com/printfriendly.js’;document.getElementsByTagName(‘head’)[0].appendChild(pf)})();