I was inspired to create this free crochet checkered bag pattern from Tammy Silver’s faux leather knot bag in Mollie Makes (issue 135).
I thought it looked really stylish and could visualise how well it would work crocheted in the checkered pattern.
To complete your look, you might find inspiration from one of the crochet checkered bucket hats in this free pattern collection.

Jera’s Jamboree receives payments for affiliate advertising. This is at no extra cost to you. As an Amazon Associate I earn from qualifying purchases. Please see my disclosure policy for more information.
The checkered crochet bag sits comfortably on your arm or from your shoulder.

The Japanese knot gives added security by acting as a closure to the top of the bag.

Go straight to the instructions (UK crochet terms)
Go straight to the instructions (US crochet terms)
Join the Facebook Community
Join us to share your projects, discover new patterns, swap tips and tricks, and connect with a warm, welcoming community that loves all things crochet!
What You’ll Find:
- Inspiring patterns and tutorials
- Themed posts
- A supportive space to ask questions and share your progress
- Friendly chats with fellow yarn lovers
Join Our Crochet Facebook Group Now!
Don’t forget to answer the questions and accept the group rules.
How the crochet checkered bag pattern is worked
This crochet bag pattern is worked in rows with no decreases and is suitable for confident beginners.
The checkered pattern is crocheted in two contrasting colours.
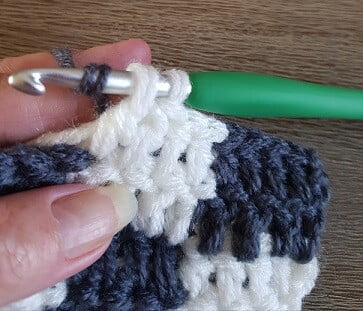
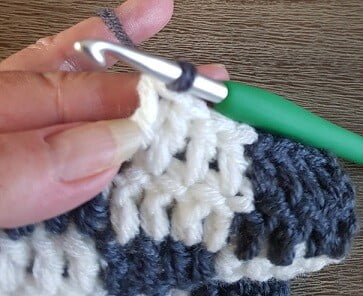
You will need to know how to change colours as we will be changing colours every 4th stitch throughout each row.
The unused yarn is carried across each row. This gives the crocheted fabric an extra layer making it hard-wearing and longer lasting.


The checkered crochet bag pattern is worked in two panels that mirror each other.

Once the body of the bag is crocheted for the first panel, the shorter handle is worked first. Then the yarn is rejoined 12 stitches from the edge for the second, longer handle.
The second panel mirrors the first panel.
To assemble, the handles are lined up and the seam is sewn across the top of the handle, down the side seam, along the bottom, up the side seam and across the top of the handle.
Happy crocheting!
Best gifts for crocheters? Get inspired with my gift guide
Related Crochet Bag Patterns
If you enjoy working with more than one colour you might like to check out the Bramble drawstring bag, Hearts and Stripes tote bag, the Rainbow tote bag and the Mosaic Bricks tote.
Granny square bag patterns include the Josephine tote, the easy granny square bag or the Canterbury Edition tote.
If you’re not sure which designs suit your skills, have a browse of this collection of crochet tote bag patterns or these easy granny square bags.
Yarn
I’m still using up my stash of Emu Classic DK yarn.
Soft and smooth, it’s a premium acrylic yarn and it’s a great price!
Pattern Notes
- I used two strands of DK yarn of the same colour together to add bulk. You will get the same effect from using Aran/Worsted yarn.
- Yarn A = light, neutral colour
- Yarn B = contrasting colour
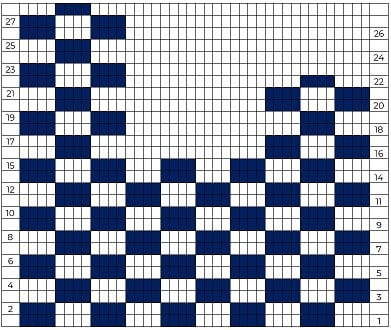
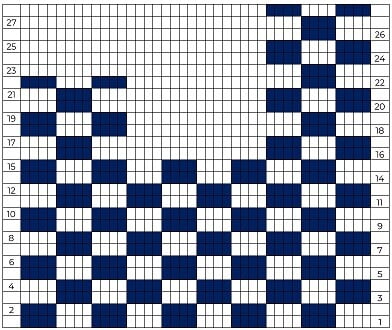
- Four stitches and 2 rows of treble crochet (US double crochet) complete each check. The colours are alternated to create the checkered pattern. See chart.
- The unworked yarn is carried across the rows because we will be changing colour every 4 crochet stitches.
- Change colour on the 4th stitch of the check pattern by yarn over, pull through two loops, yarn over, pick up the new colour and pull through the last two loops of the treble crochet (US double crochet) stitch.
- Check your tension. You will need to make sure your tension is tight enough so that the yarn you are carrying doesn’t show through. But not too tight that it pulls the fabric.
- Keep checking you are carrying the yarn across the row otherwise you will have loops. Don’t worry too much if this is on the wrong side of your work because this will be hidden inside the bag.
- One handle is longer than the other. The longer handle pulls through the shorter one which gives the Japanese knot.
- Each handle ends on 1 row of the same colour yarn (instead of 2 rows) so that front and back continue the checkered pattern.
- Chain 2 does not count as a stitch.

Level
Confident beginner
Materials
- 5.5mm crochet hook
- 100g Aran/Worsted of each contrasting colour – if you’re using two strands of DK you will either need to wind the yarn into two separate balls or use 2 x 100g
- Scissors
- Tapestry Needle
Stitches and Abbreviations
- Ch – chain
- t-ch – turning chain
- tr – treble crochet (US double crochet)
- rep – repeat
- sl-st
- ws – wrong side
- rs – right side
Measurements
32cm (12.5 inches) width x 46cm (18 inches) long handle height
Testimonials

Etsy 5 star review 5 Oct 2024. A photo of a customer’s finished bag. Text reads “It was very easy to follow”
Pattern includes a PDF of the checkered chart
Crochet Checkered Bag Pattern
Pattern written in UK and US crochet terms (scroll down for US terms)
If you are a visual learner, you may prefer working from the charts.
Checkered Knot Bag Instructions UK Crochet Terms
First Panel – front of bag
Ch 40 + 2 (t-ch)
Row 1: With Yarn A tr into 3rd ch from hook, tr in next 3 sts changing to Yarn B on the last pull through, *4 x tr changing to Yarn A on the last pull through, 4 x tr changing to Yarn B on the last pull through * rep 6 more times, turn
Row 2: ch2, tr in base of ch, continue with the pattern from Row 1, change to Yarn B
Row 3: rep row 1 but with Yarn B
Row 4: rep row 3
Rows 1 – 4 = one complete checkered pattern
Row 5 – 15 rep rows 1 – 4, alternating the blocks of colour (7 checkered patterns). See chart.
Handle – right side (this is the shorter handle)
Row 16: ch2, tr in base of ch, 3 x tr in Yarn B, change to Yarn A, 4 x tr, change to Yarn B, 4 x tr, turn
Row 17: ch2, tr in base of ch3, 3 x tr in Yarn B, change to Yarn A, 4 x tr, change to Yarn B, 4 x tr, change to Yarn A , turn
Row 18: – 21 rep rows 16 and 17 alternating colour blocks
Row 22: rep row 15
Fasten off.
Handle – left side (this is the longer handle)
Row 16, count 12 stitches from the edge and rejoin Yarn A.
Row 16 – 28 rep rows 16 and 17 from the right handle.
Fasten off.
Second Panel – back of bag
Mirror the pattern from the first panel.
Follow the chart above.
Finishing off
With WS facing inwards, place both panels together, lining up the long handles. Sew or sl st across the top of the handle, down the side seam, along the bottom, up the side seam and across the top of the handle. Fasten off, weaving in the tail.
Turn the checkered knot bag RS out.
Pull the longer handle through the shorter handle and your knot bag is complete.

Checkered Knot Bag Instructions US Crochet Terms
First Panel – front of bag
Ch 40 + 2 (t-ch)
Row 1: With Yarn A dc into 3rd ch from hook, dc in next 3 sts changing to Yarn B on the last pull through, *4 x dc changing to Yarn A on the last pull through, 4 x dc changing to Yarn B on the last pull through * rep 6 more times, turn
Row 2: ch2, dc in base of ch, continue with the pattern from Row 1, change to Yarn B
Row 3: rep row 1 but with Yarn B
Row 4: rep row 3
Rows 1 – 4 = one complete checkered pattern
Row 5 – 15 rep rows 1 – 4, alternating the blocks of colour (7 checkered patterns). See chart.
Handle – right side (this is the shorter handle)
Row 16: ch2, dc in base of ch, 3 x dc in Yarn B, change to Yarn A, 4 x dc, change to Yarn B, 4 x dc, turn
Row 17: ch2, dc in base of ch3, 3 x dc in Yarn B, change to Yarn A, 4 x dc, change to Yarn B, 4 x dc, change to Yarn A , turn
Row 18: – 21 rep rows 16 and 17 alternating colour blocks
Row 22: rep row 15
Fasten off.
Handle – left side (this is the longer handle)
Row 16, count 12 stitches and rejoin Yarn A.
Row 16 – 26 rep rows 16 and 17 from the right handle.
Fasten off.
Second Panel – back of bag
Mirror the pattern from the first panel.
Follow the chart above.
Finishing off
With WS facing inwards, place both panels together, lining up the long handles. Sew or sl st across the top of the handle, down the side seam, along the bottom, up the side seam and across the top of the handle. Fasten off, weaving in the tail.
Turn the checkered knot bag RS out.
Pull the longer handle through the shorter handle and your knot bag is complete.
Happy crocheting!
Copyright Notice
The pattern and photographs of this design are the property of Sharon Goodwin at Jera’s Jamboree. This pattern and design are subject to copyright and are for personal, non-commercial use only. You may not share, resell, alter or redistribute this pattern in part or in whole. You may, however, sell any finished items you make. If you would like to include this pattern in a roundup, you may take one photo and link back to this pattern.
Bookmark this Content to Save for Later
To bookmark this content using the Grow.me app on Jera’s Jamboree, all you need to do is click the blue heart on the right-hand side of the screen and the Grow.me app will pop up.
If you don’t have a Grow account you will need to enter your email and create a password.
Once you’ve created an account, every time you want to bookmark content on my blog (or any others that use Grow), simply login to your Grow account.
If you forget your password, click the “forgot password” link and follow the prompts. Please note that I’m unable to assist with resetting Grow passwords or accessing your Grow account, so be sure to save your login information in a safe place.
With your Grow account you can:
- Share and bookmark posts.
- Subscribe to Jera’s Jamboree email crochet newsletter.
- Unlock content available only to subscribers.