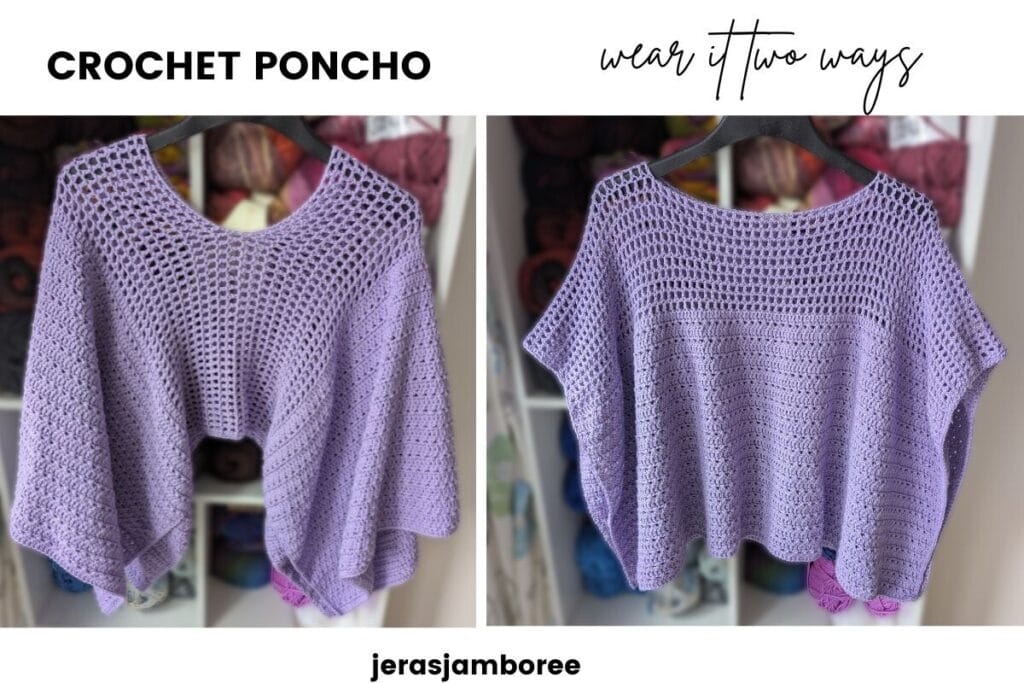
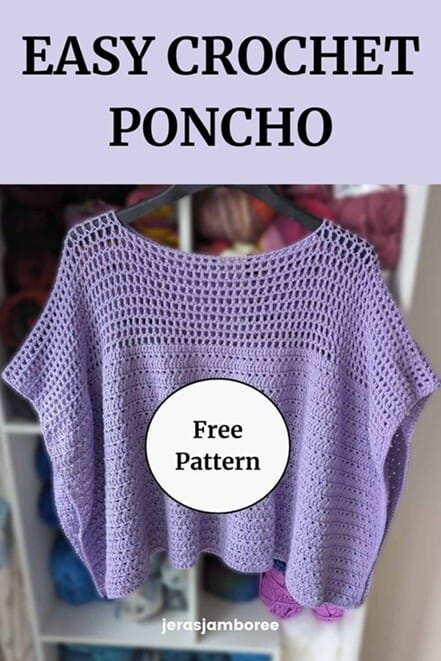
A simple, one-piece poncho worked in DK weight yarn, featuring an airy mesh yoke and textured crossed stitches for beautiful drape.
My Lilienne Poncho is designed to feel light, elegant, and beautifully wearable.
An airy mesh yoke flows into a denser, textured body, creating balance between openness and drape. The result is a crochet poncho that feels soft and breathable while still having enough structure to hang gracefully.
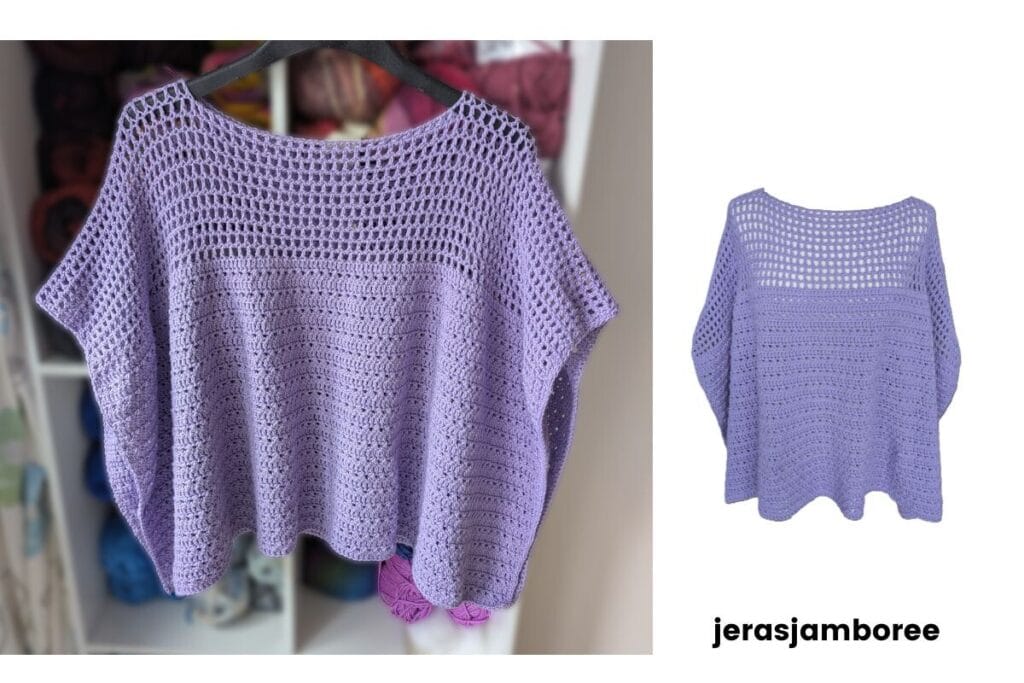
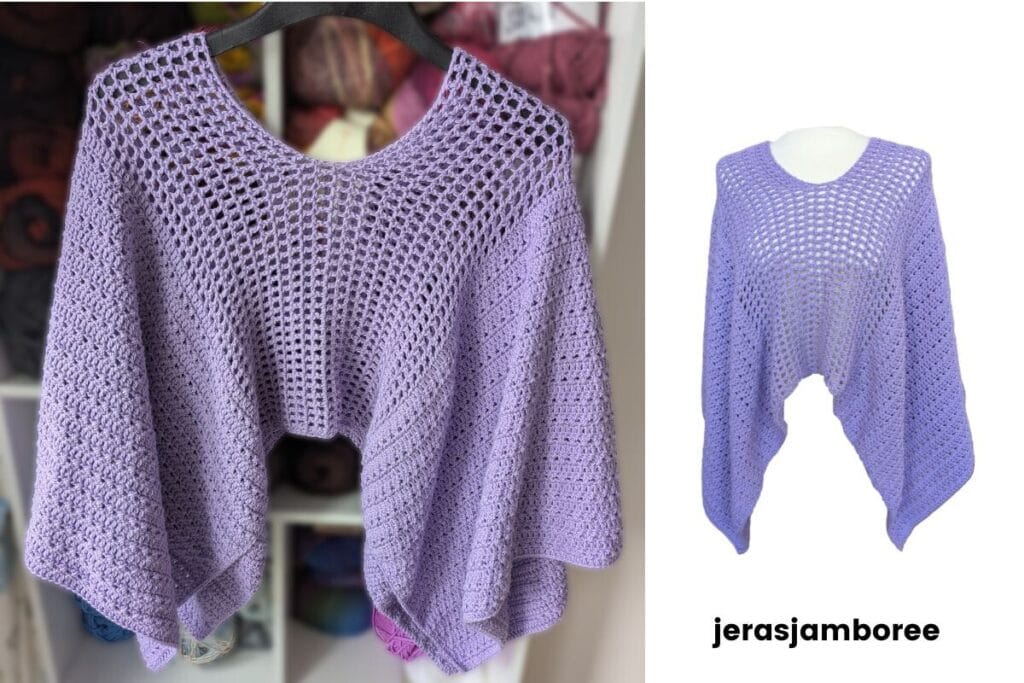
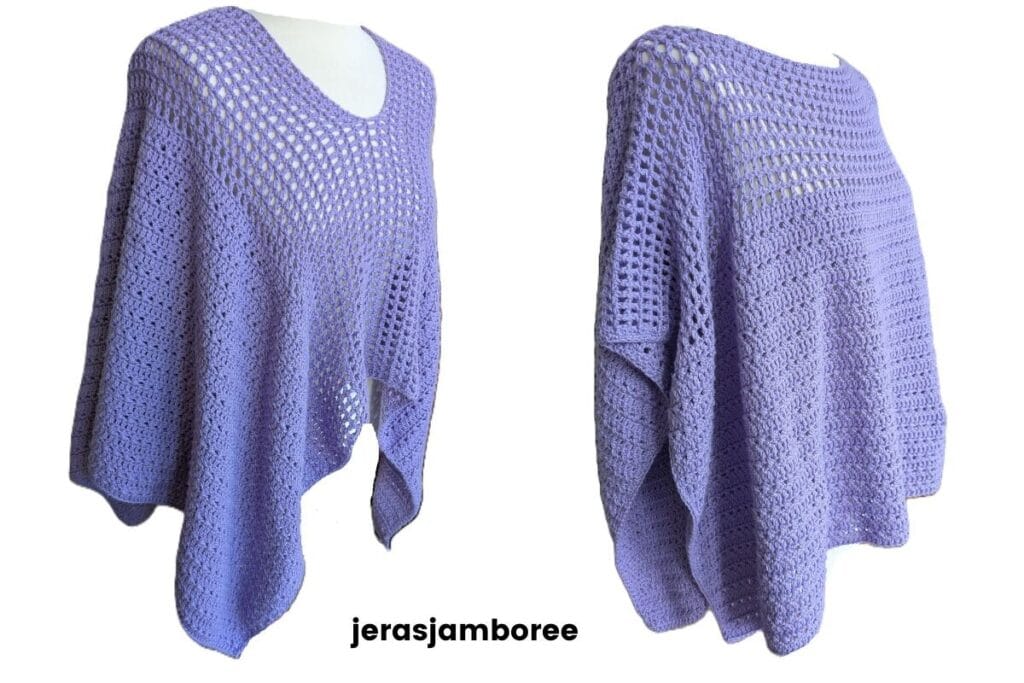
One of my favourite features of this design is that it can be worn two ways. For a classic boat neckline, position the mesh yoke across the shoulders and upper chest. Alternatively, rotate the poncho to create a softer scoop neckline, allowing the mesh section to run from the centre front down towards the hem. Two looks in one, with the same effortless comfort.
I’ve designed Lilienne to be an easy, go-to piece that feels just as lovely to wear as it is to crochet. I can’t wait to see how you style yours!
The full crochet poncho pattern is available below to view for free. If you prefer an ad-free, printable version, a PDF can be purchased from my Etsy, Ravelry, and LoveCrafts shops. Thank you for supporting my work.
Jump to: Measurements | Materials | Free Crochet Pattern
Skill Level
Beginner Friendly
Measurements
Each panel measures approx. 38 inches / 97cm (W) X 20 inches / 51 cm (L)
- Front and back panels: 38 inches each (76 inches total circumference)
Jera’s Jamboree receives payments for affiliate advertising. This is at no extra cost to you. As an Amazon Associate I earn from qualifying purchases. Please see my disclosure policy for more information.
Materials
- Cotton DK (#3 weight) yarn; 1205 yards
- 4mm Crochet Hook (I use Clover Amour hooks)
- Stitch Markers
- Tape Measure
- Scissors
- Needle
Yarn Choices
I used King Cole CottonSoft DK (100% cotton) in the colourway Lavender. I know cotton can sometimes feel heavier to wear, but the airy mesh yoke and the crossed stitch detailing of this poncho keep the fabric light and breathable without sacrificing drape.
I machine wash at 30°C, though it can be washed at up to 40°C. You will need to dry flat to maintain shape.
Yarn Substitutions
You can use any DK weight yarn you love for this design, but if you have a cotton and acrylic blend in your stash, that would be a lovely choice. The cotton keeps the poncho breathable for warmer days, while the acrylic adds softness and helps prevent the fabric from feeling too heavy.
If using acrylic, your poncho may feel slightly lighter on the shoulders. It can also feel a bit warmer though because acrylic doesn’t breathe in the same way cotton does. It won’t have quite the same cool, crisp touch against the skin.
You can expect a slightly warmer and softer finish with a little less drape than cotton, though the open stitchwork will still keep the garment light and comfortable.
Using acrylic, your poncho will be more suitable as a spring or autumn layer rather than for summer.
Gauge
Using a 4mm hook
14 stitches and 10 rows = 4” x 4”
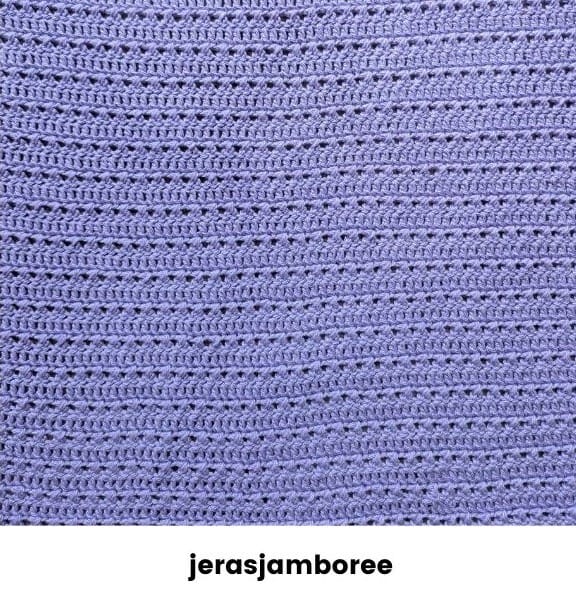
Pattern used for gauge swatch:
1 row double crochet, 1 row crossed double crochet alternating 5 times
Not getting the same rows and stitches in your 4″ swatch? You can easily adjust your stitches using my stitch gauge converter.
Stitches and Abbreviations
If you need help for how to work these stitches, or a refresher, you’ll find them in part one of my stitch library.
- Single crochet (sc)
- Double crochet (dc)
- Crossed Double Crochet (Xdc)
- Slip stitch (sl st)
These common abbreviations are used in my pattern:
- Chain/s (ch/s)
- Continue (cont)
- Each (ea)
- Previous (prev)
- Repeat (rep)
- Right Side (RS)
- Skip (sk)
- Space (sp)
- Stitch (st)
Design and Construction
My Lilienne Poncho is worked in one piece, making it a simple crochet poncho pattern that’s enjoyable to create from start to finish.
This is the same construction as my Fiona poncho. If you like simple projects you can wear, you’ll love this one too.
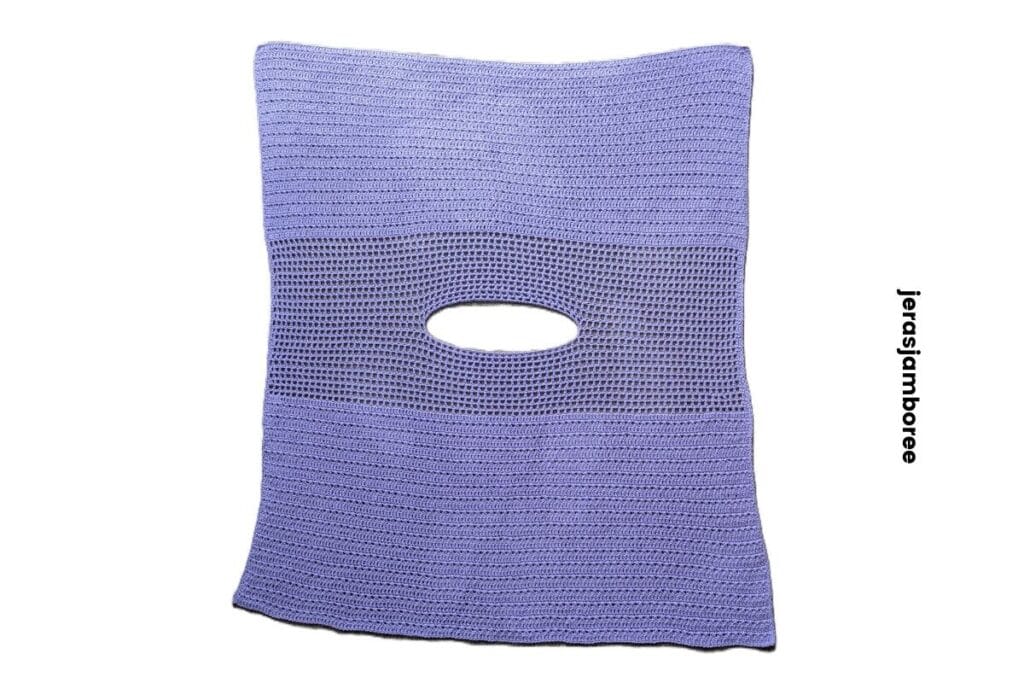
Designed as a rectangle poncho, it begins at the lower edge with alternating rows of double crochet and crossed double crochet stitches, creating texture while maintaining a soft, wearable drape.
The yoke is crocheted in a light mesh stitch (double crochets separated by chain spaces) which keeps the fabric airy and breathable. I love how this lightens the whole piece without losing that lovely drape.
Chains and strategically skipped stitches shape the neckline before the crochet poncho continues across the front.
Once the mesh section on the front is complete, the yarn is fastened off and rejoined at the start of the row just worked to continue the double crochet and crossed stitch pattern. This makes sure the crossed stitches sit correctly and mirror the back. (The mesh stitch looks the same whichever way it’s worked.)
The open stitchwork allows air to flow through the fabric, helping you to stay comfortable on milder days, while the lower section gives the poncho beautiful movement and structure.
This crochet poncho design balances structure and openness, resulting in a lightweight layer that drapes beautifully while remaining easy to wear.
I enjoy creating wearables that can be worn two ways. One of my most popular patterns is the Cotton Candy poncho which looks great styled as a boat neck or v-neck.
Why I Love Using Crossed Stitches
Crossed stitches are one of my favourite ways to add texture without complicating a pattern. They bring interest to the fabric and transform what could feel repetitive into something engaging to crochet.
I especially love how easily they can be used in all sorts of projects, from garments and shawls to accessories and bags.
I’ve used crossed stitches in several of my other designs, including:
- Crossed Half Double Crochet (Xhd) Canterbury Tote Bag
- Crossed Half Double Crochet Back Loop Only (Xhd blo) Sierra Nevada Scarf
- Crossed Double (Xdc) Lauren Triangle Shawl, Raspberry Ripple Bucket Hat, Elodie Pullover Sweater, Cotton Candy Poncho, Peek-a-Boo Bunny Blanket and Ava Summer Top.
This stitch creates lovely definition and texture while remaining beginner-friendly. Once you’ve worked a few rows, the rhythm quickly becomes second nature.
My Pattern Notes
- Pattern is written in English using US crochet terms.
- Worked in multiples of 2.
- Rows begin with a stacked double crochet. If you prefer not to stack but to work a chain 3 at the end or beginning of a row, this will work too. Substitute chain 3 for stacked double in the pattern instructions.
- Row 1 is worked in the back bumps.
- Stitch repeats are between * symbols. For example: *sk 1 st, dc in next st, ch1, * rep to last st, dc in last st. You will skip 1 stitch, double crochet in the next stitch, chain 1 and repeat this until the last stitch where you will place a double crochet in the last stitch.
- Weave in ends as you go.
- If you substitute the yarn you may need more or less than stated in the pattern.
Purchase the easy-to-read print friendly PDF (ad free)
The PDF of this pattern includes everything you need:
- how to work the stitches
- how the pattern is worked
- pattern notes
- clear written instructions
- printable row counter

Lilienne Poncho Pattern Instructions (US terms)
With a 4mm hook
Back
Ch 154
Row 1 (RS): dc in 4th ch from hook, dc in ea ch across, turn (152 dc)
Row 2: stacked dc, *sk 1 st, dc in next st, dc in sk st working in front of dc just made, * rep to last st, dc in last st, turn (75 Xdc, 2dc)
Row 3: stacked dc, dc in ea st across, turn (152 dc)
Row 4 – 35: rep rows 2 and 3
Mesh Pattern
Row 36: stacked dc, dc in next st, ch1, *sk 1 st, dc in next st, ch1, * rep to last st, dc in last st, turn (77 dc, 75 ch-1)
Row 37: stacked dc, *ch1, sk 1 st, dc in next dc, * rep to last st, dc in last st, turn (77dc, 75 ch-1)
Cont rep rows 36 and 37 to row 47
DO NOT FASTEN OFF
Setting up neckline
Count 76 stitches and place a st marker
Count 24 sts to the left and place a st marker
Count 24 sts to the right and place a st marker
Remove the middle st marker
The sp bet st markers is the neckline
Front
Row 1 (neckline): cont in mesh pattern until 1st st marker, dc in same st as st marker, ch 47, sk 47 sts, dc in same st as st marker, cont mesh pattern across, turn
*Try on your poncho to make sure you’re happy with the neckline*
Row 2: cont in mesh pattern working into chs from prev row, turn
Rows 3 – 12: cont in mesh pattern
Fasten off
DO NOT TURN
Rejoin yarn at start of row
Row 13: stacked dc, dc in ea dc and ch1 from prev row, turn
Row 14 – 47: rep rows 2 and 3 from front (1 row Xdc, 1 row dc)
DO NOT FASTEN OFF
Single Crochet Edging
Worked on RS
Turn to work along the side edge
ch1, sc in first st, sc evenly along front and back side edges
Fasten off
Rejoin yarn on other side edge
Rep on side edge
Fasten off
Congratulations! Your poncho is ready to be blocked and worn.
Whether you choose soft cotton for summer or experiment with a different fibre for another season, I’d love to see your finished piece and how you style it!
For more designs, I have a roundup of free poncho patterns you might like.
If you’d like to share your progress, ask questions, or connect with other crocheters working on my patterns, you’re warmly invited to join my Jera’s Jamboree Crochet Community on Facebook.
Copyright Notice
The pattern and photographs of this design are the property of Sharon Goodwin at Jera’s Jamboree. This pattern and design are subject to copyright and are for personal, non-commercial use only. You may not share, resell, alter or redistribute this pattern in part or in whole. You may, however, sell any finished items you make. If you would like to include this pattern in a roundup, you may take one photo and link back to this pattern.
Save Lilienne to your crochet board for later.
This is so pretty. And I love the color. Thank you
Thank you Diane. Have fun making yours 🙂
Shaz