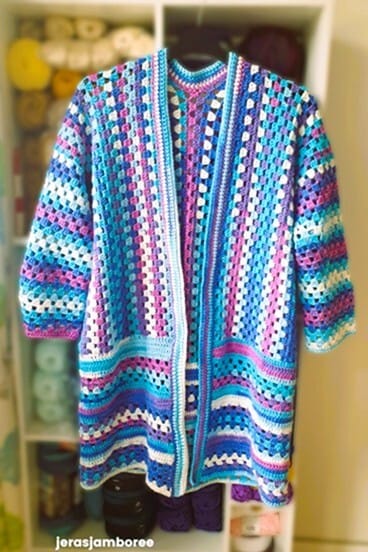
Designed with simplicity in mind, my granny crochet cardigan works up beautifully. Constructed with two granny stitch rectangles worked lengthways, the length is extended by working rows along the bottom once the rectangles are joined.
The two different directions give this stitch a fresh feel and an eye-catching design.
The extended length creates a flattering, drapey silhouette. And best of all, the sleeves are worked directly onto the garment, making construction seamless and enjoyable.
Enjoy my crochet patterns and blog posts?
Add Jera’s Jamboree as a preferred source on Google, Just click below and tick the box to add me.
Jump to: Sizing | Materials | Crochet Pattern
My easy crochet cardigan pattern is a fantastic stash-buster, allowing you to mix and match colours for a unique, personalized look. Prefer a vibrant, multicoloured style or a classic, monochrome aesthetic? My granny stitch cardigan design is completely adaptable.
Whether you want a long cardigan or a shorter version, my pattern is easily customised. Simply adjust the number of extension rows for the perfect fit!
The Evelyn cardigan would make a great addition to your handmade spring and summer wardrobe. Come and show yours off in our Facebook group!
The free pattern is below and you also have the option of upgrading to a PDF in my Etsy and Ravelry stores.

Why you’ll Love my Granny Crochet Cardigan
Skill Level
I consider my granny crochet cardigan an easy project. To help you decide if you have the skills, you will need to:
- Be able to work single crochet, half double crochet and double crochet stitches.
- Work in rows and rounds.
- Know what a stitch post is (working between posts is used for sleeve shaping).
Jera’s Jamboree receives payments for affiliate advertising. This is at no extra cost to you. As an Amazon Associate I earn from qualifying purchases. Please see my disclosure policy for more information.
Supplies and Materials
- DK Yarn: 1863, (1965, 2259, 2457, 2655, 2853) yards
- 4mm / G-6 Crochet Hook
- Tape Measure
- Scissors
- Yarn Needle

Yarn Choices
I had plenty of Cicibebe Batik yarn leftover from my Fruitdrop sweater and having loved the way the colour changes worked, I knew it would be perfect to use on this granny stitch project to give the boho vibe I wanted.
There’s a whopping 393 yards in each 100g ball with several shades to choose from. This 100% acrylic self striping yarn is ideal if you’re on a budget.
You can use any DK yarn (have a rummage through your stash to use up those leftovers) but make sure your gauge matches mine. If it doesn’t, using my stitch gauge converter will make it easy to adjust your stitches.
Gauge
16 stitches and 10 rows of granny stitch using a 4mm hook = 10cm X 10cm

Glossary
Stitches
- Single Crochet (sc)
- Half Double Crochet (hdc)
- Double Crochet (dc)
- Slip Stitch (sl st)
Abbreviations
- Chain/s (ch/s)
- Chain Space/s (ch-sp/s)
- Each (ea)
- Left Hand Side (LHS)
- Repeat (rep)
- Right Side (RS)
- Right Hand Side (RHS)
- Stitch/s (st/s)
- Wrong Side (WS)
Measurements
Sizes follow guidance from the Craft Yarn Council.
| To Fit (inches) | Width approx. (inches) | Length (shoulder to hem) approx. (inches) | Total Yarn (yds) approx. |
| S 32 – 34 | 36 | 36 | 1863 |
| M 36 – 38 | 40 | 36 | 1965 |
| L 40 – 42 | 44 | 38 | 2259 |
| XL 44 – 46 | 48 | 38 | 2457 |
| 2X 48 – 50 | 52 | 38 | 2655 |
| 3X 52 – 54 | 56 | 38 | 2853 |
How the Granny Crochet Cardigan Pattern is Worked
The numbers and instructions below correspond to the numbers on the image at the end of this section.
- Two rectangles of granny stitch are worked first lengthways (the stitches are the length and the rows are the width). The panels are then joined together at the back and both sides of the fabric, leaving space for the armholes. I used the Join As You Go (JAYG) method but you can use any technique to join you feel comfortable with.
- Next, the length is extended. The yarn is rejoined at the hem. Rows of double crochet alternate with rows of granny stripes. You can choose the length of your cardigan at this stage in the construction. Working less repeats will give you a shorter garment, working more repeats will make your cardigan longer.
- Yarn is rejoined under the armhole to work the sleeves directly onto the cardigan in rounds. Sleeves are shaped by working a 2 double crochet cluster in one round, skipping the 3 double crochet cluster either side and working between the posts of the 2 double crochet cluster in the next round. Before working a final round of half double crochet, I recommend you try on your granny cardigan to make sure you’re happy with the length of the sleeves. To shorten the sleeves, work less rounds of granny stripe and if you want longer sleeves, work more repeats. If you make an adjustment on the first sleeve, remember to do the same for the second sleeve!
- Finally, the edging is worked using 4 rows of half double crochet and 1 row of single crochet.

If you enjoy working with granny stitch and squares, browse of my Clover Lane sweater. It’s constructed from two granny squares for the yoke and the body is worked in rounds.
My Pattern Notes
- Pattern is written in US crochet terms.
- Multiples of 4.
- Instructions for sizes are written like this: S, (M, L, XL, 2X, 3X)
- Repeated instructions are written like this *instructions* for instance, *sk 3 sts, 3dc in next ch-sp, ch1, * rep to last 3 sts. You will skip 3 stitches, work 3 double crochet in the next chain space, chain 1 and repeat to the last 3 stitches.
- Granny stitch – chain 3 counts as a double crochet, chain 4 counts as a double crochet and chain 1.
- Extending length double crochet rows – chain 2 counts as a double crochet.
- Front edging – chain 1 does not count as a stitch.
- The top of the folded rectangles is the shoulders
- Joining rectangles 3cm down from the fold at the top allows for a comfortable neck space.
- Row 2 of body and row 6 of length extension (and repeats of these rows), work the last stitch in the 3rd chain of the turning chain from previous row.
- Make sure both sleeves have the same amount of stitches in Row 1.
- Weave in ends as you go.
- Reading ‘How the Granny Crochet Cardigan Pattern is Worked’ section, these pattern notes and the instructions will help you to succeed in working your cardigan.
Purchase the easy-to-read print-friendly PDF (ad free)
The PDF of this cardigan pattern includes everything you need:
- how to work the stitches
- how the pattern is worked
- pattern notes
- clear written instructions
Testimonials
11 April 2026, 5 star Etsy review “Easy pattern that can be modified for length and size.”
Granny Crochet Cardigan Instructions (US crochet terms)
Make 2 rectangles
With a 4mm / G-6 hook
Ch 178, (178, 182, 182, 182, 182)
Row 1: 3dc in 7th ch from hook, *ch1, sk 3 chs, 3dc in next ch, * rep to last 3 chs, ch1, sk 2 chs, dc in last ch, ch3, turn
Row 2 (RS): 2dc in 1st ch-sp, *ch1, sk 3 sts, 3dc in next ch-sp, * rep to last ch-sp, 2dc in last ch-sp, dc in last st, ch4, turn
Row 3: *sk 3 sts, 3dc in next ch-sp, ch1, * rep to last 3 sts, sk 2 sts, dc in last st, ch3, turn
Row 4 – 18, (20, 22, 24, 26, 28) rep rows 2 and 3
Fasten off
Assembling rectangles
With WS facing outwards, fold each rectangle in half with the fold at the top and place side by side.
Back Seam
Place a st marker 3 cm from the top on the back piece of the fabric on both sides.
Join back together from st marker to hem.
Fasten off
Side Seams
From the fold at the top, measure 7, (7.5, 8, 8.5, 9, 9.5) inches along each side and place a st marker.
Join sides through both pieces of fabric from the st marker to the hem.
Fasten off
Extending Length
For a shorter length, reduce the number of repeats in this section, for a longer cardigan work more repeats.
With RS facing outwards, rejoin yarn with a sl st at hem on LHS (as worn).
Row 1: dc evenly around hem (making sure sts are a multiple of 4), ch2, turn
Row 2: dc in ea st to end, ch2, turn
Row 3: rep row 2
Row 4: rep row 2, ch4 at end of row
Row 5: *sk 3 sts, 3dc in next st, ch1, * rep to last 3 sts, sk 2 sts, dc in last st, ch3, turn
Row 6: 2dc in 1st ch-sp, *ch1, sk 3 sts, 3dc in next ch-sp, * rep to last ch-sp, 2dc in last ch-sp, dc in last st, ch4, turn
Row 7: rep row 5
Row 8: rep row 6
Row 9: rep row 5
Row 10: dc in ea dc and ch-sp across, ch2, turn
Row 11 – 13: rep row 2, ch4 at end of row 13
Row 14: rep row 5
Row 15: rep row 6
Row 16: rep row 5
Row 17: rep row 6
Row 18: rep row 5
Row 19: rep row 10
Row 20 – 22: rep row 2
Row 23: rep row 5
Row 24: rep row 6
Row 25: rep row 5
Row 26: rep row 6
Row 27: rep row 5, ch1 at end of row
Row 28: hdc in 1st st, hdc in ea st across
Fasten off
Sleeve
Working on the RS, rejoin yarn with a sl st underarm in ch-sp, ch3
Round 1: 2dc in same sp as join, ch1, *3dc in next ch-sp, ch1, * rep around, join with sl st, sl st to next ch-sp, ch3
Round 2: 2dc in same ch-sp, *3dc in next ch-sp, ch1, * rep around to last ch-sp, 2dc in last ch-sp, ch1, join with sl st, sl st to next ch-sp, ch3
Round 3 (decrease): 2dc in same sp, ch1, *3dc in next ch-sp, ch1, *rep to 2dc group, miss the sp before, 3dc bet posts of 2dc, miss the sp after, join with sl st, sl st to next ch-sp, ch3
Round 4: 2dc in same sp, ch1, *3dc in next ch-sp, ch1, * rep around, join with sl st, sl st to next ch-sp, ch3
Rep rounds 2, 3 and 4 for a total of 9 rounds
Rep round 4 for a total of 7 rounds
Rep rounds 2, 3 and 4 once
Rep round 4 a total of 3, (3, 4, 4, 5, 5) rounds
Try on your cardigan to make sure you’re happy with the length and fit of the sleeve
Final round: ch1, hdc in ea st and ch-sp round, join with a sl st
Fasten off
Rep on other sleeve
Front Edging
Working on RS, rejoin yarn with a sl st at hem on RHS (as worn), ch1
Row 1: hdc evenly up right front, along back of neck, down left front to hem, ch1, turn
Row 2: hdc in ea st to end, ch1, turn
Row 3 – 4: rep row 2
Row 5: sc in ea st to end
Fasten off
Congratulations! Your granny stitch cardigan is finished and ready to be blocked and worn.
Copyright Notice
The pattern and photographs of this design are the property of Sharon Goodwin at Jera’s Jamboree. This pattern and design are subject to copyright and are for personal, non-commercial use only. You may not share, resell, alter or redistribute this pattern in part or in whole. You may, however, sell any finished items you make. If you would like to include this pattern in a roundup, you may take one photo and link back to this pattern.
Save to Pinterest
No time now? Save this pin to your favourite board to make later.
