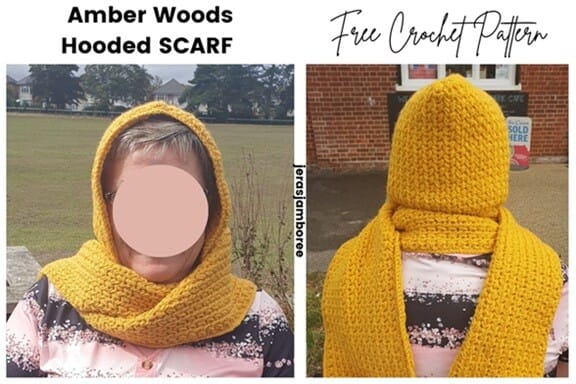
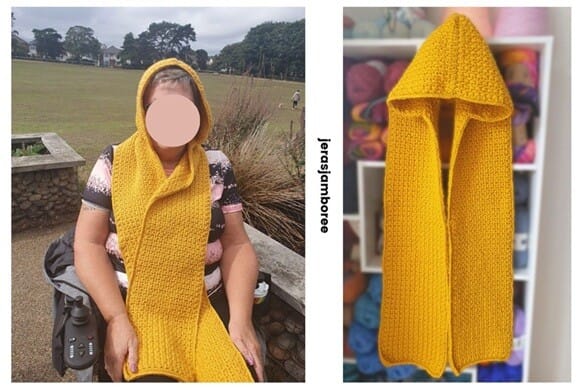
My Amber Woods crochet hooded scarf is one of those projects that feels as lovely to make as it does to wear. The feather stitch gives the pattern a soft, squishy texture, while the hood adds that extra layer of comfort for crisp mornings and chilly evenings.
No need to juggle both a scarf and a hat — this two-in-one design keeps you cosy and is much harder to misplace!
I’ve kept it simple with a one-row repeat and just a little shaping for the hood — perfect if you’re looking for a relaxing project that works up beautifully without complicated steps.
Whether you wrap it snugly around your neck or wear it loose and casual, this is the kind of crochet hooded scarf pattern that quickly becomes a favourite in your handmade wardrobe.
The free pattern is below, written in English in US crochet terms. Prefer a printable version you can take on the go? The Amber Woods Hooded Scarf is also available as an ad-free PDF in my Etsy and Ravelry shops.
I hope you enjoy making and wearing it as much as I do! If you need any help or would like to share your progress or finished scarf, you’re welcome to join us in the Facebook crochet community.
If you enjoy making hooded scarves, you might also like my Brambleberry Scarf , one of my most-loved scarf patterns.
Jump to: Measurements | Materials | Free Crochet Pattern
Skill Level
Easy – one row repeat and minimal shaping for the hood
Measurements
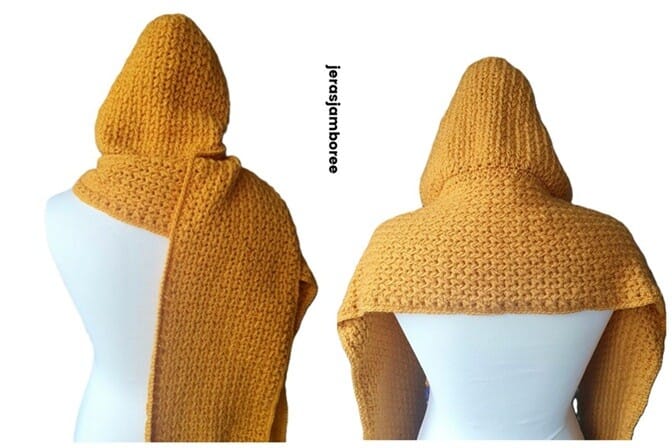
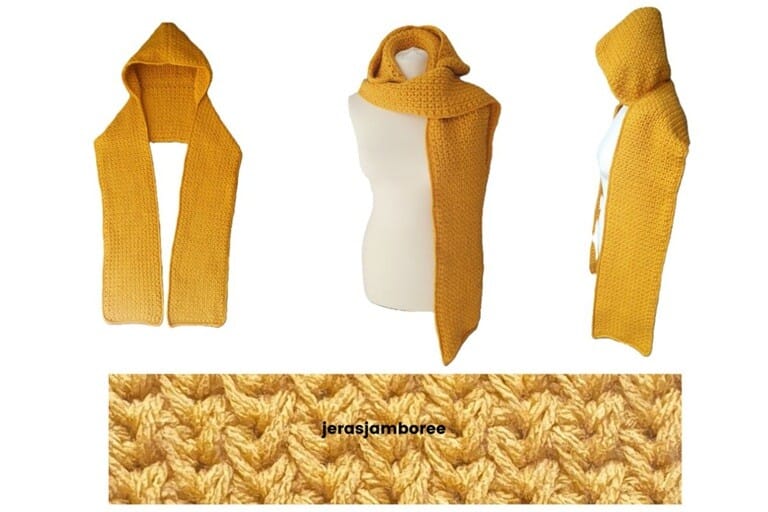
Finished size of scarf is approx. 8” (W) x 70” (L)
Finished size of hood is approx. 18″ (W) x 8.5″ (L)
Jera’s Jamboree receives payments for affiliate advertising. This is at no extra cost to you. As an Amazon Associate I earn from qualifying purchases. Please see my disclosure policy for more information.
Materials
- DK weight #3; 1268 yds / 1160 m
- 5mm crochet hook (I use Clover Amour)
- Tape Measure
- Stitch Markers (I’ve used my Harlequin set for a couple of years)
- Scissors
- Yarn Needle
Yarn Choices
I used Yarnsmiths Create DK in Mustard Yellow from my stash. It’s a budget yarn with class 🙂
100% acrylic, it’s a lovely and soft DK weight yarn that works up great.
With 120 different shades to choose from (yes, 120!) we’re spoilt for choice. I think the mustard yellow is perfect for autumn but of course, you can choose whatever your preference of colour is.
A big bonus, this range is not only EN71-3, Oeko-Tex and REACH certified, but does not contain Bisphenol A and TCEP/TCPP/TDCP chemicals. As crafters I think we always worry about the synthetic fibres and their affect on the environment.
Projects made from Create DK wash up lovely on a 30 degree wash. You can tumble dry on a low heat but I haven’t tried it yet. My drying is done on an airer.
The feather stitch is quite bulky so for this hooded scarf, I used a larger hook than recommended.
There are several substitutes you can make that match the texture, fiber content and gauge such as:
However, you could substitute with any DK yarn (whether in your stash, a yarn you’ve been wanting to work with or a hand dyed yarn you’ve been saving for a smaller project).
I wouldn’t recommend using a thicker fiber. Your scarf will probably lose its drape and be quite stiff – not ideal for a scarf! Having said that, crocheting a swatch will give you an idea if it’s suitable.
Gauge
With a 5mm hook, 8 feather stitches and 14 rows = 4” x 4”
Gauge is not critical for this project.
If you’re gauge is too far out and you want a scarf with the same dimensions as this pattern, you can adjust your stitches using my stitch yarn calculator.
Stitches and Abbreviations
Special Stitches:
Foundation Half Crochet Double (FHDC): Chain 2, yarn over, insert hook into the first chain made, yarn over, pull up a loop (3 loops on hook), yarn over, pull up through the first loop on the hook (first *chain stitch* made), yarn over, pull through all 3 loops on hook (first foundation half double crochet made).
To create the second half double crochet, yarn over and insert hook into the *chain stitch*, yarn over and pull up through the first loop on the hook, yarn over and pull through all 3 loops on hook to complete your next half double crochet stitch. Repeat until you reach your desired foundation chain size.
If you need help for how to crochet the foundation half double crochet, you might find this video helpful.
Feather Stitch (FS): yarn over, insert hook in the chain space, yarn over, pull up, (3 loops on hook), yarn over, insert hook in the chain space two rows down, yarn over, pull up, (5 loops on hook), yarn over, insert hook in the next chain space, yarn over, pull up (7 loops on hook), yarn over and pull through all 7 loops. Chain one and start the next feather stitch in the same chain space.
- Half double crochet (hdc)
- Single Crochet (sc)
- Slip stitch (sl st)
Need help working these stitches? I have written instructions in my stitch library.
Common Crochet Abbreviations Used
These are the abbreviations I’ve used in this scarf pattern:
- Each (ea)
- Chain (ch)
- Chain space (ch sp)
- Continue (cont)
- Remaining (rem)
- Repeat (rep)
- Right Side (RS)
- Skip (sk)
- Spaces (sps)
- Stitch/es (st/s)
- Wrong Side (WS)
How to Crochet the Hooded Scarf Pattern
My Amber Woods scarf is an easy project.
- The feather stitch pattern is used throughout (including the hood). This gives a lovely squidgy and cosy feel!
- The scarf and hood are worked in turned rows.
- Once the long rectangle is crocheted, the hood is worked directly onto the scarf.
- Finally, an edging is worked all around the scarf in single crochet.
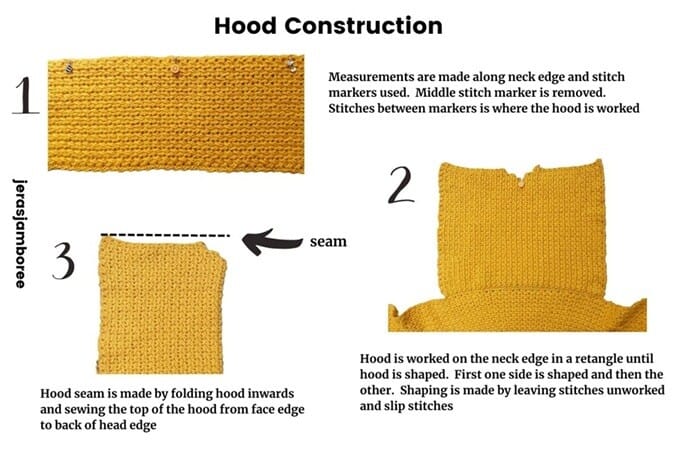
Constructing the Hood
- Measurements are made along the neck edge and stitch markers used. The middle stitch marker is removed. The hood is worked between the two remaining stitch markers.
- The hood is worked in a rectangle until shaping. A stitch marker is placed in the centre stitch and first one side is shaped and then the other. Shaping is made by leaving stitches unworked and slip stitches on the opposite side.
- The hood is folded with wrong side facing outwards and the seam sewn along the top of the hood.
I thought it might be helpful to see a visual of these steps. The image below will help you as you’re working your hood.
How to Customise Your Hooded Scarf
It’s easy to change the size of your scarf:
- To make a longer scarf, work extra row 3 repeats to your desired length. Finish off with the final row instructions.
- To make your scarf wider (perhaps you’re thinking of a shawl), add to your foundation row in multiples of 2 to your desired width. The hood instructions will remain the same no matter the width. Be aware, the feather stitch is a yarn eater!
Don’t want a hood on your scarf? Follow the instructions to the hood, skip the hood and go straight to the edging instructions.
Prefer a pocket scarf (with or without a hood)? Work extra row 3 repeats to the size of your desired pockets ending with the final row instructions. Decide which is your right and wrong side, fold the extra fabric up from the bottom edge on the right side and sew seams along each side of the pocket.
If you amend this pattern in any way you will need more or less yarn than stated.
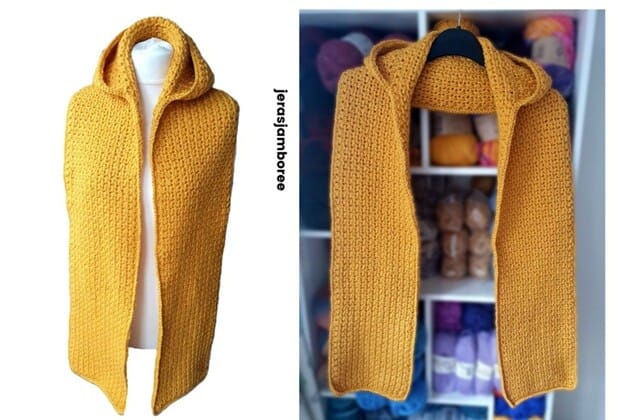
Image below shows the length and width of the pattern without alterations (and a close up of the feather stitch).
My Pattern Notes
- Chain 1 does not count as a stitch.
- The first half double crochet of each row is worked into the turning chain stitch. Chaining one loosely at the end of rows will make it easier to work into the stitch.
- The first time row 3 is worked, the feather stitch is worked into the stitch 2 rows below in the foundation half double crochet. Repeats are worked into the space 2 rows below.
- Stitch repeats in the instructions are written like this; *stitch repeats*
- When working the feather stitch make sure the loop from working the stitch in the space below is the same length as the row you’re working on. This stops the fabric from bunching up.
- Don’t be concerned about the edges of the scarf, the border tightens and neatens the edges.
- There is no right side or wrong side. Choose your right and wrong side before measuring for the hood.
- To make the hood seam invisible, working on the right side, weave through first one feather stitch on one side of the seam and then the feather stitch on the opposite side of the seam. Pull tight before securing the end. Be careful not to pull too tightly.
- Wrapping the scarf around the neck secures the hood.
- The simple edging is worked all around the scarf.
- Weave in ends as you go.
- Keep these notes and how the pattern is worked in mind as you follow my instructions.

Purchase the easy-to-read print-friendly PDF (ad free)
The PDF of this pattern includes everything you need:
- how to work the stitches
- how the pattern is worked
- pattern notes
- clear written instructions
- printable row counter
Amber Woods Hooded Scarf Crochet Pattern Instructions (US Crochet Terms)
With a 5mm hook
Row 1: 27 FHDC (see special stitches), ch1
Row 2: *hdc, ch 1, skip 1 st* rep across to last st, hdc in last st, ch1, turn
Row 3: hdc, ch 1, starting in the ch1 sp from row 2, FS across to the last st, hdc in the last st, ch1 turn
Rows 4 – 244: Rep row 3. At end of last row, ch1, turn
Final row: 1 hdc in ea st and ch sp across (there should be 1 hdc in each ch sp and 1 hdc on top of every FS)
Fasten off
Hood
Choose which side is RS and which is WS
Fold scarf in half and place a st marker in centre st. Measure 7.5” from the left of the central st marker and place a st marker. Measure 7.5” from the right of the central st marker and place a st marker. Remove the central st marker. Sts between markers are where the hood is worked.
Rejoin yarn on RS at first st marker and working in sps on edge in multiples of 2 plus 1
Row 1: hdc evenly across edge between st markers, ch1, turn
Row 2: *1 hdc, ch 1, skip 1 st* rep across to last st, hdc in last st, ch1, turn
Row 3: 1 hdc, ch 1 in the same st, FS across (row should end with 1 hdc in the last st), ch1 turn
Continue with row 3 repeats until hood measures approx. 8” / 20cm from row 1
Identify the middle FS of last row and place a st marker
DO NOT FASTEN OFF
Shape First Side of Hood
Row 1: rep row 3 of scarf across to FS before st marker, turn leaving rem sts unworked (2sts decreased)
Row 2: rep row 3 of scarf
Row 3: rep row 3 of scarf across to FS before end of row, ch1, turn
Row 4: rep row 3 of scarf
Fasten off
Shape Second Side of Hood
Row 1: sk FS to the left of the central st marker, rejoin yarn, rep row 3 of scarf, ch1, turn
Row 2: rep row 3 of scarf
Row 3: sl st in first 3 sts, rep row 3 of scarf
Row 4: rep row 3 of scarf
Fasten off
Hood Seam
With WS facing, fold ea side of hood inwards (see photo in section how the pattern is worked).
Sew central seam.
Fasten off
Neaten the Hood Seam
Working on RS, weave yarn through first one FS on one side and then the FS on the opp side of the seam.
Fasten off
Scarf Edging
Set up round
Working on the RS, rejoin yarn at long side on outer edge on bottom of scarf, ch1
Sl st evenly across long edge to last st, 2sc in last st (corner made), turn and cont around hood, cont sl st around all scarf edges working 2sc in the last st of each edge, join with sl st to ch1, ch1
Round 1: sc in ea sl st around, remembering to work 2sc in corner sps, join with sl st.
Fasten off
Congratulations! Your scarf is ready to be blocked/washed and worn.
All Wrapped Up
My Amber Woods crochet hooded scarf really is a cosy companion for the colder months — simple to crochet, practical to wear, and easy to make your own with different colours or yarns. Whether you keep it for yourself or gift it to someone special, I hope this pattern brings you as much joy as it’s brought me.
If you’re looking for more inspiration, you’ll find plenty of other free crochet patterns here on the blog, from scarves and shawls to cardigans and blankets. There’s always a new project waiting to jump onto your hook!
Copyright Notice
The pattern and photographs of this design are the property of Sharon Goodwin at Jera’s Jamboree. This pattern and design are subject to copyright and are for personal, non-commercial use only. You may not share, resell, alter or redistribute this pattern in part or in whole. You may, however, sell any finished items you make. If you would like to include this pattern in a roundup, you may take one photo and link back to this pattern.
Save the pin below to your favourite board so that it doesn’t get lost when you need it later.

Shaz thank you once again for your generosity ❣️
You’re very welcome Cindy.