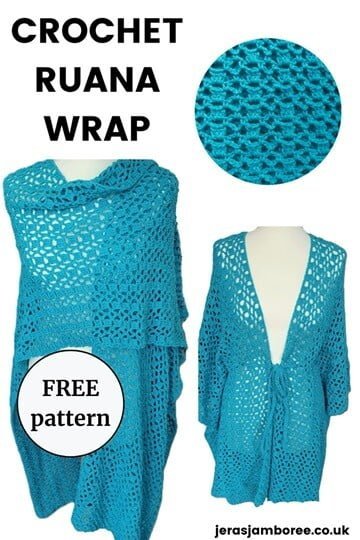
A beginner-friendly crochet ruana worked in simple stitches, featuring an easy two-rectangle construction and multiple styling options from buttoned and belted to softly draped over the shoulders.
My crochet ruana is a beginner-friendly project that is perfect if you’re looking to create a stylish piece with ease.
Constructed from two simple rectangles that are seamed together, my shawl offers a straightforward approach for new crocheters while still delivering a stunning result that more experienced crocheters will enjoy making and wearing.
Wide and long enough to give you decent coverage, you’ll be able to wear it when you’re at home as an extra layer or out in the evening as a stylish option for a cover up to complete your outfit.
With three sizes available, S/M, L/XL, and 2XL/3XL you can create a ruana that fits comfortably and layers beautifully.
This free crochet ruana pattern is designed to be both stylish and easy to make.
Free to view below, you can also upgrade to a PDF in my Etsy and Ravelry stores.
Enjoy my crochet patterns and blog posts?
Add Jera’s Jamboree as a preferred source on Google, Just click below and tick the box to add me.
Jump to: Sizing | Materials | Instructions
How to Make a Crochet Ruana
Learning how to make a ruana is simpler than you might think. This pattern is constructed from two rectangles that are seamed together, making it an approachable project for all skill levels.
Why you’ll Love to Crochet my Ruana
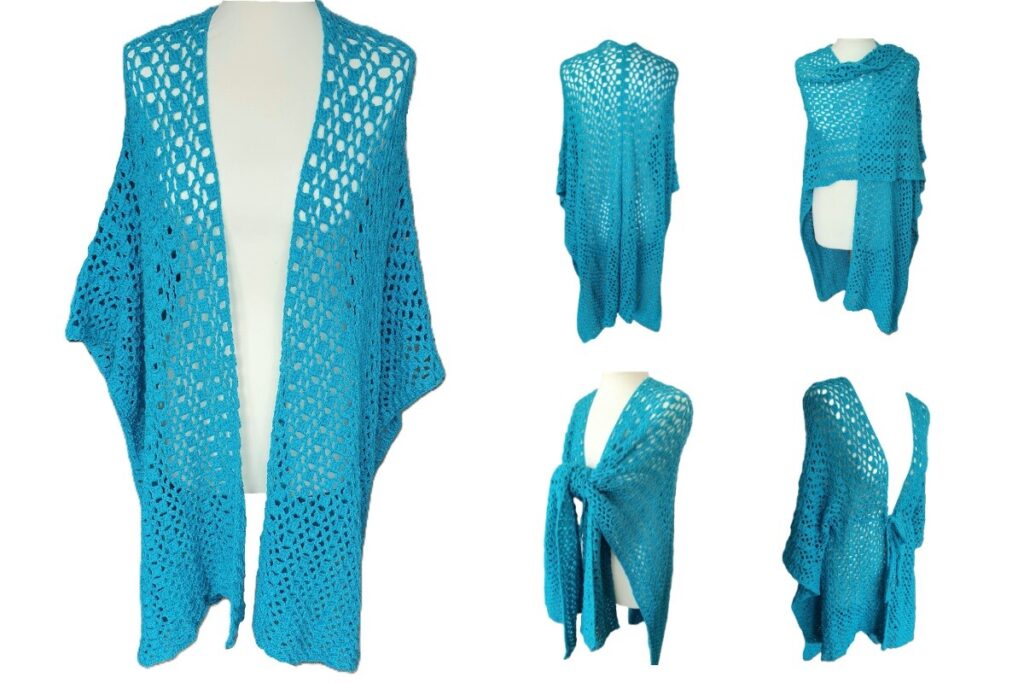
How to Style Your Ruana
I love the different ways a ruana can be worn! If you need some inspiration for how to style yours, this section is useful.

The numbered list below corresponds to those in the image above.
1. Secured at the Front with a Button
Fasten the front of the ruana with a button to keep it closed. You don’t need to crochet a button band, just sew the button on one side and use the open lace stitches to secure.
Position the button at your chest level or slightly lower for a neat and secure look.
This style keeps the ruana in place and adds a focal point to the garment.
2. One Side Over the Shoulder Like a Crochet Wrap
Drape one side of the ruana over your shoulder, allowing the other side to hang freely.
Adjust the drape so it falls elegantly over the shoulder, creating an asymmetrical look.
This style provides a cozy feel and showcases the ruana’s length and texture.
Looks great worn on lunch-time dates or to dress up an outfit in the evening.
3. Tied at the Front Like a Crochet Shawl
Gather the two front ends of the ruana and tie them together in a knot or bow at the chest or waist.
This style can create a more fitted appearance and adds a playful touch.
Adjust the knot to your preferred tightness and position for comfort and style.
4. Crocheted Belt Threaded Through Like a Crochet Cover Up
Use a crocheted strap or belt to thread through the open stitches of the ruana (instructions to crochet the belt are included in the pattern).
Secure at the front with a knot or bow.
This method of styling cinches the ruana at the waist, creating a defined silhouette and adding an extra design element.
Perfect for layering up out and about in the daytime.
You could just leave it as is but these styling options allow you to wear your crochet ruana in versatile and fashionable ways. You’ll be able to adapt to different occasions while taking into account your personal preferences.
Looking for More Crochet Garment Patterns?
If you love this ruana, you might also enjoy these crochet patterns for layering and styling your handmade wardrobe:
- Crochet Shawl Patterns – perfect for lightweight layering and easy makes
- Crochet Cover-Up Patterns – ideal for holidays, beach days, and summer outfits
- Crochet Poncho Patterns – stylish, versatile pieces you can wear year-round
- Summer Crochet Cardigans – breathable layers for warmer weather
Skill Level
Beginner
Jera’s Jamboree receives payments for affiliate advertising. This is at no extra cost to you. As an Amazon Associate I earn from qualifying purchases. Please see my disclosure policy for more information.
Supplies and Materials
- DK weight #3 Yarn: 1600, (1984, 2390) yds
- 5mm / H-8 crochet hook (I use these hooks)
- Tape Measure
- Stitch Markers
- Scissors
- Yarn Needle
Yarn Choices
I used Scheepjes Scrumptious in the Bubblegum Ice Cream colour – it’s been in my stash for a long time! I bought mine at Wool Warehouse.
I wasn’t sure how it would feel … it’s actually the softest yarn I’ve worked with for an age. It doesn’t split and slides smoothly on the hook. And gives a fabulous drape!
It’s great value for the cost – you get a whopping 300 metres/328 yards in a 100g ball.
All the usual care instructions apply:
- Machine washable at 30 degrees
- Dry flat
- Iron on low
- Do not bleach
- Do not dry clean
- Do not tumble dry
Yarn Substitutions
You can substitute any DK yarn but you might get a different drape than I did.
These yarns fall within gauge of the yarn I used and fibre content is similar:
Gauge
3 X 3 dc, 2 X sc, 4 x chain 3’s = 15 sts
Unblocked 15 stitches X 11 rows = 10cm X 10cm (4in X 4in)
Although gauge isn’t critical for this ruana pattern, if your swatch is too far out you can use the stitch gauge converter tool to adjust your stitches. Keep in mind that the pattern is worked in multiples of 8.
Stitches and Abbreviations
This pattern uses these stitches:
- Single Crochet (sc)
- Double Crochet (dc)
- Slip Stitch (sl st)
If you need any help to work these stitches, you’ll find instructions in the first part of my crochet stitch library.
For my UK crocheters, the table below is a conversion of basic crochet stitches from US to UK.
| US Crochet Terms | UK Crochet Terms |
|---|---|
| single crochet (sc) | double crochet (dc) |
| half double crochet (hdc) | half treble crochet (htr) |
| double crochet (dc) | treble crochet (tr) |
| treble (tr) | double treble (dtr) |
| double treble (dtr) | triple treble (trtr) |
Abbreviations
- Chain (ch)
- Wrong Side (WS)
- Right Side (RS)
- Skip (sk)
- Chain Space/s (ch-sp/s)
- Stitch/es (st/s)
- Repeat (rep)
- Each (ea)
Sizing (including Yarn Amounts)
| To Fit Size | Panel Width (inches) | Total Width (inches) | Length (inches) | Approx. Yarn Amount (yards) |
| S/M | 20 | 40 | 60 | 1600 |
| L/XL | 24 | 48 | 62 | 1984 |
| 2XL/3XL | 28 | 56 | 64 | 2390 |
Design and Construction
My pattern uses a 2-row repeat throughout.
Chains and single crochet stitches (the stitches anchor the chain to the row) are worked in one row. 3 double crochet clusters and single crochet are worked into those chain spaces for the second row. Easy!
This creates a gorgeous lacy pattern.

Two identical (long) rectangles are worked in this stitch pattern.
Once crocheted, assembly is easy!
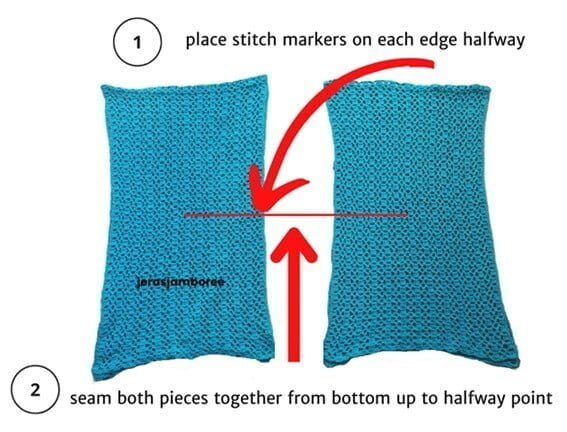
The panels are laid side by side, halfway from the bottom is measured and stitch markers are placed on the edges of the fabric to mark the seam.
The seam is sewn from the bottom to the stitch markers.
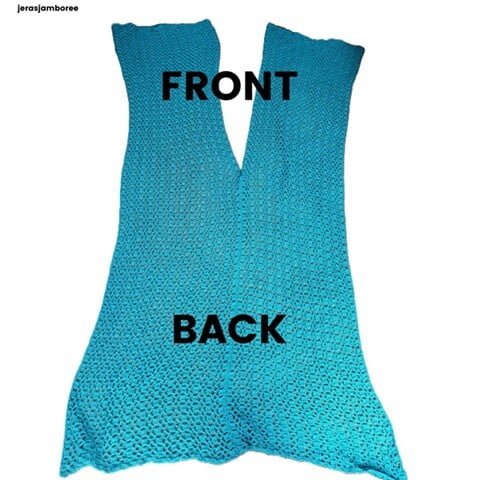
(Note: it was a bit difficult to capture the ruana laid out flat once assembled! – the image above isn’t in perspective but I wanted to show you how it would look. This can sometimes be hard to visualise, especially if you’re a beginner.)
The two front panels go over each shoulder.
If you choose a button closure, you’ll sew your button onto the edge.
If you choose a crochet belt, instructions are included in the pattern below.
You could opt for both of these to wear for different occasions!
My Pattern Notes
- Pattern is written in US crochet terms
- Multiples of 8 + 5
- Sizes are written thus; S/M, (L/XXL, XXL/XXXL)
- Chain one does not count as a stitch
- Chain 3 counts as a double crochet
- Pattern repeats are shown with * for example: *ch3, sk 3 chs, sc in next ch, *rep to last st. You will chain 3, skip 3 chains, single crochet in the next chain and repeat this sequence to the last stitch
- Weave in ends as you go
Purchase the easy-to-read print friendly PDF (ad free)
The PDF of this pattern includes everything you need:
- how to work the stitches
- how the pattern is worked
- pattern notes
- clear written instructions
Free Crochet Ruana Pattern Instructions (US terms)
Rectangle (make 2)
With a 5mm / H-8 crochet hook
Ch101, (117, 133)
Row 1 (WS): sc in 2nd ch from hook, *ch3, sk 3 chs, sc in next ch, *rep to last st, sc in last st, ch3, turn
Row 2 (RS): 3dc in 1st ch3-sp, *ch3, sc in next ch3-sp, ch3, 3dc in next ch3-sp, * rep to last ch3-sp, 3dc in last ch3-sp, dc in last st, ch1, turn
Row 3: sc in base of ch1, *ch3, sc in next ch3-sp, *rep across to last st, sc in last st, ch3, turn
Rows 2 and 3 form pattern
Row 4 – 143, (149, 157) rep rows 2 and 3
Fasten off.
Assembly
Seaming
With WS facing outwards, lay both rectangles flat lined up with each other
- Find the halfway mark on your rectangles and place a st marker
- Sew seam from the bottom up to the stitch marker (see image below)
Fasten off
Optional Crochet Belt
With a 5mm / H-8 crochet hook
Ch250, (275, 300)
Dc in 3rd ch from hook, dc in ea ch across, DO NOT TURN, fold in half, sl st through foundation loop and loop of dc sts across.
Fasten off
That’s it! Your crochet ruana is ready to be blocked and worn.
I’d love to see your version of this pattern! Whether you keep it classic or experiment with colours, every ruana turns out beautifully unique.
If you share your make, I’d love to see yours in my Jera’s Jamboree Crochet Community on Facebook.
It’s a lovely space to share your projects, ask questions, and connect with other crocheters.
And if you enjoyed this pattern, don’t forget to save it to Pinterest so you can come back to it later!
Copyright Notice
The pattern and photographs of this design are the property of Sharon Goodwin at Jera’s Jamboree. This pattern and design are subject to copyright and are for personal, non-commercial use only. You may not share, resell, alter or redistribute this pattern in part or in whole. You may, however, sell any finished items you make. If you would like to include this pattern in a roundup, you may take one photo and link back to this pattern.
Pin for Later
No time now? Save to Pinterest for later.
Happy crocheting!