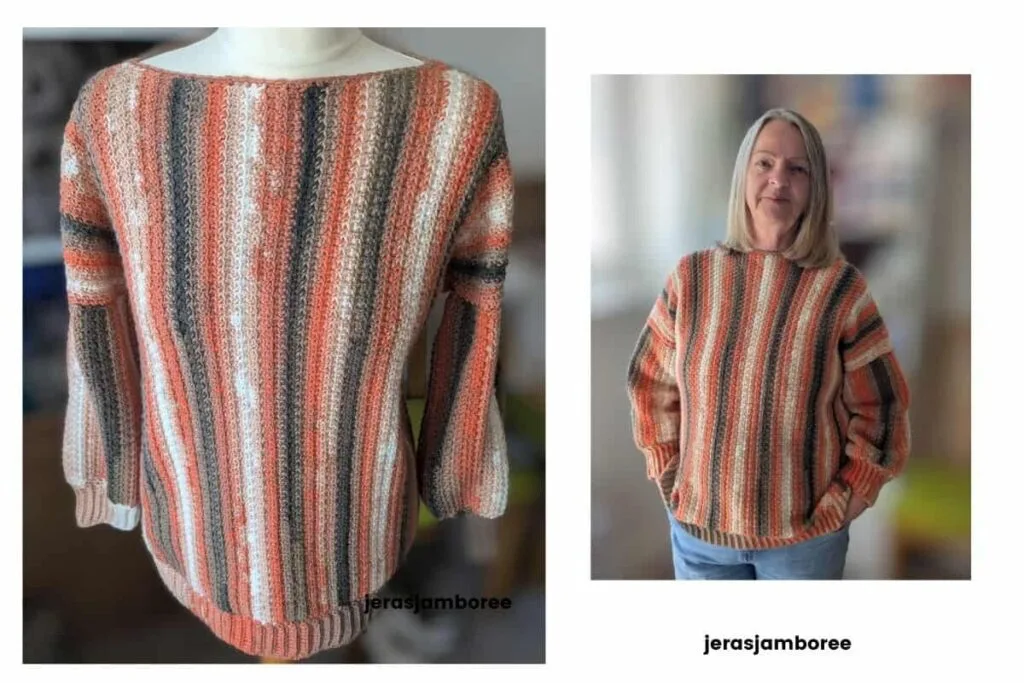
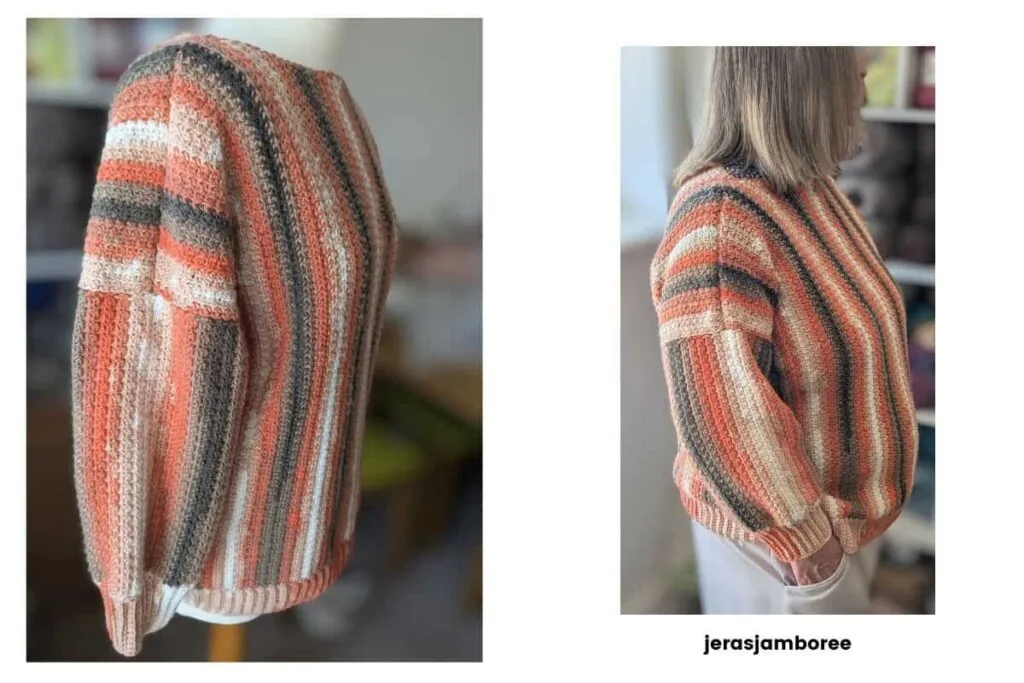
Made from four simple rectangles with no shaping, my Rowan Ridge Sweater combines an easy stitch repeat with cosy ribbed cuffs, hem and a classic boat neckline.
Rowan Ridge is a relaxed crochet sweater pattern designed for those in-between days when you want something cosy without feeling bundled up. Worked lengthways, the simple stitch pattern creates subtle vertical texture while still being easy to crochet.
It’s an easy-to-wear layer for autumn, winter and spring, and works just as well with jeans for an everyday outfit as it does layered over something warmer when the temperature drops.
While searching for inspiration from trees with beautiful autumn colour, I kept coming back to the Sorbus. Better known as the rowan, its warm berries and seasonal foliage perfectly captured the cosy autumn feel I wanted this design to have — and Rowan Ridge found its name.
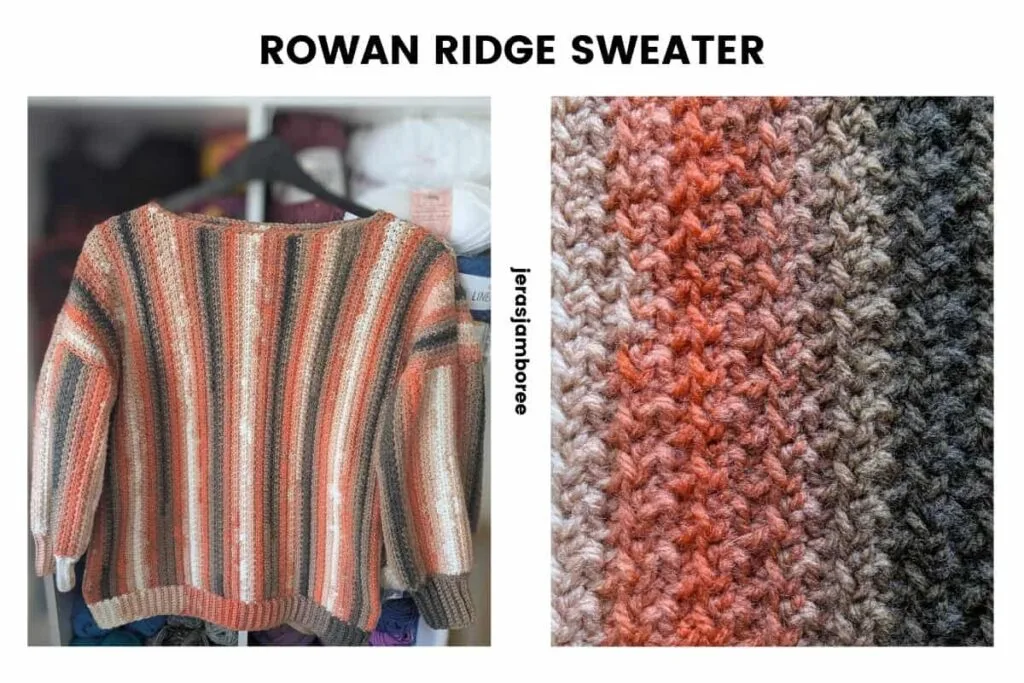
Ready to make your own? You’ll find my free Rowan Ridge crochet sweater pattern below, with all the sizing, materials, construction details and written instructions you’ll need from start to finish.
Want to crochet away from the screen? An ad-free, easy-to-read PDF is available in my Etsy and Ravelry shops. Thank you for supporting my designs.
Enjoy my crochet patterns and blog posts?
Add Jera’s Jamboree as a preferred source on Google, Just click below and add me.
Jump to: Sizing | Materials | Free Crochet Pattern
Why You’ll Love My Rowan Ridge Sweater
If you’ve been looking for an easy crochet sweater without complicated shaping, Rowan Ridge is a great project to try. Here’s what I think you’ll love:
- Simple construction: the sweater is made from four rectangles, so there’s no shaping to worry about.
- Easy stitch repeat: once you’ve worked the first couple of rows, the same stitch pattern is repeated throughout the front, back and sleeves.
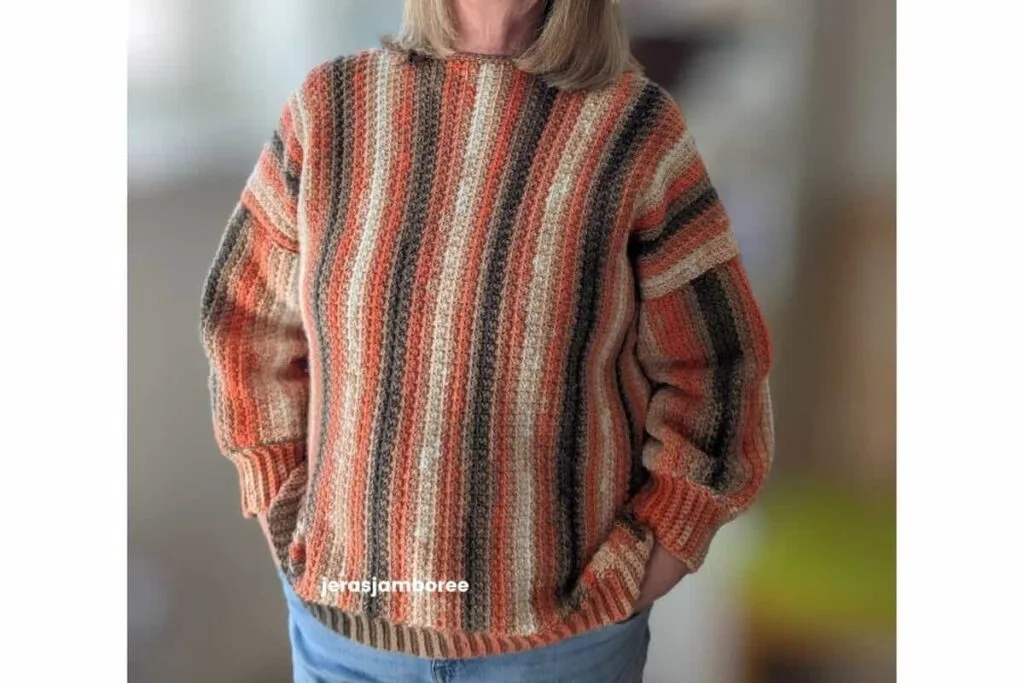
- Relaxed fit: positive ease gives you room to move, while the boat neckline creates a simple, relaxed finish.
- Cosy finishing details: ribbed cuffs and a ribbed hem give the sweater a neat finish and add to that cosy feel.
- Great for colour-changing yarn: working the panels lengthways shows off the colour changes as vertical stripes. Prefer horizontal stripes? My Emberley crochet pullover is also constructed in four pieces but works the stripes in the opposite direction.
- Make it your own: choose a solid, self-patterning or colour-changing DK yarn to give Rowan Ridge a completely different look.
Skill Level
Easy
Rowan Ridge uses simple construction with no shaping or increases. Once you’re familiar with the stitch pattern, the same repeat is worked across the front, back and sleeves.
You’ll need to know how to work basic crochet stitches and how to work into the front loop of a stitch and chain. Full instructions for the Loop Stitch used in this pattern are included below.
Join me for free on Substack for new pattern releases, crochet news and subscriber-only freebies.
Rowan Ridge Crochet Pullover Sizing
Rowan Ridge is available in six sizes, from S to 3XL, and is designed to fit chest measurements from 32–54 inches.
Sizes follow Craft Yarn Council guidance. The table below shows the recommended chest size, finished sweater measurements, sleeve length, upper arm measurement and approximate yarn requirements for each size.
Yarn amounts are approximate and may vary depending on your tension, yarn choice and any adjustments you make to the length or fit.
| To Fit Chest (inches) | Finished Size Width approx. (inches) | Finished Size Length incl ribbing approx. (inches) | Finished Sleeve Length to underarm approx. (inches) | Finished Upper Arm Width approx. (inches) | Yarn Amounts approx. |
| S 32 – 34 | 38 | 22 | 17 | 14 | 1360 |
| M 36 – 38 | 42 | 22 | 17 | 15 | 1491 |
| L 40 – 42 | 46 | 23 | 17.5 | 16 | 1651 |
| XL 44 – 46 | 50 | 23 | 17.75 | 17 | 1767 |
| 2XL 48 – 50 | 54 | 24 | 18 | 18 | 1922 |
| 3XL 52 – 54 | 58 | 24 | 18 | 19 | 2056 |
Choosing the Right Size For You
Rowan Ridge is designed to be worn with approximately 4–6″ of positive ease for a relaxed fit. Choose the size that corresponds with your chest measurement in the table above.
For example, if your chest measures 36″, size M has a finished chest measurement of approximately 42″, giving you 6″ of positive ease. If your chest measures 38″, the same size will give you approximately 4″ of positive ease.
If you prefer a looser, oversized fit, you may wish to size up. Keep in mind that this will also affect the finished sleeve width and the amount of yarn required.
The sleeves have approximately 4″ of ease around the upper arm for comfortable movement.
I have a 40″ chest and I’m wearing size L in the photos, giving me approximately 6″ of positive ease.
Jera’s Jamboree receives payments for affiliate advertising. This is at no extra cost to you. As an Amazon Associate I earn from qualifying purchases. Please see my disclosure policy for more information.
Materials
- DK (#3) yarn: 1360, (1491, 1651, 1767, 1922, 2056) yds
- 5mm Crochet Hook
- 4mm Crochet Hook (for ribbing)
- Dressmaker Pins (for seaming)
- Stitch Markers
- Tape Measure
- Scissors
- Yarn Needle
Yarn Choices
I’m still working my way through my yarn stash (which doesn’t mean I’m not buying more yarn though haha). When I started designing Rowan Ridge, I had the stitch pattern in mind first and thought Papatya Batik would be a good match.
This self-patterning DK yarn works particularly well with the sweater’s vertical construction, allowing the colour changes to form stripes from hem to neckline. As soon as I worked the first swatch, I loved how the colours transitioned through the stitch pattern.
Considering Papatya Batik is a budget-friendly yarn, I found it lovely and soft to crochet with. The finished sweater also feels comfortable against bare skin with no scratchiness.
Papatya Batik measures approximately 11 wraps per inch (WPI), placing it towards the thicker end of the DK (#3) range.
You can substitute another DK yarn for this pattern. When substituting yarn, choose one with a similar WPI and work a gauge swatch before starting to make sure you can achieve the pattern gauge and finished measurements.
Tip: to find the Wraps Per Inch, search online for the yarn name followed by “WPI” or “wraps per inch.” Use this as a guide to compare yarn thickness. You’ll find more advice on yarn, gauge and other useful techniques in my crochet tips for beginners.
If your gauge doesn’t match mine, you can use my stitch gauge converter to help adjust your stitch and row count.
Gauge
20 stitches and 16 rows = 4″ x 4″ (10cm x 10cm) in the Loop Stitch pattern.
This sweater is worked lengthways, so your stitch gauge affects the finished length of the sweater and your row gauge affects the finished width.
I recommend working a tension square before starting your sweater, particularly if you’re substituting yarn. Matching gauge will help you achieve the finished measurements shown in the sizing table.
Stitches and Abbreviations
Special Stitches
Loop Stitch (LS): draw up front loop of stitch, draw up front loop of next chain, yarn over, draw through three loops on hook. Loop Stitch made.
Stitches
- single crochet (sc)
- single crochet 2 together (sc2tog)
- single crochet front loop only (scflo)
- single crochet back loop only (scblo)
- slip stitch (sl st)
For my UK crocheters, the table below is a conversion of basic crochet stitches from US to UK.
| US Crochet Terms | UK Crochet Terms |
|---|---|
| single crochet (sc) | double crochet (dc) |
| half double crochet (hdc) | half treble crochet (htr) |
| double crochet (dc) | treble crochet (tr) |
| treble (tr) | double treble (dtr) |
| double treble (dtr) | triple treble (trtr) |
Abbreviations
This pattern uses the following common abbreviations in the written instructions:
- chain (ch)
- each (ea)
- repeat (rep)
- Right Side (RS)
- space (sp)
- stitch/es (st/s)
- Wrong Side (WS)
Crochet Sweater Construction
Rowan Ridge is constructed from four simple rectangles: one front panel, one back panel and two sleeves. There is no shaping, making the construction straightforward even if you haven’t crocheted many garments before.
Each rectangle is worked lengthways, so the stitches determine the length and the rows determine the width. The ribbed cuffs are added to the sleeves before the sweater is assembled.
To assemble, the shoulder seams are sewn first before the sleeves are attached to the front and back panels. The sleeve and side seams are then sewn in one continuous seam on each side. For guidance, see the assembly image below.
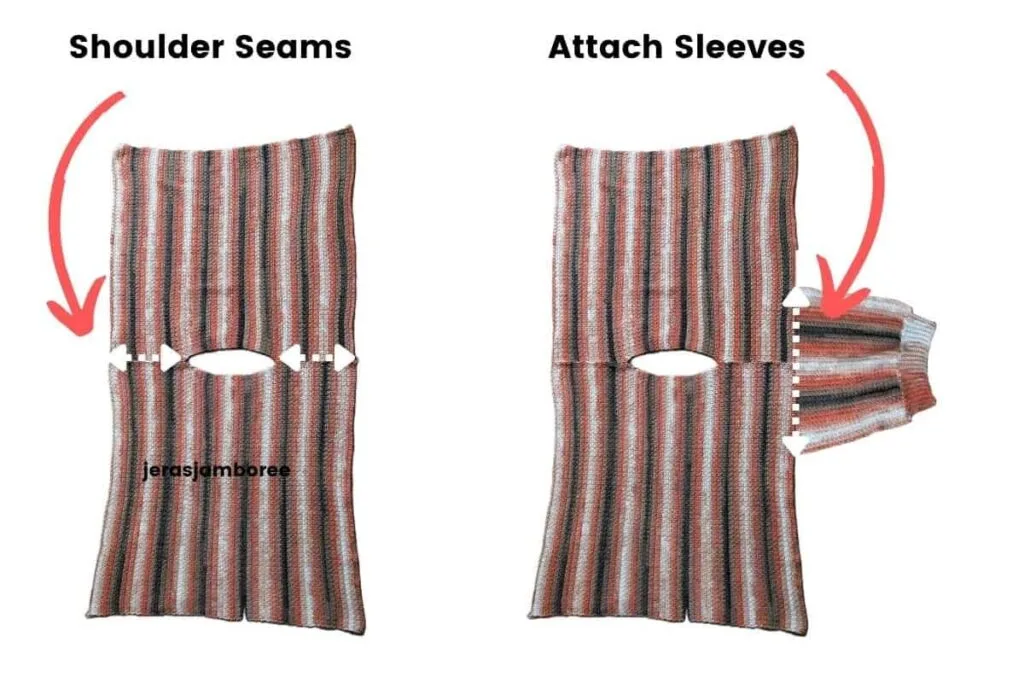
Once assembled, ribbing is worked around the bottom edge to create the hem.
One round of single crochet finishes the boat neckline.
If you enjoy simple sweater construction, you might also like my Selene Crochet Sweater, which is also worked in four pieces with just a small amount of shaping at the neckline.
If you’d rather avoid seaming separate panels, my one-piece crochet pullover uses a completely different construction method.
My Pattern Notes
- Instructions are written in English using US crochet terms.
- Sizes are written like this: S, (M, L, XL, 2X, 3X)
- Chain 1 turning chain does not count as a stitch.
- Chain 1 of the Loop Stitch counts as a stitch.
- The front and back panels are reversible, so there is no right or wrong side while crocheting them. Before working the shoulder seams, choose which side you would like to use as the wrong side.
- The sleeves have a right and wrong side once the ribbed cuffs have been added.
- All seams are sewn on the Wrong Side.
- When working the Loop Stitch, the front loop is the loop closest to you.
- Remember to work into the front loop of the first stitch at the beginning of each row.
- The last single crochet of each row is worked through both loops.
- Weave in ends as you go to save having them all to deal with once the sweater is assembled.
Get the easy-to-read print friendly PDF
Prefer to crochet from a printed pattern or work without scrolling through the blog? The ad-free Rowan Ridge PDF brings everything together in an easy-to-read format, with extra resources to help you keep track as you crochet.
- stitch instructions
- an overview of how the sweater is constructed
- assembly photographs
- pattern notes
- clear written instructions
- a printable row counter
Fall Into Crochet Blog Hop
The Fall into Crochet blog hop is hosted by Itchin’ For Some Stitchin’ and is running 1st September to 30th September 2026.
Click the image below to go to the event page.
There’s also a Fall Into Crochet bundle at the fab reduced price of just $15.99, with all 30 patterns from the event plus 2 bonus patterns.
The bundle image link below is an affiliate link, which means I may earn a small commission if you purchase through it, at no extra cost to you.
Click the image below to go to more information about the Fall Into Crochet bundle.
Rowan Ridge Crochet Sweater Instructions (US terms)
(Back and Front)
Make 2
Ch 112, (112, 118, 118, 124, 124)
Row 1: sc2tog in second and third ch from hook, ch1, *sc2tog, ch1, * rep to last ch, sc in last ch, ch1, turn
Row 2: LS over first sc and next ch, ch1, *LS over next sc and ch, ch1, *rep to last st, sc in last st, ch1, turn
Row 3 – 76, (84, 92, 100, 108, 116): rep row 2
Fasten off
Sleeve
Make 2
Ch 60, (60, 62, 62, 64, 64)
Row 1: sc2tog in second and third ch from hook, ch1, *sc2tog, ch1, * rep to last ch, sc in last ch, ch1, turn
Row 2: LS over first sc and next ch1-sp, ch1, *LS over next sc and ch1-sp, ch1, *rep to last st, sc in last st, ch1, turn
Row 3 – 56, (60, 64, 68, 72, 76): rep row 2
DO NOT FASTEN OFF
Ribbed Cuff
Change to 4mm hook
Turn the sleeve to work across the row ends. This edge forms the cuff.
Set up row
Ch1, sc evenly into the end of each row across (56, 60, 64, 68, 72, 76 sc)
Ribbing
Ch 14
Row 1 (RS): sc in 2nd ch from hook, sc in ea ch to cuff edge, sl st in next 3 sts, turn
Row 2: sc blo in ea st to last st, sc in last st, ch1, turn
Row 3: sc in first st, scblo to cuff edge, sl st in next 3 sts, turn
Rep rows 2 and 3 across
Fasten off
Assembly
Choose which side you would like as the RS
With WS facing outwards, lay the front and back panels flat on top of ea other
Identify the centre st of the top edge of each panel and place a st marker through both panels
From the centre marker, measure 4 (4, 4¾, 4¾, 4¾, 5½)” / 10 (10, 12, 12, 12, 14)cm from the centre st towards the left edge and place a stitch marker. Repeat towards the right edge.
Remove the centre marker. The sp bet the remaining st markers forms the neckline
Try the neckline placement against you and adjust the stitch markers if you would prefer a wider or narrower neckline.
Shoulder Seams
Cont working on WS
Sew seams from st marker to outer edge on ea side
Refer to the image in the Crochet Sweater Construction section for the shoulder seam and sleeve placement.
Setting Sleeves in Place
Cont working on WS
Identify middle st of sleeve at shoulder edge and place a st marker
Lay back and front panels out flat as per diagram in sweater construction section
Line up st marker with shoulder seam, pin sleeve in place
Sew seam
Fasten off
Rep on other side
Underarm and Side Seams
Still working on WS
Fold front over back
Pin sleeve seam and side seam
Sew seam from cuff to underarm and underarm to hem
Fasten off
Rep on other side
Turn sweater right side out
Ribbed Hem
Working on RS with a 4mm hook
Rejoin yarn at side seam
Ch 11
Row 1: (RS): sc in 2nd ch from hook, sc in ea ch to hem edge, sl st in next 2 sts, turn
Row 2: sc blo in ea st to last st, sc in last st, ch1, turn
Row 3: sc in first st, scblo to hem edge, sl st in next 2 sts, turn
Rep Rows 2 and 3 around the hem. Join the first and last ribbing rows by working a sl st through each corresponding st of both layers.
Fasten off
Neck Edging
With the sweater RS facing outwards and using a 5mm hook, rejoin yarn at one shoulder seam
Round 1: Ch 1, sc evenly around the neck opening, join with sl st to first sc
Fasten off
Congratulations! Your Rowan Ridge sweater is finished
Copyright Notice
The pattern and photographs of this design are the property of Sharon Goodwin at Jera’s Jamboree. This pattern and design are subject to copyright and are for personal, non-commercial use only. You may not share, resell, alter or redistribute this pattern in part or in whole. You may, however, sell any finished items you make. If you would like to include this pattern in a roundup, you may take one photo and link back to this pattern.

Not ready to start your yet? Save the pin below to your favourite crochet board on Pinterest so you can easily find this free crochet sweater pattern again.
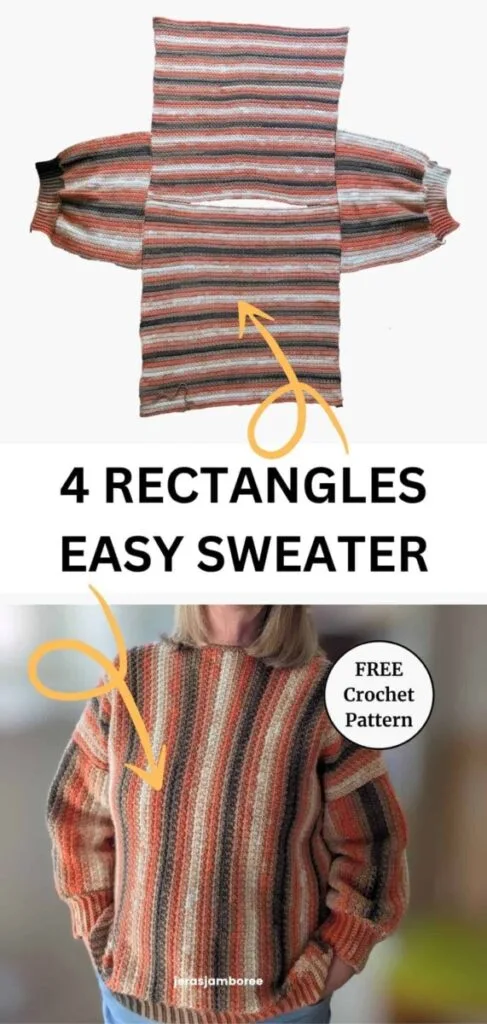
I loved watching the autumn-inspired colours develop as I crocheted Rowan Ridge, and I hope you enjoy seeing your own version take shape too. Whether you choose a self-patterning yarn like mine or make yours in a solid colour, I’d love to know what you choose. Share it with us in the Jera’s Jamboree Crochet Community on Facebook so that we can admire your beautiful work.
If simple crochet sweater construction is your thing, you’ll find plenty more inspiration in my collection of easy crochet sweater patterns, including different ways to construct your next pullover.
