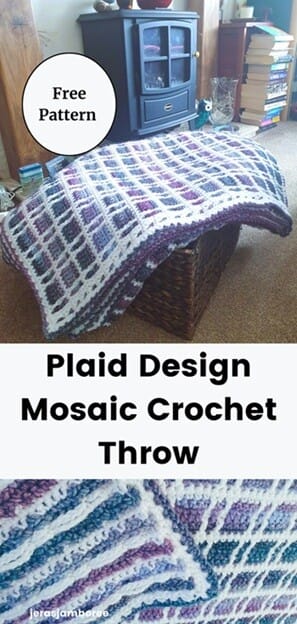
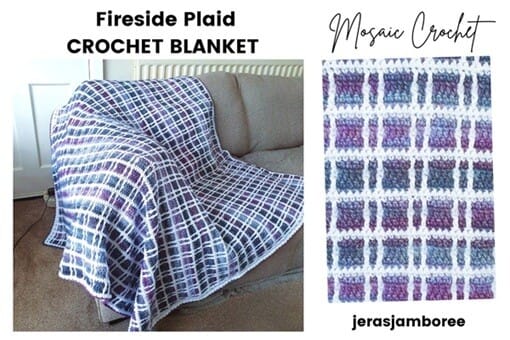
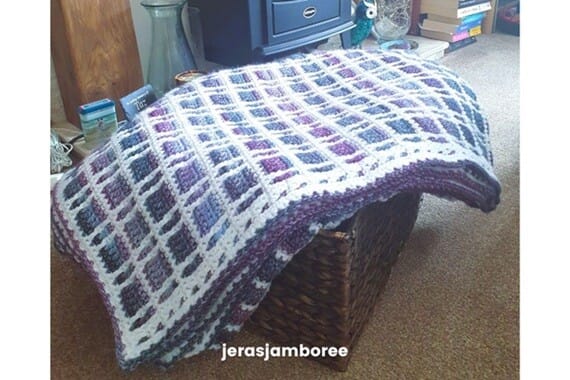
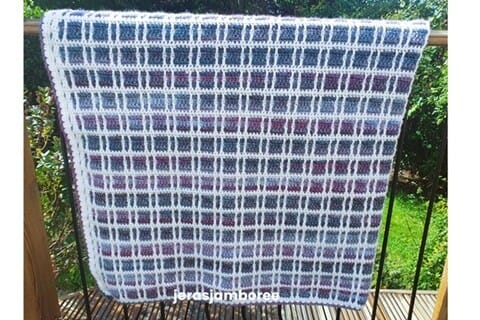
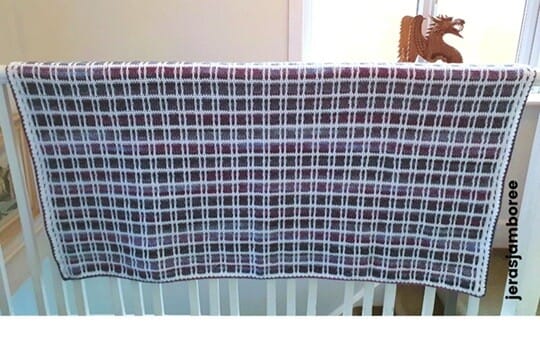
There’s something extra-snuggly about a crochet blanket with a tartan twist – and my Fireside Plaid Blanket brings that cosy magic to life.
Worked in the inset mosaic technique, I’ve included both written instructions and a clear chart, so you can follow whichever way you prefer.
Using just single crochet and mosaic double crochet, my afghan pattern creates a stunning plaid effect without the complicated colourwork.
A simple one-round border gives a neat finish, while the generous throw size makes it perfect for curling up on the sofa or layering on a bed.
Even if you’re new to mosaic crochet, the step-by-step guide (including how to read the chart) makes it easy to relax and enjoy every row.
Whatever colours you choose, I have a feeling that your finished blanket will soon be your go-to comfort piece!
The free pattern is below, and if you prefer a printable version, you’ll also find it as a PDF (US crochet terms) in my Etsy, Ravelry and LoveCrafts shops.
Jump to: Measurements | Materials | Free Crochet Pattern
Skill Level
Beginner Friendly / Easy
Measurements
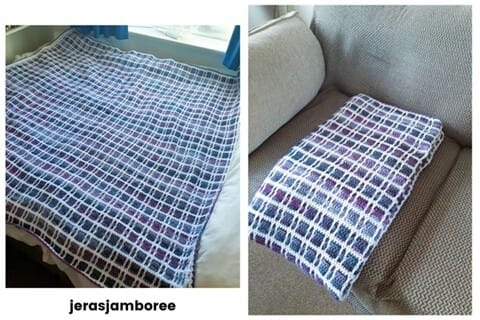
This crochet throw blanket measures approx. 60″ (W) x 58″ (L).
It’s the perfect size for snuggling on the couch and also fits a double bed (as in the photo below).
For recommendations to help you customise the size of your throw, jump to the ‘How to customise’ section.
Jera’s Jamboree receives payments for affiliate advertising. This is at no extra cost to you. As an Amazon Associate I earn from qualifying purchases. Please see my disclosure policy for more information.
Materials
- Aran/Worsted weight yarn #4: Yarn A (solid neutral colour) 1382 yds/1283 m; Yarn B (variegated yarn) 1964 yds/1794 m
- 5mm crochet hook (I use Clover Amour)
- Tape measure (I love these cute Emma Ball designs)
- Yarn Needle
- Scissors
Yarn Choices
When planning the mosaic blanket, I browsed tartan fabrics and knew a variegated or ombre yarn with purple would work. Yarnsmiths Pebble Haze Prints Aran (Chesil) was the perfect match.
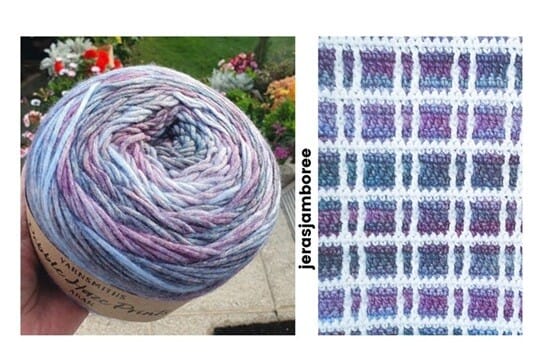
I’d already used Pebble Haze in a DK weight in a cardigan pattern so knew I would enjoy working with the blown yarn.
I also love the fact that this yarn is a blend of cotton and acrylic. Hard-wearing but lovely and soft!
I wanted the horizontal and vertical lines to be neutral and chose Yarnsmiths Create Aran in white.
Both of the yarns are easy to care for – machine washable at 30 degrees and can be ironed and tumble dried on a low setting.
You can substitute any yarn of the same weight. When you crochet your swatch, make sure you’re happy with how the blanket drapes and the flexibility of the blanket.
Gauge
With a 5mm hook and working in single crochet:
15 stitches and 18 rows = 4” x 4”
Gauge is not critical for this project but maintaining tension is.
If your gauge is too far out, it’s possible to adjust your stitches using my stitch gauge converter.
Tip: Don’t stress if your gauge isn’t exact – as long as you’re happy with the drape, your blanket will be beautiful.
Stitches
If you need help working any of the stitches, you’ll find full instructions in my stitch library.
Mosaic Double Crochet (mdc): a normal double crochet worked in the skipped stitch of the same colour three rows below, working the stitch in front of the two rows of chains in the other colour. The chains show on the wrong side of the fabric.
- single crochet (sc)
- slip stitch (sl st)
Abbreviations
Change colour (cc): Colour changes take place on the last pull through of the single crochet at the end of a row. When you have two loops on the hook, yarn over with the new colour and pull through the loops on the hook. Colour change made.
- chain (ch)
- each (ea)
- repeat (rep)
- Right Side (RS)
- skip (sk)
- space (sp)
- stitch (st)
- wrong Side (WS)
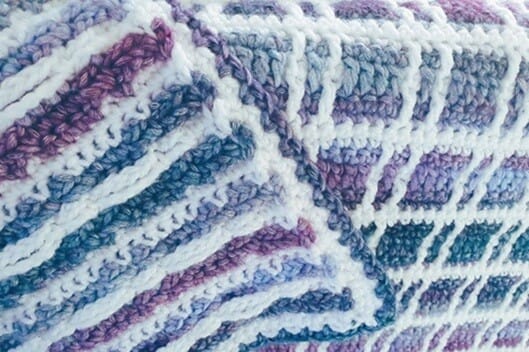
How Inset Mosaic Crochet Works
This technique uses two rows in one colour, back and forth, then the next colour is switched to for the next two rows – this repeats throughout the project.
The yarn not in use is not fastened off but left at the side of the work, ready to be picked up again after two rows.
Both loops are worked into as you normally would.
All mosaic double crochet stitches are worked on the right side.
The first row of colour creates the pattern and the second row in the same colour repeats it.
- Where a mosaic double crochet was used in the first row, in the second row a single crochet is worked into this stitch.
- Where a chain space was made in the first row, the same chain space is made on the second row.
- One more chain is made than the number of stitches skipped. This is to give space so that the fabric doesn’t pull in.
The image below shows how the right side and wrong side of the Fireside Plaid Blanket looks using this technique.
How to Follow the Inset Mosaic Crochet Chart
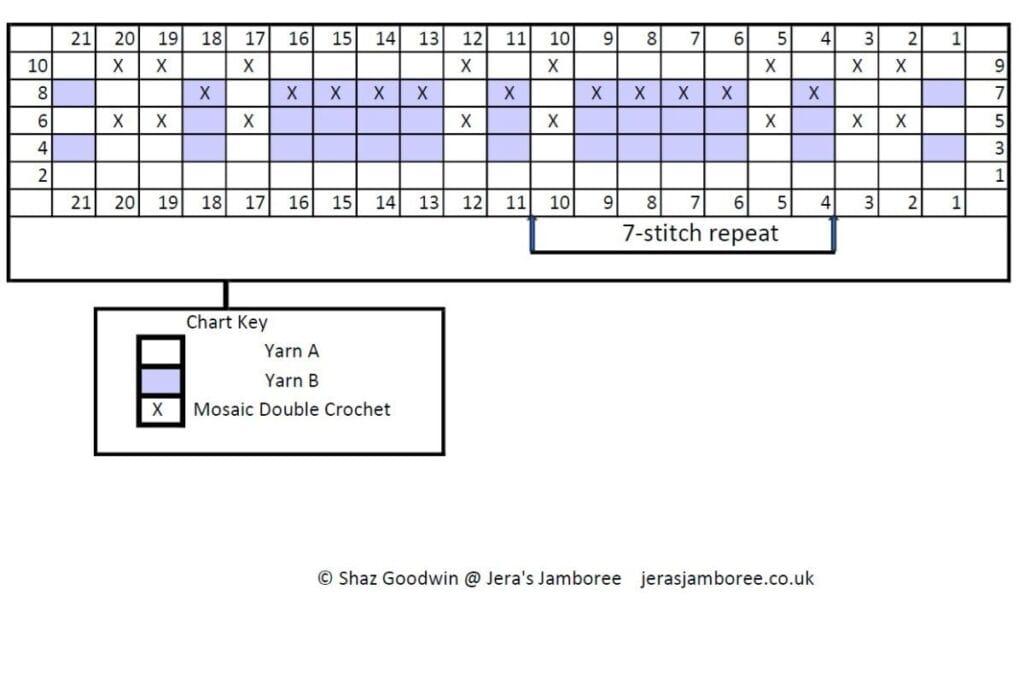
- The chart is read from the bottom up.
- Each square in a chart row represents a stitch and each chart row represents two rows of crochet worked back and forth in the same colour.
- The colour in the first and last squares of the row is the yarn colour of the row.
- Odd numbered rows (right side) are read from right to left.
- Even numbered rows (wrong side) are read from left to right.
- When a square in the chart row is a different colour from the working colour, a chain space is made and stitches skipped. The skipped stitches will be worked with a mosaic double crochet in the next odd numbered row.
- The first and last stitch of all rows is a single crochet.
- Rows 1 and 2 are single crochet.
- The tartan pattern is worked from rows 1 – 10 and repeats from rows 3 – 10.
How to Customise Your Mosaic Crochet Blanket
The Fireside Plaid throw blanket pattern can be customised to any size.
- For the width, work your foundation chain to a multiple of 7 (and add 8) – measure as you go and stop when you’re close to your preferred size. Don’t forget to add the 8 chains!
- For the length – to shorten work less repeats of rows 3 – 10. To lengthen, continue working repeats of rows 3 – 10 to your desired size.
- Once the border has been set up, it is only one round and will not make much difference to your finished size.
You might find the table of blanket sizes below helpful:
| Blanket Type | Width (inches) | Length (inches) | Width (cm) | Length (cm) |
| Lap / Throw | 40″ | 50″ | 102 cm | 127 cm |
| Twin / Single | 66″ | 90″ | 168 cm | 229 cm |
| Full / Double | 80″ | 90″ | 203 cm | 229 cm |
| Queen | 90″ | 100″ | 229 cm | 254 cm |
| King | 108″ | 100″ | 274 cm | 254 cm |
Customising your yarn choices:
- For Yarn A, I would recommend you choose a lighter colour (white in this pattern) but you could experiment when you crochet a swatch. Sometimes colours you don’t think will work, do! The rows worked in Yarn A form the horizontal and vertical lines. Yarn A is also used for the set-up rows for the border.
- For Yarn B, if you already have yarn in your stash, have a look through and see if you have colours that are either graduated or compliment each other. When the pattern instructs you to change to Yarn B (cc to B), substitute your colours. The rows worked in Yarn B create the squares inside the horizontal and vertical lines. Yarn B is also used to work the border.
- The only downside for not using an ombre/variegated yarn is you will likely need to fasten off at the end of row of the colour, rather than carrying the yarn up the side of the blanket. Which of course means more ends for you to sew in …
My Pattern Notes
- Pattern is a multiple of 7 (+8 for starting chain).
- Chain one does not count as a stitch.
- Row 1 is worked into the back bumps of the chain.
- Pattern repeats are written like this: *stitches to repeat*
- Border: the last stitch of each edge is the corner stitch
- Weave in ends as you go.
Fireside Comforts Blog Hop
If you’ve found your way here from the Fireside Comforts Blog Hop event page, welcome!
My Fireside Plaid Blanket is free to download on October 20th 2025 for 24 hours by clicking on the ‘Download the PDF here’ opposite.
To check out each day’s pattern in the hop you will need to visit the event page.

Purchase the easy-to-read print-friendly PDF (ad free)
The PDF of this pattern includes everything you need:
- how to work the stitches
- how the pattern is worked
- pattern notes
- clear written instructions
- printable row counter
Fireside Plaid Blanket Crochet Pattern Written Instructions (US crochet terms)
With a 5mm hook and yarn A
Ch 204
Row 1 (RS): 1sc in 2nd ch from hook, sc in ea ch across, ch1, turn
Row 2 (WS): 1sc in ea st across, cc to B, ch1, turn
Row 3: 1sc, ch3, sk 2 sts, 1sc *ch2, sk 1 st, 4sc, ch2, sk 1 st, 1sc, * rep to last 3 sts, ch3, sk 2 sts, 1sc, ch1, turn
Row 4: 1sc, ch3, sk ch-3 sp, 1sc, *ch2, sk ch-2 sp, 4sc, ch2, sk ch-2 sp, 1sc, *rep to last 3 sts, ch3, sk ch-3 sp, 1sc, cc to A, ch1, turn
Row 5: 1sc, 2mdc, ch2, sk 1 st, *1mdc, ch5, sk 4 sts, 1mdc, ch2, sk 1 st, *rep to last 3 sts, 2mdc, 1sc, ch1, turn
Row 6: 3sc, ch2, sk ch-2 sp, *1sc, ch5, sk ch-5 sp, 1sc, ch2, sk ch-2 sp, *rep to last 3 sts, 3sc, cc to B, ch1, turn
Row 7: 1sc, ch3, sk 2 sts, 1mdc, *ch2, sk 1 st, 4mdc, ch2, sk 1 st, 1mdc, *rep to last 3 sts, ch3, sk 2 sts, 1sc, ch1, turn
Row 8: 1sc, ch3, sk ch-3 sp, 1sc, *ch2, sk ch-2 sp, 4sc, ch2, sk ch-2 sp, 1sc, *rep to last 3 sts, ch3, sk ch-3 sp, 1sc, cc to A, ch1, turn
Row 9: 1sc, 2mdc, 1sc, *1mdc, 4sc, 1mdc, 1sc, *rep to last 3 sts, 2mdc, 1sc, ch1, turn
Row 10: rep row 2
Rows 3 – 10 form mosaic pattern
Row 11 – 240: rep rows 3 – 10
Fasten off
Setting up Border
Working along length edge
Rejoin Yarn A on RS at row 1.
Sl st loosely and evenly along side length, (208 sl st)
Fasten off
Rejoin Yarn A at 1st sl st, ch1
Row 1: sc in ea sl st to end, ch1, turn
Row 2: sc in ea st to end
Fasten off
Rejoin Yarn A at RS on other side
Rep for other side along length edge
Border
Working on RS
With a 5mm hook
Join Yarn B in 1st st of any edge, ch1
Round 1: [sc, ch2, sc] in 1st st (corner st made), ch1, sk 1 st, *sc in next st, ch1, sk 1 st, *rep to corner st, [sc, ch2, sc] in corner st, * rep around, join with sl st
Fasten off
Congratulations! Your crochet throw blanket is ready to be blocked/washed.
Copyright Notice
The pattern and photographs of this design are the property of Sharon Goodwin at Jera’s Jamboree. This pattern and design are subject to copyright and are for personal, non-commercial use only. You may not share, resell, alter or redistribute this pattern in part or in whole. You may, however, sell any finished items you make. If you would like to include this pattern in a roundup, you may take one photo and link back to this pattern.
Final Words
I hope you enjoy making – and snuggling under – your Fireside Plaid Blanket as much as I loved designing it.
If you’d like to try more mosaic designs, take a look at my Mosaic Crochet Blanket Roundup (it covers both inset and overlay styles).
You can also browse all my crochet blanket patterns here for even more inspiration.
I’d love to see your colour choices – share in the Jera’s Jamboree Crochet Community on Facebook so we can all admire your plaid creations!
If you’re looking for inspiration for your next project, don’t forget to check out the Muse!
Short on time now? Save the image below to your favourite board for later.