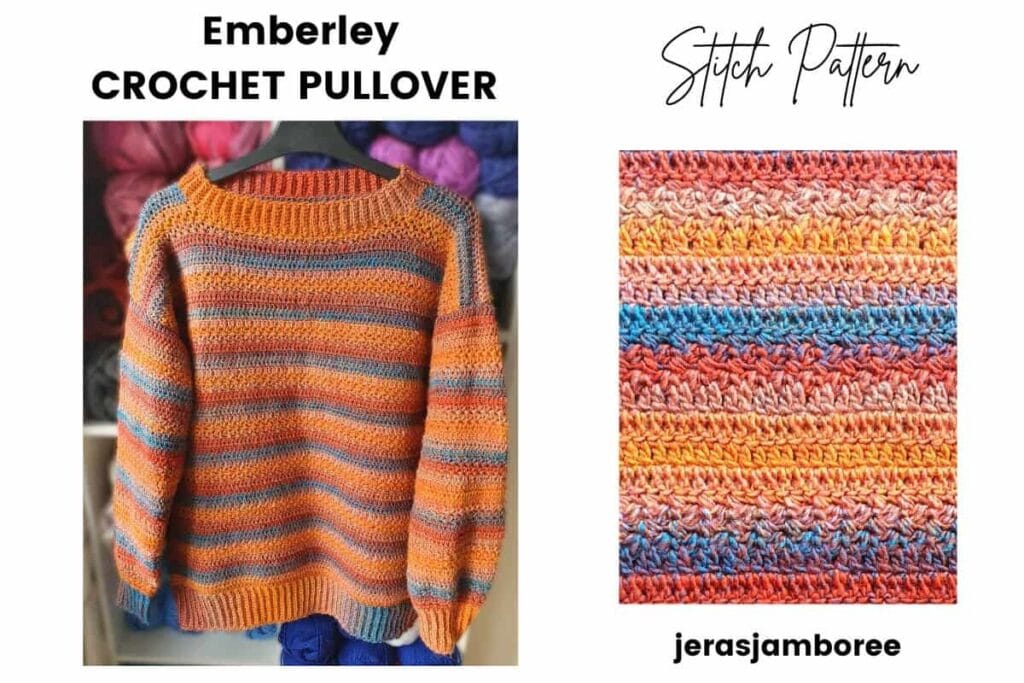
My Emberley crochet pullover pattern is designed to be an easy, comfortable make — from the relaxed boat neckline to the cosy texture created by alternating double crochet with mini bean stitch.
If you’re someone who prefers a neckline that doesn’t feel tight or close to the throat, this style gives you that comfortable, easy-to-wear fit without losing shape or structure.
The stitch repeat is simple to follow, adds texture, and keeps the fabric interesting to work and lovely to wear. Whether you use a variegated yarn or dive into your stash, the stitches do the hard work for you.
If you’ve seen my roundup of crochet sweater patterns for beginners, you’ll recognise the same simple, approachable style here: clear instructions, minimal shaping, and plenty of room to make it your own.
You can follow the free crochet pullover pattern right here on the blog, or if you prefer a printable version, the ad-free PDF is available in my Etsy, Ravelry and LoveCrafts shops.
Ready to get started? Below you’ll find everything you need — sizing, materials, gauge and the full free crochet jumper pattern.
Jump to: Sizing | Materials | Free Crochet Pattern
Skill Level
Easy – my pullover is worked in four separate pieces with minimal shaping. The stitch pattern is straightforward, and the variegated yarn means no colour changes (unless you choose to stash-bust, in which case you’ll need to know how to change colours).
Sizing
The Emberley Pullover follows Craft Yarn Council sizing guidelines.
The table below shows the chest measurements, finished garment width, length, and approximate total yardage.
| To Fit Chest (inches) | Finished Size Width approx. (inches) | Length (shoulder to hem) approx. (inches) | Total Yarn (yds) approx. |
| S 32 – 34 | 38 | 25 | 1600 |
| M 36 – 38 | 42 | 25 | 1785 |
| L 40 – 42 | 46 | 25.5 | 1970 |
| XL 44 – 46 | 50 | 25.5 | 2120 |
| 2XL 48 – 50 | 54 | 26 | 2345 |
| 3XL 52 – 54 | 58 | 26 | 2530 |
How to Choose Your Size
- Measure your bust:
Use a tape measure around the fullest part of your chest. - Compare with the “To Fit Chest” column:
Choose the size where your measurement falls within that range. - Consider ease:
The Emberley crochet pullover sweater is designed with positive ease so it feels relaxed rather than snug. This means the finished sweater will be wider than your body for a comfortable, everyday fit. - Prefer a closer fit?
Work the back and front in the next size down, but keep the sleeve instructions for your actual size so the upper arms aren’t too tight. - Between sizes?
Size up for a roomier feel or size down for a more tailored look.
Jera’s Jamboree receives payments for affiliate advertising. This is at no extra cost to you. As an Amazon Associate I earn from qualifying purchases. Please see my disclosure policy for more information.
Materials
- DK yarn (#3 weight):
S 1600 yds / 1460 m;
M 1785 yds / 1630 m;
L 1970 yds / 1800 m;
XL 2120 yds / 1940 m;
2XL 2345 yds / 2140 m;
3XL 2530 yds / 2310 m - 4mm Crochet Hook (body)
- 3.5mm Crochet Hook (ribbing)
- Stitch Markers
- Tape Measure
- Dressmaker Pins
- Scissors
- Yarn Needle
Yarn Choices
I used Yarnsmiths Lagoon DK for my sample (left over from my Lennox Book Sleeve), and I loved how the colour changes worked with this stitch pattern. The fabric came out soft but with enough structure, and the texture really highlights the variegated shades.
All of my balls were from the same dye lot, but there were slight differences in colour depth between a few of them. I matched my balls carefully as I went, which meant using a little extra yarn—something to keep in mind if you’re using the same brand. The colour transitions were consistent though, making it easy to blend between balls.
Each 100g ball gives you 372 yards / 340 metres, which is fantastic value. It’s 100% acrylic, machine washable at 30°C, and you can tumble dry on low if needed. Personally, I find that draping over an airer works perfectly—creases drop out quickly and it dries fast.
You can substitute any DK/#3 weight yarn that meets gauge. If you’re struggling to match my pattern gauge, my stitch gauge converter can help you adjust your stitch count to suit your chosen yarn.
And don’t skip your swatch! Not only will it test your gauge but will make sure you’re happy with both the drape and the feel of the fabric. This will set you up for a sweater you’ll truly enjoy wearing.

Gauge
With a 4mm hook:
18 stitches x 13 rows = 4″ x 4″ (10cm x 10cm)
Pattern used for gauge swatch:
- 4 rows double crochet
- 4 rows mini bean stitch
- 4 rows double crochet
- 1 row mini bean stitch
Measuring your gauge over the full repeat helps ensure the texture and drape match the finished sweater. If your gauge is slightly off, try adjusting hook size or using my stitch gauge converter to modify stitch counts.
Stitches and Abbreviations
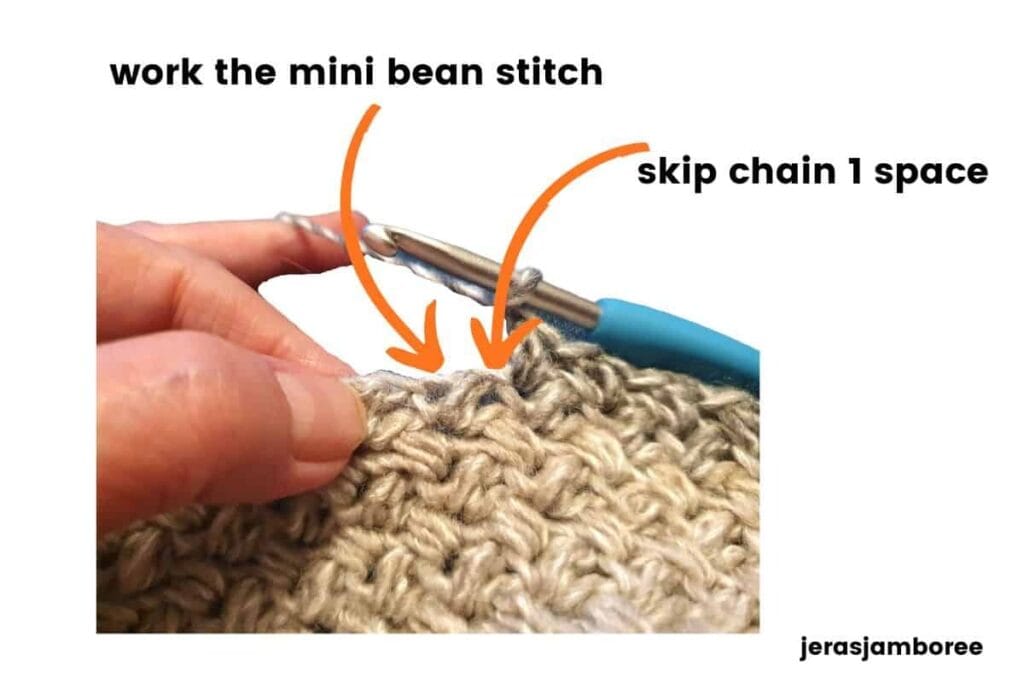
Special Stitches: Mini Bean Stitch (mb): insert hook into indicated stitch, yarn over and pull up a loop, yarn over and insert hook into same stitch, yarn over and pull up a loop, yarn over and pull through all 4 loops on hook. Mini bean stitch made.
The image below shows you the indicated stitch for the mini bean (row 2 and repeats).
If you need a refresher on any of these, you’ll find instructions in my stitch library:
- Single crochet (sc)
- Single Crochet Back Loop Only (scblo)
- Single Crochet 2 Together (sc2tog)
- Stacked Double Crochet (stacked dc)
- Double Crochet (dc)
- Double Crochet 2 Together (dc2tog)
- Slip Stitch (sl st)
These common abbreviations are used throughout the pattern:
- Between (bet)
- Chain (ch)
- Chain space (ch sp)
- Continuity (cont)
- Decrease (decr)
- Each (ea)
- Instructions (instr)
- Repeat (rep)
- Right Side (RS)
- Skip (sk)
- Space (sp)
- Stitch/es (sts)
- Wrong Side (WS)
How to Crochet the Emberley Pullover
Once the foundation rows are set up for the back and front, the stitch pattern alternates 4 rows of double crochet with 4 rows of mini bean stitch. It’s an easy repeat to memorise and creates a soft, textured fabric that works beautifully in solid, tonal, or variegated yarns.
I first used the mini bean stitch in my popular seamless cardigan pattern back in 2024, and I’ve been wanting to design another garment with it ever since. Paired with rows of double crochet, it gives this pullover a lovely balance of drape and structure.
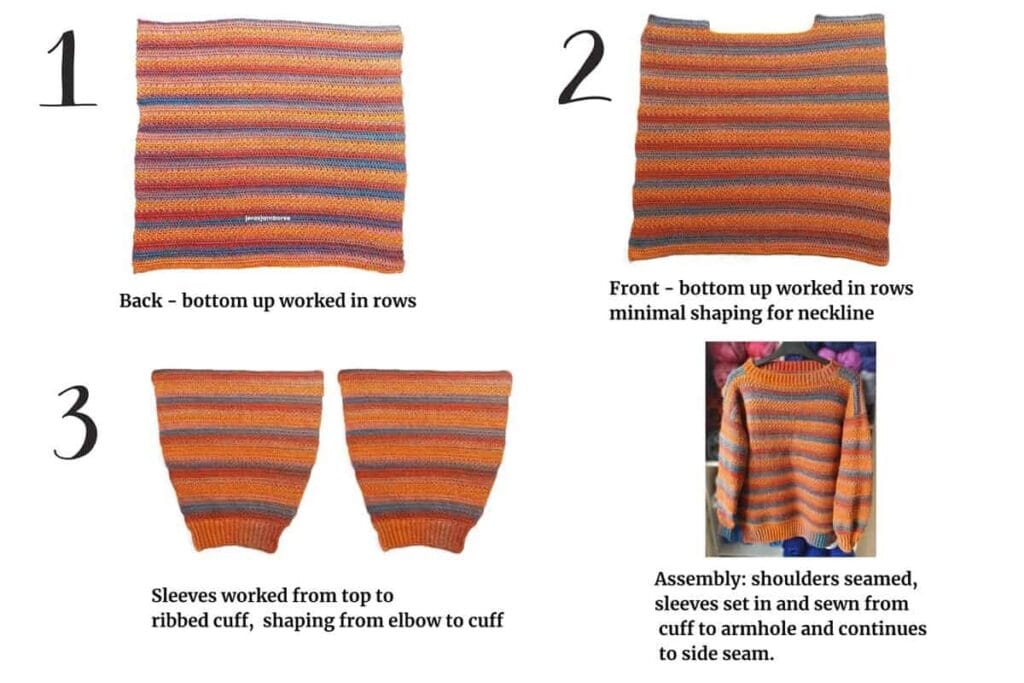
The construction of the Emberley Pullover is similar to my Selene Sweater. This crochet pullover sweater is worked in four separate pieces.
- Back: a simple rectangle worked bottom-up in turned rows.
- Front: worked the same as the back, with the neckline shaped by working the left and right shoulders separately.
- Sleeves: worked from the shoulder down to the wrist and includes a ribbed cuff. Decreases are made by working two stitches together at the beginning and end of specified rows.
Assembly Overview
- Join the shoulders:
Place the front and back together with wrong sides facing out, line up the shoulders, and sew the seams. - Set in the sleeves:
With the sweater laid flat, align the centre top of each sleeve with the shoulder seam and sew along the sleeve cap. - Sew sleeve and side seams:
Fold the sleeve with the wrong side facing out and sew from the cuff to the underarm, then continue down the side seam to the hem. Repeat for the second sleeve. - Finish with ribbing:
Add a ribbed hem and neckline using single crochet back loop only.
The image below will help you visualise the placement of the sleeve before seaming.

My Pattern Notes
- Pattern is written in English using US crochet terms.
- Chain 1 of mini bean stitch counts as a stitch.
- Chain 2 at end of mini bean stitch rows does not count as a stitch.
- Chain 1 of ribbing does not count as a stitch.
- Instead of a turning chain, double crochet rows start with a stacked double crochet. If you prefer to chain 3 at the end or a start of rows then you can do that too without affecting the pattern.
- Stacked double crochet (or chain3 ) counts as a double crochet.
- Mini bean stitch pattern is a multiple of 2 (+1).
- Different size instructions are written like this: S, (M, L, XL, 2X, 3X)
- Repeated stitches are written between *
- Weave in ends as you go.
- If you substitute the yarn, you may need more or less yarn than stated in the written pattern.
Purchase the easy-to-read print-friendly PDF (ad free)
The PDF of this pattern includes everything you need:
- how to work the stitches
- how the pattern is worked
- pattern notes
- clear written instructions
- printable row counter

Emberley Crochet Pullover Instructions (US crochet terms)
Back
With a 4mm hook
Ch 87 (95, 103, 111, 119, 127)
Row 1 (RS): dc in 4th ch from hook, dc in ea ch across, turn (85, 93, 101, 109, 117, 125 dc)
Row 2: stacked dc, dc in ea st across, turn
Row 3 – 6: rep row 2
Row 7: mb in 1st st, *ch1, sk 1 st, mb in next st, * rep across, ch2, turn
Row 8 – 10: rep row 7 (at end of row 10, ch1 and turn)
Row 11: stacked dc, dc in ea mb and ch-sp across (85, 93, 101, 109, 125 dc)
Row 12 – 14: rep row 2
Rows 7 – 14 form stitch pattern
Row 15 – 69, (69, 70, 70, 71, 71): rep stitch pattern
Fasten off
Front
With a 4mm hook
Ch 87 (95, 103, 111, 119, 127)
Rep instr for back to row 66, (66, 67, 67, 68, 68)
Create Neckline
Identify middle st and place a st marker
Measure 11cm to the right of the centre and place a st marker
Measure 11cm to the left of the centre and place a st marker
NOTE: for a smaller neckline, measure less cms to right and left of centre st marker
Remove middle st marker
Sp bet st markers is the neckline
First Shoulder
Row 67, (67, 68, 68, 69, 69): keeping cont of pattern, work to st marker
Row 68, (68, 69, 69, 70, 70) to row 69, (69, 70, 70, 71, 71): cont with st pattern
Fasten off leaving a long tail to sew shoulder seam
Second Shoulder
Rejoin yarn at 2nd st marker
Rep instr for first shoulder
Remove st markers
Sleeves (make 2)
With a 4mm hook
Ch 71, (75, 79, 85, 93, 99)
Row 1 – 4: rep rows 1 – 4 of front
Row 5 – 24: rep rows 7 – 14 of stitch pattern
Row 25 (decr): stacked dc, dc2tog, dc to last 3 sts, dc2tog, dc in last st, turn
Row 26: stacked dc, dc in ea st across, turn
Row 27 (decr): rep row 25
Row 28: rep row 26
Row 29 (decr): sc2tog, mb to last 2 sts, sc2tog, ch1, turn
Row 30: sc in 1st st, *ch1, mb in ea st, * rep across to last st, sc in last st, ch1, turn
Row 31: (decr): rep row 29
Row 32: rep row 30
Row 33 – 48: rep rows 25 – 32
S ONLY
Row 49: sc in 1st st, sc in next 2 sts, sc2tog, *sc in next 3 sts, sc2tog, * rep across
M/L/XL ONLY
Row 49: sc in 1st st, sc in next st, sc2tog, *sc in next 2 sts, sc2tog, *rep across
2X/3X ONLY
Row 49: sc in 1st st, sc2tog, *sc in next st, sc2tog, * rep across
DO NOT FASTEN OFF
Continue with ribbed cuff
Ribbed Cuff
Change to 3.5mm hook
Ch15
Row 1: (working back down ch) sc in 2nd ch from hook, sc in ea ch to cuff edge, sl st in next 2 sts on cuff edge, turn
Row 2: (working back up to cuff edge) scblo to last st, sc in last st, ch1, turn
Row 3: sc in 1st st, scblo to cuff edge, sl st in next 2 sts on cuff edge, turn
Rep rows 2 and 3 across
Fasten off
Assembly
With WS facing outwards, place the front on top of the back piece. Line up shoulders and pin in place
Sew shoulder seams
Lay out back and front flat with WS facing outwards
Identify middle st of top of sleeve and line up with shoulder seam
Pin sleeve in place
Sew top of sleeve to shoulder edge
Fold sleeve so WS is facing outwards
Sew sleeve seam from cuff to armhole and from armhole to hem for side seam.
Fasten off
Rep on other side
Turn sweater RS outwards
Ribbed Hem
With 3.5mm hook, rejoin yarn on either side seam
Ch 15
Row 1: (working back down ch) sc in 2nd ch from hook, sc in ea ch to hem edge, sl st in next 2 sts on hem edge, turn
Row 2: (working back up to hem edge) scblo to last st, sc in last st, ch1, turn
Row 3: sc in 1st st, scblo to hem edge, sl st in next 2 sts on hem edge, turn
Rep rows 2 and 3 around
Join with a sl st through 1 loop on either side of ribbing
Fasten off
Neck Ribbing
With 3.5mm hook, rejoin yarn at shoulder seam
Ch 8
Row 1: (working back down ch) sc in 2nd ch from hook, sc in ea ch to neck edge, sl st in next 2 sts on neck edge, turn
Row 2: (working back up to hem edge) scblo to last st, sc in last st, ch1, turn
Row 3: sc in 1st st, scblo to neck edge, sl st in next 2 sts on neck edge, turn
Rep rows 2 and 3 around
Join with a sl st through 1 loop on either side of ribbing
Fasten off
Congratulations! Your sweater is finished and looking fabulous 🙂
I hope you’ve enjoyed making your Emberley crochet pullover pattern. The stitch texture and relaxed fit make it such a comfortable, everyday piece, and I’d love to see your version.
If you’re ready for another project, take a look at my free crochet pullover pattern, or try my one-piece crochet pullover sweater pattern for a different construction approach. You’ll also find more inspiration under my crochet sweater patterns tag.
Prefer a printable copy? The ad-free PDF is available on Etsy, Ravelry and LoveCrafts.
Share your finished sweater in the Jera’s Jamboree Crochet Community on Facebook — I’d love seeing your make!
Copyright Notice
The pattern and photographs of this design are the property of Sharon Goodwin at Jera’s Jamboree. This pattern and design are subject to copyright and are for personal, non-commercial use only. You may not share, resell, alter or redistribute this pattern in part or in whole. You may, however, sell any finished items you make. If you would like to include this pattern in a roundup, you may take one photo and link back to this pattern.
Save to Pinterest
Short on time? Save the pin below to your favourite board to come back to when you’re ready.
