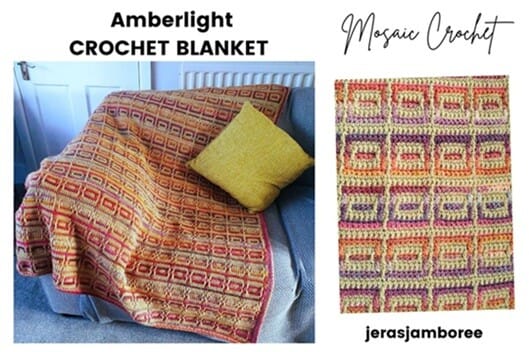
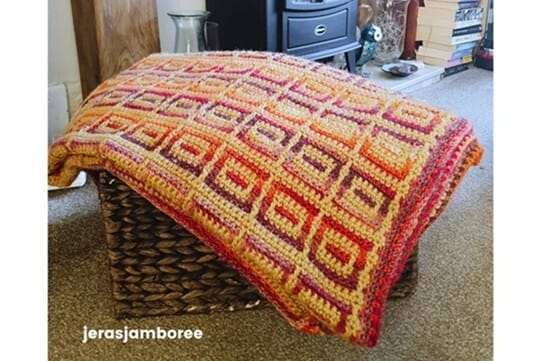
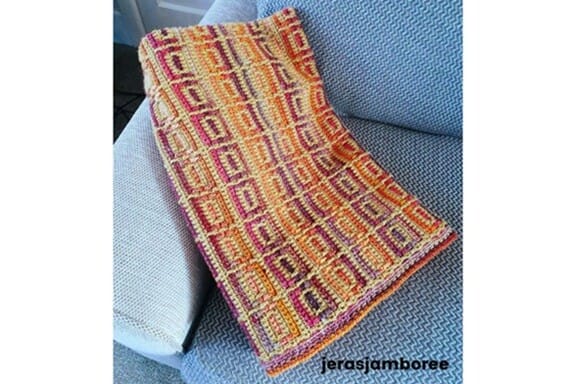
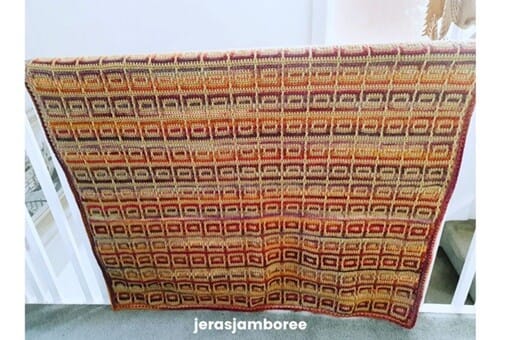
The Amberlight Blanket is my latest mosaic crochet design, and I’m excited to be sharing it with you. It combines the simple rhythm of inset mosaic crochet with an eye-catching textured geometric square pattern that’s easy to master and relaxing to make.
I designed it to bring warmth and colour back to our well-loved sofa, but you can easily choose shades to match your own décor — whether you love soothing neutrals or bold, vibrant tones.
If you’re new to mosaic crochet blankets, this project is a perfect starting point. You’ll love watching the pattern emerge as you work, and the finished throw adds a cozy, handcrafted touch to any space.
The free crochet pattern is below. Prefer to work from a PDF? you’ll also find the Amberlight blanket as a PDF (US crochet terms) in my Etsy, Ravelry and LoveCrafts shops.
Jump to: Measurements | Materials | Mosaic Chart | Free Crochet Pattern
Skill Level
Beginner Friendly / Easy
Blanket Measurements
Finished crochet throw size (including border): 44in (W) x 54” (L)

Customise the Size of Your Mosaic Crochet Blanket
If you’d like to make your blanket a little larger or smaller, it’s easy to adjust — just follow the tips below.
- For the width, work your foundation chain to a multiple of 9 (and add 4 to the foundation chain) – measure as you go and stop when you’re close to your preferred size. Don’t forget to add the 4 chains!
- To shorten the length, work less repeats of rows 3 – 14.
- To make yours longer, continue repeating rows 3 – 14 until you reach your desired length.
- The border has a set up along the sides of both lengths and then continues in 2 rounds of moss stitch. To make yours wider without changing the mosaic pattern, just work more round 2 repeats.
If you’re a beginner you might find my post on beginner crochet tips helpful.
If you’re not sure which size throw you’d like to make, you might find the table of sizes below helpful:
| Blanket Type | Width (inches) | Length (inches) | Width (cm) | Length (cm) |
| Lap / Throw | 40″ | 50″ | 102 cm | 127 cm |
| Twin / Single | 66″ | 90″ | 168 cm | 229 cm |
| Full / Double | 80″ | 90″ | 203 cm | 229 cm |
| Queen | 90″ | 100″ | 229 cm | 254 cm |
| King | 108″ | 100″ | 274 cm | 254 cm |
The finished Amberlight Blanket sits nicely between a lap and small throw size — ideal for curling up with a book or adding colour to your favourite chair.
If you’re looking for more cosy makes in this size range, take a look at my Free Crochet Lap Blanket Patterns Roundup, which includes a mix of easy textures and classic designs.
Jera’s Jamboree receives payments for affiliate advertising. This is at no extra cost to you. As an Amazon Associate I earn from qualifying purchases. Please see my disclosure policy for more information.
Materials
- Aran weight #4 yarn: Yarn A (solid colour) 1253yds/1144m; Yarn B (variegated) 1380yds/1263m
- 5mm hook (blanket)
- 4mm hook (border)
- Stitch Markers
This Harlequin stitch marker set is my favourite.
- Scissors
- Yarn Needle
Yarn Choices
For my yarn choice, I wanted the colours to fit on our old brown leather sofa (it’s ancient and my husband is reluctant to part with it – so we cover the seating with a blanket to hide the repairs and cracks!).
Looking through my stash, I opted for Lion Brand Basic Stitch in Mustard (Yarn A) and Sirdar Jewelspun Aran in Sunstone Amber (Yarn B).
Although the yarns are different brands, the thickness of the fibres is the same. When I tested, both yarns are 8 wpi (wraps per inch) and I found from working a swatch that they worked up similarly. Care instructions are similar too.
(8 wpi falls at the lower end of the 8-10 wpi range for Aran and worsted weight yarn).

Customising your Yarn
You can substitute any Aran weight #4 yarn for this easy mosaic blanket project as long as the care instructions are the same and of a similar thickness. You may also need a different amount of yarn to that stated in the pattern.
It doesn’t matter whether you have your solid colour as Yarn A and variegated as Yarn B (or even two solid colours) or swap them round as all three options will work. Keep in mind though that if you switch them around, you will need to switch the yarn amounts too. The moss stitch border in this pattern is worked in Yarn B.
I would recommend that your variegated yarn has long, slow colour transitions as this suits the mosaic design. However, if you’re working with what’s in your stash, have a play around and see what works for you.
If you enjoy mixing colours, you might also like my Fireside Plaid Blanket — it uses the same technique to create a cozy, textured plaid design that’s perfect for cooler days.
Gauge
With a 5mm hook
15 single crochet stitches and 18 rows = 4” x 4”
Gauge is not critical for this crochet blanket but if you’re not happy with the difference between your gauge and mine, it’s easy to adjust your stitches using my stitch gauge converter.
Stitches You Need To Know
If you need help working any of the stitches, you’ll find full instructions in my stitch library.
Mosaic Double Crochet (mdc): a normal double crochet worked in the skipped stitch of the same colour three rows below, working the stitch in front of the two rows of chains in the other colour.
- single crochet (sc)
- slip stitch (sl st)
Abbreviations Used in the Pattern
Change colour (cc): Colour changes take place on the last pull through of the single crochet at the end of a row. When you have two loops on the hook, yarn over with the new colour and pull through the loops on the hook. Colour change made.
- chain (ch)
- each (ea)
- repeat (rep)
- Right Side (RS)
- skip (sk)
- space (sp)
- stitch (st)
- wrong Side (WS)
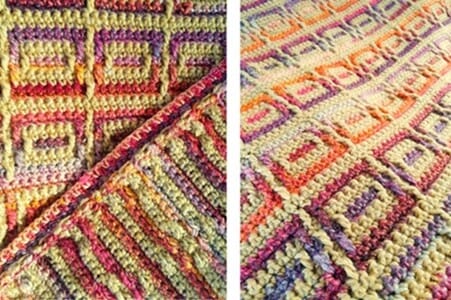
How Inset Mosaic Crochet Works
This technique uses two rows in one colour, back and forth, then the next colour is switched to for the next two rows – this repeats throughout the project.
The yarn not in use is not fastened off but left at the side of the work, ready to be picked up again after two rows.
Both loops are worked into as you normally would.
All mosaic double crochet stitches are worked on the right side.
The first row of colour creates the pattern and the second row in the same colour repeats it.
- Where a mosaic double crochet was used in the first row, in the second row a single crochet is worked into this stitch.
- Where a chain space was made in the first row, the same chain space is made on the second row.
- One more chain is made than the number of stitches skipped. This is to give space so that the fabric doesn’t pull in.
The image on the left below shows how the right side and wrong side of the Amberlight blanket looks using this technique.

How to Follow the Amberlight Inset Mosaic Crochet Chart
- The chart is read from the bottom up.
- Each square in a chart row represents a stitch and each chart row represents two rows of crochet worked back and forth in the same colour.
- The colour in the first and last squares of the row is the yarn colour of the row.
- Odd numbered rows (right side) are read from right to left.
- Even numbered rows (wrong side) are read from left to right.
- When a square in the chart row is a different colour from the working colour, a chain space is made and stitches skipped. The skipped stitches will be worked with a mosaic double crochet in the next odd numbered row.
- The first and last stitch of all rows is a single crochet.
- Rows 1 and 2 are single crochet.
- The pattern is worked from rows 1 – 14 and repeats from rows 3 – 14.
My Pattern Notes
- Pattern is a multiple of 9 (+4 for starting chain).
- 5mm hook – blanket, border set up.
- 4mm hook – moss stitch border.
- Chain one does not count as a stitch.
- Row 1 is worked into the back bumps of the chain.
- Pattern repeats are written between *.
- Float yarn up the side – do not fasten off each colour.
- Border set up worked along length of each side (not width).
- When working the border set up, make sure the slip stitch works over the floated yarn.
- Border: the first and last stitch of each edge is the corner stitch.
- Border: placing a stitch marker in the chain 2 corner spaces make it easier for round 2 (and any repeats if customising)
- Weave in ends as you go.
- There are a few ways you can use this pattern: chart and written instructions together, chart on its own, written instructions only. Use whatever feels most comfortable for you.
Purchase the easy-to-read print-friendly PDF (ad free)
The PDF of this pattern includes everything you need:
- how to work the stitches
- how the pattern is worked
- pattern notes
- clear written instructions
- printable row counter
Free Amberlight Crochet Blanket Pattern (US Terms)
With a 5mm hook and Yarn A
Ch 157
Row 1 (RS): sc in 2nd ch from hook, sc in ea st across, ch1, turn
Row 2: sc in ea st across, cc to B, ch1, turn
Row 3: 1sc, ch2, sk 1 st, *8sc, ch2, sk 1 st, * rep across to last st, sc in last st, ch1, turn
Row 4: 1sc, ch2, sk ch-2sp, *8sc, ch2, sk ch-2 sp, * rep across to last st, sc in last st, cc to A, ch1, turn
Row 5: 1sc, 1mdc, *ch2, sk 1 st, 6sc, ch2, sk 1 st, 1md, * rep across to last st, sc in last st, ch1, turn
Row 6: 2sc, *ch2, sk ch-2 sp, 6sc, ch2, sk ch-2sp, 1sc, * rep across, placing sc in last st, cc to B, ch1, turn
Row 7: 1sc, ch2, sk 1 st, *1mdc, ch2, sk 1 st, 4sc, ch2, sk 1 st, 1mdc, ch2, sk 1 st, * rep to last st, sc in last st, ch1, turn
Row 8: 1sc, ch2, sk ch-2sp, *1sc, ch2, sk ch2-sp, 4sc, ch2, sk ch2-sp, 1sc, ch2, sk ch2-sp, * rep to last st, sc in last st, cc to A, ch1, turn
Row 9: 1sc, 1mdc, *ch2, sk 1 st, 1mdc, 4sc, 1mdc, ch2, sk 1 st, 1mdc, * rep across to last st, sc in last st, cc to A, ch1, turn
Row 10: 2sc, *ch2, sk ch-2sp, 6sc, ch2, sk ch2-sp, 1sc, * rep across to last st, sc in last st, cc to B, ch1, turn
Row 11: 1sc, ch2, sk 1 st, *1mdc, 6sc, 1mdc, ch2, sk 1 st,* rep across to last st, sc in last st, ch1, turn
Row 12: 1sc, ch2, sk ch-2 sp, *8sc, ch2, sk ch-2 sp, * rep across to last st, sc in last st, cc to A, ch1, turn
Row 13: 1sc, 1mdc, *8sc, 1mdc, * rep across to last st, sc in last st, ch1, turn
Row 14: rep row 2
Rows 3 – 14 complete mosaic pattern
Rep rows 3 – 14 a further 19 times
Last row: rep row 2
Fasten off
Border
Set up
Working on RS with 5mm hook
Rejoin Yarn B at start of row 1, sl st evenly along length of the blanket in multiples of 2 (214 sl st)
Fasten off
Change to 4mm hook and working on RS
Rejoin Yarn B at 1st sl st on length edge, ch1, sc in top loop of ea sl st
Fasten off
Rep on length edge of other side
Moss Stitch Border
Using a 4mm hook and working on RS
Join Yarn B in any corner st, ch1
Round 1: sc in same corner st, ch 1, sk 1 st, *sc in next st, ch 1, sk 1 st; rep from * to next corner st **(sc, ch 2, sc) in corner st, ch 1, *sc in next st, ch1; rep from * to corner st; rep from ** twice more, sc, ch 2 in corner st. Join to first sc with sl st, ch1
Round 2: sc in same corner sp, ch 1, sk 1 st, *sc in next ch-1 sp, ch 1, sk 1 st; rep from * to next corner sp, **(sc, ch 2, sc) in corner sp, ch 1, *sc in next ch-1 sp, ch1; rep from * to corner sp, rep from ** twice more, sc, ch 2 in corner sp. Join to first sc with sl st
Fasten off
Congratulations! Your crochet throw blanket is ready to be blocked/washed.
Copyright Notice
The pattern and photographs of this design are the property of Sharon Goodwin at Jera’s Jamboree. This pattern and design are subject to copyright and are for personal, non-commercial use only. You may not share, resell, alter or redistribute this pattern in part or in whole. You may, however, sell any finished items you make. If you would like to include this pattern in a roundup, you may take one photo and link back to this pattern.
I hope you’ve loved working on my Amberlight Blanket. The soothing rhythm of inset mosaic crochet makes it such a relaxing project, and the result is a cozy throw you’ll treasure for years.
Ready for more mosaic inspiration? Take a look at my zig zag blanket. You’ll find plenty of other ideas in my Mosaic Crochet Blanket Roundup, or explore all my crochet blanket patterns for your next project.
Don’t forget to share your Amberlight Blanket in the Jera’s Jamboree Crochet Community on Facebook — I’d love to see your colour palette!
Save to Pinterest
Come back to this free pattern when you’re ready by pinning the image below to your favourite Pinterest board.
