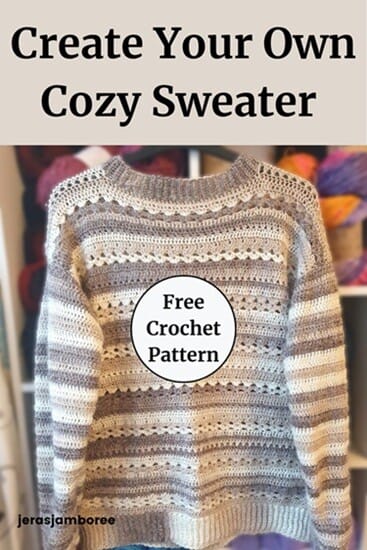
I’m excited to share my Selene Sweater with you! If you’ve been searching for an easy crochet sweater pattern (or jumper pattern, if you’re in the UK), this one’s designed with you in mind.
The stitch pattern and yarn blend beautifully to create a soft, cozy texture with a flattering, comfortable fit — the kind of project that looks impressive but feels effortless to crochet.
Even if this is your first garment, you’ll feel confident from the very first row, and you’ll finish with a sweater that’s as wearable as it is satisfying to make.
If you’ve browsed through my roundup of crochet sweater patterns for beginners, you’ll recognise the same straightforward approach: minimal shaping, clear steps and the freedom to personalise.
This free pattern is available right here below—or if you prefer working from a downloadable PDF, you’ll find it in my Etsy, Ravelry and LoveCrafts shops too.
Ready to start? Scroll down for everything you need — sizing, materials, and the full free crochet pattern.
Jump to: Sizing | Materials | Free Crochet Pattern
Skill Level
Easy – minimal shaping for sleeves, stitch pattern uses basic crochet stitches, colour change if not using variegated or ombre yarn
Sizing
Sizes use the Craft Yarn Council measurements as a guideline.
As well as chest measurements, the table below also includes the finished width of the sweater.
If you prefer a baggier jumper, follow the instructions for the front and back for the next size up.
For instance, if your chest is 38 inches, following the instructions for medium (M) will give you 2 inches of positive ease (for movement). Following front and back for large (L), you will have 6 inches of positive ease.
| To Fit Chest (inches) | Finished Size Width approx (inches) | Length (shoulder to hem) approx (inches) | Total Yarn (yds) approx |
| S 32 – 34 | 36 | 24.5 | 1654 |
| M 36 – 38 | 40 | 24.5 | 1804 |
| L 40 – 42 | 44 | 25 | 2012 |
| XL 44 – 46 | 48 | 25 | 2196 |
| 2XL 48 – 50 | 52 | 25.5 | 2223 |
| 3XL 52 – 54 | 56 | 25.5 | 2633 |
Jera’s Jamboree receives payments for affiliate advertising. This is at no extra cost to you. As an Amazon Associate I earn from qualifying purchases. Please see my disclosure policy for more information.
Materials
- DK yarn #3 weight: 1654, (1804, 2012, 2196, 2223, 2633) yds
- 4mm Crochet Hook – I use Clover Amour hooks
- Stitch Markers – These Harlequin stitch markers are my favourite (and longest lasting!)
- Dressmaker Pins – I’m currently using these butterfly head pins
- Scissors
- Yarn Needle
Yarn Choices
I used Hobbii Colorina for this sweater which when I tested, came in at 14 wraps per inch (wpi). DK #3 weight is 11 – 15 wpi and Hobbii has the weight as light (DK). This falls into the lighter end of the scale (and just so you know, 14 wpi also fits into the sport weight category!).
I loved the long colour changes in Colorina – it really suits my design! Plus it was lovely and soft to work with, the only downside being if you need to unpick (frog) it’s a nightmare.
It’s a blended yarn of 80% Acrylic and 20% Wool but still machine washable at 30°C (86°F). No tumble drying with this yarn – the recommendation is to dry flat but a clothes airer works for me.
Don’t be fooled by the 50g ball sizes. 50g of this yarn is equal to 218.72 yd (200 m) so for 100g there is 437.44 yards!
If you are going to substitute the yarn, my advice would be that once you’ve crocheted your swatch and measured your gauge, if it is different to mine in this pattern, use my stitch gauge converter tool to recalculate the stitches needed for your foundation chain. There’s also a calculator at the bottom of the page (not tested yet) where you can recalculate the rows too – although you could measure the front, back and sleeves as you are crocheting to determine what length is best for you.
Gauge
With a 4mm hook
18 stitches and 10 rows of pattern = 4” x 4”
Stitches and Abbreviations
You need to know how to work these stitches (if you need instructions, you’ll find them in my stitch library):
- Single crochet (sc)
- Single Crochet Back Loop Only (scblo)
- Stacked Double Crochet (stacked dc)
- Double Crochet (dc)
- Crossed Double Crochet (Xdc)
- Slip Stitch (sl st)
These common abbreviations have been used:
- Between (bet)
- Chain/s (ch/s)
- Continue (cont)
- Decrease (decr)
- Each (ea)
- Instructions (instr)
- Pattern (patt)
- Remaining (rem)
- Repeat (rep)
- Right Side (RS)
- Skip (sk)
- Space (sp)
- Stitch/es (st/s)
- Wrong Side (WS)
For my UK crocheters, the table below is a conversion of basic crochet stitches from US to UK.
| US Crochet Terms | UK Crochet Terms |
|---|---|
| single crochet (sc) | double crochet (dc) |
| half double crochet (hdc) | half treble crochet (htr) |
| double crochet (dc) | treble crochet (tr) |
| treble (tr) | double treble (dtr) |
| double treble (dtr) | triple treble (trtr) |
How to Crochet the Selene Sweater
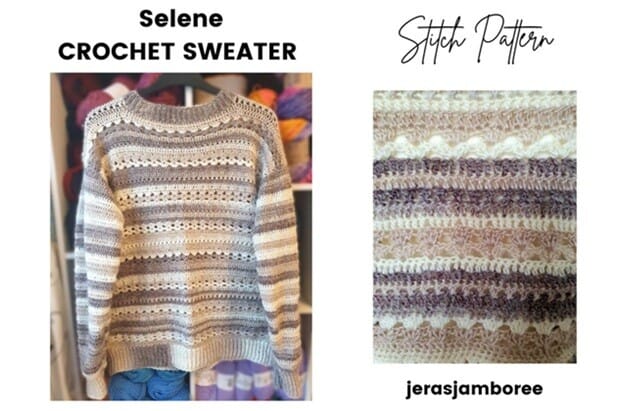
The stitch pattern for the front and back is a 7 row repeat that includes double crochet, the Iris stitch and crossed double crochet stitches.
This is the same stitch pattern used throughout the Selene collection: cardigan, triangle shawl, hooded shawl and lap blanket. If you’ve crocheted these before, you’ll be familiar with how the stitches work.
The sleeves are worked in double crochet stitches.
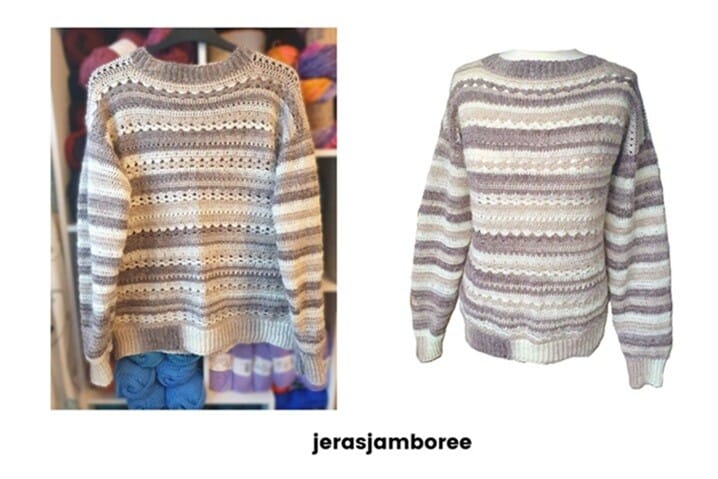
You will crochet 4 separate pieces (see image below):
- the back is a rectangle worked from the bottom up in turned rows.
- the front is worked the same but right and left shoulders are worked separately to create the neckline.
- The sleeves are worked from the shoulder to the cuff which include a ribbed cuff. Decreases are made by working 2 stitches together at the beginning and ending of rows.
This is the same construction as my Emberley Sweater.
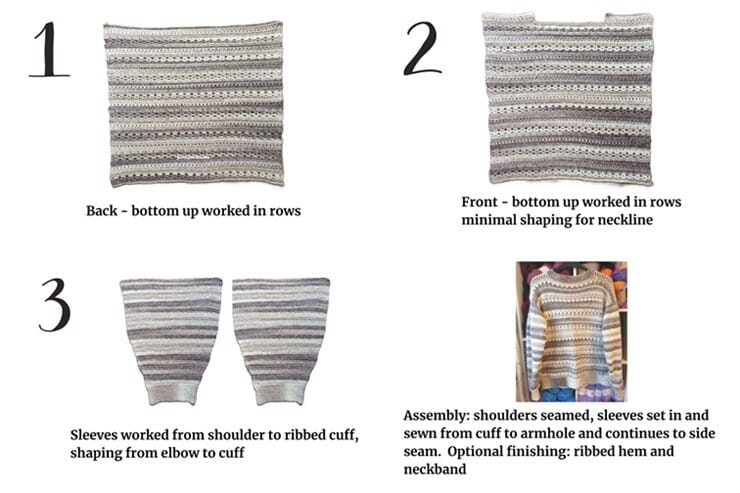
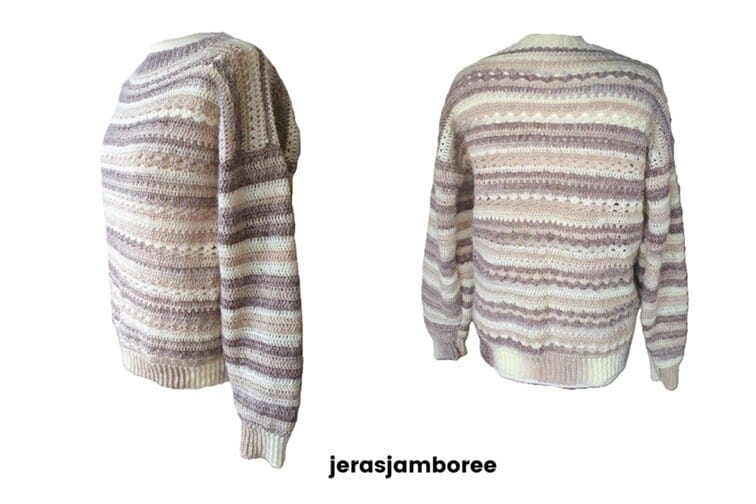
To assemble, the front and back are placed on top of each other with the wrong side facing outwards and the shoulder seams sewn.
- After sewing the shoulder seams, the sweater is laid out flat with the wrong side facing outwards.
- The top of the sleeve is lined up with the shoulder edge and sewn.
- The sleeve edges are folded over with the wrong side facing outwards and a seam is sewn from the cuff to the underarm and continues for the side seam.
This is repeated for the second sleeve.
The image below will help you visualise setting in the sleeve and sewing the seams.

A ribbed hem and ribbed neckline finish the garment. This is worked in single crochet back loop only.
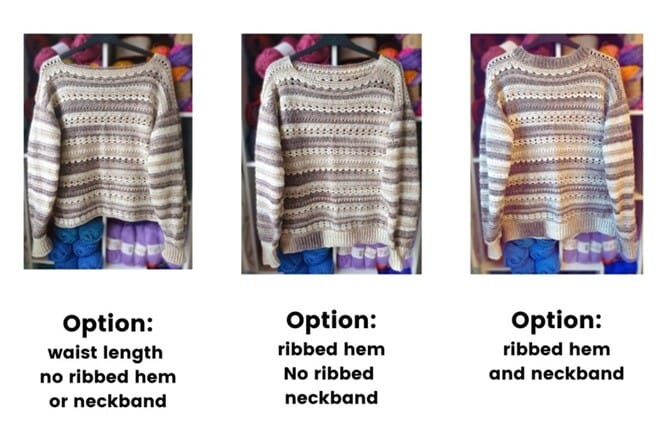
How to Customise Your Jumper
Apart from going up a size for a baggier top or going down a size for a figure-hugging style, there are a couple of other options for you to customise your own jumper.
If you prefer:
- a waist length style, you can leave the ribbed hem off.
- a wider neckline, you can simply leave the neckband ribbing.
- a wider neckline but a longer length, you can add the ribbed hem but leave the neckband ribbing.
The image of the styles below will help you to see how yours will look if you customise.
My Pattern Notes
- Pattern is written in English using US crochet terms.
- Stitch pattern is a multiple of 4 (plus 1)
- Different size instructions are written like this: S, (M, L, XL, 2X, 3X)
- Repeated stitches are written between *
- Stitches made in the SAME stitch are written like this: [2dc, ch1, 2dc] This means you will work 2 double crochets, chain 1, 2 double crochets in the indicated space/stitch.
- Chain 1 does not count as a stitch.
- Rows start with a stacked double crochet, this counts as a stitch. Alternatively, use a chain 3 either at the end of a row and turn or turn and chain 3. If you chain 3 instead of a stacked double crochet, this counts as a stitch.
- Row 4 and repeats work into the chain 1 space.
- Row 5 and repeats work the double crochet stitches only and skip the chain 1 spaces.
- Use the image to help when setting in the sleeve and sewing the seams.
- Weave in ends as you go.
- If you substitute the yarn or choose style options, you may need more or less yarn than stated in the written pattern.
Purchase the easy-to-read print-friendly PDF (ad free)
The PDF of this pattern includes everything you need:
- how to work the stitches
- how the pattern is worked
- pattern notes
- clear written instructions
- printable row counter
Testimonials

11 Nov 2025 5 star Etsy Review: “Brilliant Sharon is very helpful”
Selene Crochet Sweater Instructions (US crochet terms)
With a 4mm hook
Back
Ch 89, (97, 105, 113, 121, 129)
Row 1 (RS): sc in 2nd ch from hook, sc across, turn (88, 96, 104, 112, 120, 128 sc)
Row 2: stacked dc, dc in ea st across, turn
Row 3: stacked dc, dc in next st, sk1, [2dc, ch1, 2dc] in next st, *sk3, [2dc, ch1, 2dc] in next st, * rep to last 4 sts, sk2 sts, dc in last 2 sts, turn
Row 4: stacked dc, dc in next st, [2dc, ch1, 2dc] in ea ch1-sp across to last 4 sts, sk2 sts, dc in last 2 sts, turn
Row 5: stacked dc, dc in ea dc, sk ch1-sps across, turn
Row 6: rep row 2
Row 7: stacked dc, Xdc to last st, dc in last st, turn
Row 8: rep row 2
Row 9: rep row 2
Rows 3 – 9 complete pattern
Row 10 – 58, (58, 61, 61, 62, 62): rep rows 3 – 9
Fasten off
Front
Rep instr for back to row 55, (55, 58, 58, 59, 59)
Identify middle st on last row and place a st marker
Measure 12cm to the right and place a st marker
Measure 12 cm to the left and place a st marker
Remove centre st marker
Sp bet st markers is the neckline
First Shoulder
Cont working in patt to st marker, turn, leaving rem sts unworked
Remove st marker
Cont working in patt for a further 2 rows
Fasten off leaving a long tail to sew shoulder seam
Second Shoulder
Rejoin yarn at rem st marker
Rep instr for first shoulder
Sleeves (make 2)
With a 4mm hook
Ch 70, (74, 78, 84, 92, 98)
Row 1: dc in 4th ch from hook, dc in ea ch across, turn
Row 2: stacked dc, dc in ea st across, turn
Row 3 – 24, (24, 25, 25, 26, 26) rep row 2
(Decr) Row 25, (25, 26, 26, 27, 27): stacked dc, dc2tog, dc to last 3 sts, dc2tog, dc in last st, turn
Row 26, (26, 27, 27, 28, 28) – Row 37, (37, 38, 38, 41, 41): rep above 2 rows (1 row of dc and 1 row of decr)
Row 38, (38, 39, 39, 42, 42) – Row 42, (42, 47, 47, 48, 48): rep decr row
L, XL, 2X, 3X DO NOT FASTEN OFF, GO TO RIBBED CUFF INSTRUCTIONS
S/M ONLY
Row 43, (43) – Row 46, (46): rep row 2
DO NOT FASTEN OFF, GO TO RIBBED CUFF INSTRUCTIONS
Ribbed Cuff
With 4mm hook
Ch15
Row 1: (working back down ch) sc in 2nd ch from hook, sc in ea ch to cuff edge, sl st in next 2 sts on cuff edge, turn
Row 2: scblo to last st, sc in last st, ch1, turn
Row 3: sc in 1st st, scblo to cuff edge, sl st in next 2 sts on cuff edge, turn
Rep rows 2 and 3 across
Fasten off
Assembly
With WS facing outwards, place the front on top of the back piece. Line up shoulders and pin in place
Sew shoulder seams
Lay out back and front flat with WS facing outwards
Identify middle st of top of sleeve and line up with shoulder seam
Pin sleeve in place
Sew top of sleeve to shoulder edge
Fold sleeve so WS is facing outwards
Sew sleeve seam from cuff to armhole and from armhole to hem for side seam.
Fasten off
Rep on other side
Turn sweater RS outwards
Ribbed Hem
With 4mm hook, rejoin yarn on either side seam
Ch 15
Row 1: (working back down ch) sc in 2nd ch from hook, sc in ea ch to hem edge, sl st in next 2 sts on hem edge, turn
Row 2: scblo to last st, sc in last st, ch1, turn
Row 3: sc in 1st st, scblo to hem edge, sl st in next 2 sts on hem edge, turn
Rep rows 2 and 3 around
Join with a sl st through 1 loop on either side of ribbing
Fasten off
Neck Ribbing
With 4mm hook, rejoin yarn at shoulder seam
Ch 8
Row 1: (working back down ch) sc in 2nd ch from hook, sc in ea ch to neck edge, sl st in next 2 sts on neck edge, turn
Row 2: scblo to last st, sc in last st, ch1, turn
Row 3: sc in 1st st, scblo to neck edge, sl st in next 2 sts on neck edge, turn
Rep rows 2 and 3 around
Join with a sl st through 1 loop on either side of ribbing
Fasten off
Congratulations! Your sweater is finished and looking fabulous.
I hope you love how it’s turned out and that the stitch texture and colours make it one of your most-worn pieces.
If you enjoyed this project, you might like to try my free crochet pullover pattern next, or explore my one-piece crochet pullover sweater pattern for a fun twist on construction.
You’ll find even more ideas under my crochet sweater patterns tag if you’re planning your next make.
And of course, if you’d like to keep a copy, the PDF version is available on Etsy, Ravelry and LoveCrafts.
I’d love to see your finished Selene Sweater — tag me on social or share it in the Jera’s Jamboree Crochet Community on Facebook!
Copyright Notice
The pattern and photographs of this design are the property of Sharon Goodwin at Jera’s Jamboree. This pattern and design are subject to copyright and are for personal, non-commercial use only. You may not share, resell, alter or redistribute this pattern in part or in whole. You may, however, sell any finished items you make. If you would like to include this pattern in a roundup, you may take one photo and link back to this pattern.
Save this pattern to come back to later by pinning the image below to your favourite board.