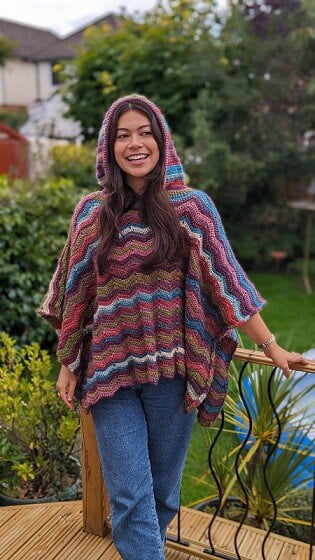
Designed with comfort in mind, my crochet pattern will show you how to crochet a poncho using the ripple stitch.
The gentle waves of the stitch worked in front and back loops give this poncho a unique texture that’s both eye-catching and functional.
The stitch pattern creates a fabric that’s warm and cozy, perfect for outdoor activities.
With an optional hood, this design will keep you stylish and toasty warm.
Everything you need to crochet the pattern is below. If you prefer to work offline, a PDF is available in my Etsy and Ravelry shops.
Jump to: Materials | Sizing | Pattern US terms | Pattern UK terms
Skill Level
Easy / Advanced Beginner
Materials
- 4mm (G/6) Crochet Hook
- Boho Spirit in Boheme: S/M 1488 yards; L/XL 1864 yards; 2X/3X 2210 yards; 4X/5X 2635 yards
- Stitch Markers
- Tape Measure
- Scissors
- Yarn Needle
Yarn Choices
Boho Spirit is a fabulously soft, variegated roving yarn, and comes in several shades, Due to the loftiness of the yarn, it is incredibly soft and versatile.
I’ve enjoyed working with this yarn. It glides on the hook and stitch definition is good.
It gives a lovely drape to this ripple stitch poncho with a beautiful subtle sheen.
It can be hard to unpick stitches with this yarn, however I didn’t have any problems using basic crochet stitches. It is something you need to be aware of.
Cygnet’s website recommends that Boho Spirit is suitable for DK and Aran/Worsted weight patterns. I found it works up to between DK and Aran/Worsted.
You can substitute any DK yarn for this project. Although gauge isn’t critical, you may get a different finished result.
| Composition | 100% Premium Acrylic |
| Meterage | 240 meters / 262 yards |
| Weight | 100g balls |
Sizing
| Size | Width approx. (inches) | Length approx. (inches) |
| S/M | 31 | 21 |
| L/XL | 39 | 22 |
| 2X/3X | 43 | 23.5 |
| 4X/5X | 47 | 26 |
| Hood (all sizes) | 11 | 15 |
Gauge
19 stitches and 8 rows = 10cm X 10xm
Gauge isn’t critical for this project. Maintaining tension is important.
Stitches and Abbreviations
| UK Crochet Terms | US Crochet Terms |
| Double Crochet (dc) | Single Crochet (sc) |
| Treble Crochet (tr) | Double Crochet (dc) |
| Treble 3 Together (tr3tog): *yarn over, insert hook into next stitch, yarn over, pull up a loop, yarn over, draw through 2 loops, repeat from * two more times, yarn over, draw through all loops on hook. | Double 3 Together (dc3tog): *yarn over, insert hook into next stitch, yarn over, pull up a loop, yarn over, draw through 2 loops, repeat from * two more times, yarn over, draw through all loops on hook. |
| Front Loop Only (flo): work stitch into the front loop of the stitch | |
| Back Loop Only (blo): work stitch into the back loop of the stitch | |
- RS = right side
- WS = wrong side
- Ch/s = chain/s
- St/s = stitch/es
- Ea = each
- Rep = repeat
- Sp = space
- Prev = previous
- Cont = continue
- Opp = opposite
- Incl = including
- Sk = skip
General Pattern Information
You’ll be creating this poncho by crocheting two simple rectangles, making it an ideal project if you’re a beginner looking to challenge yourself and improve your skills.
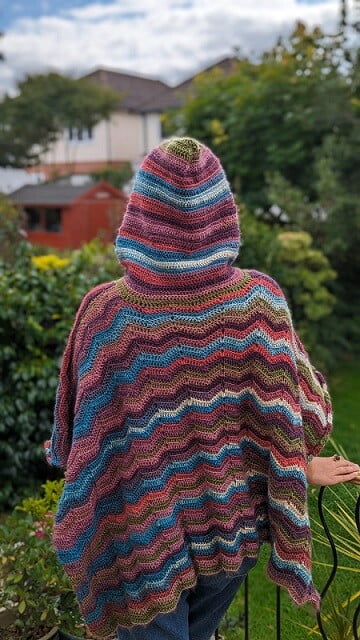
Not everyone prefers a hood, so I’ve made it optional. You can choose to add a cozy hood for extra warmth or keep it basic for a more classic look.
Layering is essential when it comes to seasonal wardrobes, and this crochet poncho is the ultimate layering piece.
Wear it over a long-sleeved shirt for those brisk autumn mornings, or layer it with your favorite chunky sweater or scarf underneath.
Design Inspiration
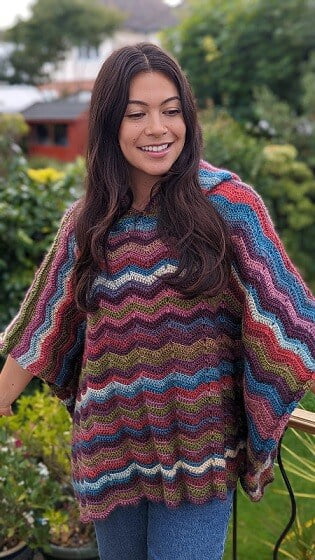
I’d already bought the yarn to crochet a poncho and after experimenting with a few different stitches using the Boho Spirt, the ripple stitch came out tops! The roving yarn, color changes (and depth of those colors) turn an easy to make garment into an eye-catching accessory that can be worn through the colder months.
What would make it even better? I asked myself. What’s one of my top needs when we’re out walking our dog Taz? A hood to keep my body heat in! Not everyone prefers a hood, so I’ve made it optional. You can choose to add a cozy hood for extra warmth or keep it basic for a more classic look.
How the poncho pattern is worked
I’ve written this pattern in UK and US crochet terms for sizes S to 5X.
The crochet poncho is worked from the bottom up and seamed at the shoulders.
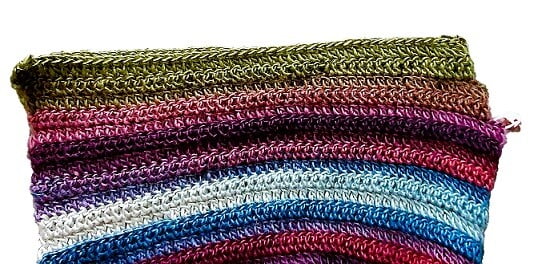
The two identical panels are worked in a 2-row pattern repeat crochet ripple stitch. One row is worked in front loops and one row in back loops, giving a lovely ridged effect.

No increasing or decreasing is used for the neckline. The shaping is minimal and achieved by leaving center stitches unworked.

The optional hood is one size. It is crocheted directly onto the poncho after seaming the shoulder seams.
For the hood, the yarn is rejoined at the center of the neck opening, picking up stitches around the neck and back to the center stitch again before turning to work the next row.

The hood is worked in treble (UK) / double (US) stitches in alternating front loop and back loop rows to a specific measurement before shaping. The sides of the hood are shaped in four rows and seamed together.
If you’re an experienced crocheter, you can continue your hood with the ripple stitch, amending stitches as you go. I’ve used basic crochet stitches for ease.
Customising your Poncho
If you would like to make your poncho wider, this pattern is in multiples of 14 stitches +1 +3 for turning chain.
You can also shorten or extend the length of your poncho simply by crocheting less or more rows.
Alternatively, you could go up or down one size!
Any alterations you make to width or length will result in less or more yarn than recommended in this pattern.

My Pattern Notes
Poncho
- Size instructions are written like this: S/M, (L/XL, 2X/3X, 4X/5X)
- Pattern requires you to work an extra stitch in the base of the turning chain and work two stitches in the last stitch of a row. Don’t forget to do this, the ripple won’t line up if you forget
- Chain three counts as a stitch
- Use stitch markers when measuring neckline shaping
Hood
- If you are using variegated/striping yarn and have chosen to add the hood, decide which rectangular panel is your front and which your back before following hood instructions
- Chain two does not count as a stitch
- Use a stitch marker to mark the center stitch at the front of the neck to help you when you rejoin the yarn and where to turn your work to continue crocheting in rows
- Use a stitch marker to mark the center stitch of the hood before shaping the first side
Purchase the easy-to-read print friendly PDF (ad free)
The PDF of this pattern includes everything you need:
- how to work the stitches
- how the pattern is worked
- pattern notes
- clear written instructions
- printable row counter
Testimonials
11 May 2026, 5 star Etsy review : “I’ve been working on this pattern for a week or so and I’m really enjoying it. The instructions are clear and easy to follow.”
Forest Ripple Poncho Instructions (UK terms)
Front and Back (make 2)
With a 4mm hook, ch 158 (186, 214, 242)
Row 1 (RS): tr in 3rd ch from hook, tr in same st, *1tr in ea of next 5 chs, tr3tog over next 3 chs, 1tr in ea of next 5 chs, [1tr, ch1, 1tr] in next ch, *rep ending 2tr in last ch, ch3, turn
Row 2: 1tr in base of ch3, *1tr flo in next 5 sts, tr3tog working in flo of next 3 sts, 1tr flo in next 5 sts, [1tr, ch1, 1tr] in ch1-sp, *rep ending 2tr in top of ch3 from prev row, ch3, turn
Row 3: 1tr in base of ch3, *1tr blo in next 5 sts, tr3tog working in blo of next 3 sts, 1tr blo in next 5 sts, [1tr, ch1, 1tr] in ch1-sp, *rep ending 2tr in top of ch3 from prev row, ch3, turn
Rows 2 and 3 complete the ripple pattern
Cont rep row 2 and 3 until rectangle measures 48, (50, 55, 61) cm
Neckline Shaping
All Sizes
Find the centre stitch at the top of the rectangle and place a st marker, count 12cm either side of the centre stitch and place a st marker (3 st markers in place).
Keeping cont of pattern, work to first st marker, ch3, turn leaving rem sts unworked
Work 2 more rows.
Remove st marker
Fasten off.
Rejoin yarn to st with the marker on the opp side, keeping cont of pattern, work to end, ch3, turn
Work 2 more rows.
Fasten off and remove st marker.
Leave centre st marker in place.
Weave in ends.
Finishing off rectangles
Two options for finishing off:
- Block each rectangle to size to stop sides curling
- Rejoin yarn on RS side edge, ch1 (does not count as a st), dc evenly along side. Rep for the other side
Assembly
With RS facing inwards, sew top of rectangles for the shoulder seams.
Fasten off.
Turn poncho RS out.
Optional Hood
Row 1: With RS facing, rejoin yarn at centre st marker, ch2, work tr evenly around entire neck opening incl centre st, ch2, turn
Row 2: tr in base of ch2, tr flo in ea st to end, ch2, turn
Row 3: tr in base of ch2, tr blo in ea st to end, ch2, turn
Rep rows 2 and 3 until hood measures 30.5cm/12”
Shape First Side
Place st marker at centre of last row
Row 1: cont pattern across to within 2 sts of centre marker, turn leaving rem sts unworked
Row 2: cont pattern across to end, turn
Row 3: cont pattern across to within the last 2 sts, turn leaving rem sts unworked
Row 4: cont pattern across to end
Fasten off
Shape Second Side
Row 1: sk 2 sts to the left of the centre marker, cont pattern across, turn
Row 2: cont pattern across to end, turn
Row 3: sl st in first 3 sts, ch2, cont pattern across to end, turn
Row 4: cont pattern across to end
Fasten off.
Assembling Hood
Working on WS, sew seam along the top edge and down to the st marker
Fasten off.
Weave in all ends.

Forest Ripple Poncho Instructions (US terms)
Front and Back (make 2)
With a 4mm hook, ch 158 (186, 214, 242)
Row 1 (RS): dc in 3rd ch from hook, dc in same st, *1dc in ea of next 5 chs, dc3tog over next 3 chs, 1dc in ea of next 5 chs, [1dc, ch1, 1dc] in next ch, *rep ending 2dc in last ch, ch3, turn
Row 2: 1dc in base of ch3, *1dc flo in next 5 sts, dc3tog working in flo of next 3 sts, 1dc flo in next 5 sts, [1dc, ch1, 1dc] in ch1-sp, *rep ending 2dc in top of ch3 from prev row, ch3, turn
Row 3: 1dc in base of ch3, *1dc blo in next 5 sts, dc3tog working in blo of next 3 sts, 1dc blo in next 5 sts, [1dc, ch1, 1dc] in ch1-sp, *rep ending 2dc in top of ch3 from prev row, ch3, turn
Rows 2 and 3 complete the ripple pattern
Cont rep row 2 and 3 until rectangle measures 48, (50, 55, 61) cm
Neckline Shaping
All sizes
Find the center stitch at the top of the rectangle and place a st marker, count 12cm either side of the center stitch and place a st marker (3 st markers in place).
Keeping cont of pattern, work to first st marker, ch3, turn leaving rem sts unworked
Work 2 more rows.
Remove st marker.
Fasten off.
Rejoin yarn to st with the marker on the opp side, keeping cont of pattern, work to end, ch3, turn
Work 2 more rows.
Fasten off and remove st marker.
Leave center st marker in place.
Weave in ends.
Finishing off rectangles
Two options for finishing off
- Block each rectangle to size to stop sides curling
- Rejoin yarn on RS side edge, ch1 (does not count as a st), sc evenly along side. Rep for the other side.
Assembly
With RS facing inwards, sew top of rectangles for the shoulder seams.
Fasten off.
Turn poncho RS out.
Optional Hood
Row 1: With RS facing, rejoin yarn at center st marker, ch2, work dc evenly around entire neck opening incl center st, ch2, turn
Row 2: dc in base of ch2, dc flo in ea st to end, ch2, turn
Row 3: dc in base of ch2, dc blo in ea st to end, ch2, turn
Rep rows 2 and 3 until hood measures 30.5cm/12”
Shape First Side
Place st marker at center of last row
Row 1: cont pattern across to within 2 sts of center marker, turn leaving rem sts unworked
Row 2: cont pattern across to end, turn
Row 3: cont pattern across to within the last 2 sts, turn leaving rem sts unworked
Row 4: cont pattern across to end
Fasten off.
Shape Second Side
Row 1: sk 2 sts to the left of the center marker, cont pattern across, turn
Row 2: cont pattern across to end, turn
Row 3: sl st in first 3 sts, ch2, cont pattern across to end, turn
Row 4: cont pattern across to end
Assembling Hood
Working on WS, sew seam along the top edge and down to the st marker
Fasten off.
Weave in all ends.
Copyright Notice
The pattern and photographs of this design are the property of Sharon Goodwin at Jera’s Jamboree. This pattern and design are subject to copyright and are for personal, non-commercial use only. You may not share, resell, alter or redistribute this pattern in part or in whole. You may, however, sell any finished items you make. If you would like to include this pattern in a roundup, you may take one photo and link back to this pattern.
Related Crochet Poncho Patterns
The rectangle is such a versatile shape and perfect for crocheting ponchos as in these patterns.
If you’re simply looking for a quick, relaxing project you’ll enjoy working this poncho too.
Enjoy working with a combination of stitches? You’ll love my Amelia poncho.
If you’re not quite ready to work with multiple stitches, try my Cotton Candy poncho which uses two basic crochet stitches.
Prefer to crochet granny squares? You’ll love my Victoria poncho. Or maybe you’re a fan of the granny stitch in which case you’ll enjoy working my Queen of Diamonds poncho.
Looking harder than it is, my Maisie poncho will surprise you with how easy it is to work the lacy stitches.
I do have more choices of construction and stitches to inspire you in these stylish patterns for every skill level.